Vraska the Unseen

Contents
Introduction
In July of 2018, Puzzles and Dragons (both NA and JP) received the Magic the Gathering collab. It is also interesting to note that this collab is one of the most recent times that content was released at the same time in both servers. It was also a highly sought out collab mostly due to the chase cards that were initially hyped (most popular Jhoira and Karn) along with the great farmable Weatherlight, for row farmers that needed their OEs.
However, the general public initially underestimated one 6*, but only truly began to understand the power of the gorgon planeswalker as time passed…
Quick Pros/Cons
Pros:
- Is capable of clearing pretty much every dungeon in the game. No joke.
- Super simple to use: only needing a 3 match of wood/dark means that activation is simple to achieve when fully clearing boards.
- Flexible sub pool: anything with wood attribute can work.
- Awakenings free up sub options, no need for an FUA or as many SBR subs.
- Can face tank a lot of hits (140-200k HP depending on team)
Cons:
- No RCV multiplier: you really want a RCV stick since Vraska has no RCV multiplier outside of her active (which will be discussed later).
- Collab 6*: This just means that it’ll be on the difficult side to find Vraska friends.
- Boring LS encourages the standard 7c playstyle. This can get repetitive very quick.
- Poisons/gravities really hurt.
Card Overview:
- JP Name: 見えざる者、ヴラスカ
- Attribute: Wood/Dark
- Type: Devil/Balance
- Note that Balance typing allows Vraska to run all killers.
- Awakenings:
- Notice how Vraska is essentially another meta card by having the double 7c and FUA while being unbindable.
- The double SBR allows for flexible sub options, allowing you to for example put in subs that are bindable, but not have to worry about skill binds in longer dungeons.
- The double 7c is now standard, allowing for a large spike in damage coming from Vraska after 7c.
- Active Skill: Treasured Find
- 2x RCV for 3 turns.; removes Orb locks, changes all Orbs to Wood, Dark, and Heal Orbs. (Cooldown 16 to 11 turns)
- Despite the slightly high cooldown for a tricolor board with heal I’m pretty sure most people would be glad to tack on 2 more turns for an orb unlock and a RCV boost.
- This can activate your leader skill, let you actually recover, and have an FUA ready whenever you need it.
- Even if not used as a kill board Vraska’s active skill is super valuable for her own survivability
- Leader Skill: Assassin of the Ochran
- 2x HP & 4x ATK for Wood Att., Orb move time +2 seconds; 3x ATK when Wood & Dark attack at once
- Unconditional 16x multiplier can be perfect for damage controlling certain enemies (Sopdet, Vishnu, and Sadalmelik come to mind)
- +2 seconds built into the leader skill increases sub pool versatility by lowering the need for TE awakenings on your team.
- Super simple activation (Wood + Dark attack) allows you to save actives since activation is mostly guaranteed from fully clearing boards.
- Other Forms
- Vraska does have an assist evolution that grants but I would highly advise against pursuing this form, since the MP card Amen also has with it’s assist evolution.
- However, this form does have a longer CD than Amen, and the blind resist may come in handy for certain ranking dungeons.
- As a sub
- Vraska can still be invaluable as a sub for itself granting you another double 7c sub FUA with a 2nd beneficial active.
- Double SBR allows you to run non SBR subs.
- Vraska can also be a sub for wood teams like Zela.
- However, it is most likely that Vraska would end up being your best lead, or at best a mediocre sub under another lead.
How to Play Vraska
Vraska’s play style is typical of a match 2 color lead. Activation is done by matching the two colors. However the majority of your ‘damage’ will originate from hitting 7c due to Vraska having double 7c awakenings. Vraska ends up being played like a combo lead, but however prioritizing the matching of wood and dark like you would with Kami, Yog, or otherwise.
Full clearing the board is absolutely crucial for healthy clears in longer dungeons such as the arenas. It’s always wise to know your damage when going into a dungeon so you can know if you can afford to save your wood/dark orbs for the next floor.
The unique aspect of Vraska teams is that the majority of them can stall extremely well due to their naturally high HP pool. Remember that you can afford to tank the majority of rage hits in easier content, and that saving hearts for FUA, or dark/wood orbs for activation is always a smart thing to do.
The reason why I enjoy Vraska so much is that it gives me a way to freely combo without worrying too much about survivability. By making my clears reliant on just full comboing boards, it lets me clear harder content on autopilot.
Vraska Leader Pairings
| Leader | Friend | Multiplier | Notes |
| 4/144/1, +4s move time | This is the standard pairing, and in my opinion the best. You can tank the majority of rage hits, even towards the end game, and can clear most content with ease with a 144x multiplier. | ||
| 4/72/1, +2s move time, additional damage when matching orbs | I would only use this if I was the person running Alistair (Arresta), or if there is some circumstance that you aren’t able to make an FUA (Enoch comes to mind). Still an acceptable pairing for easier content. | ||
| 2/210/1, 25% resist, +2s move time | This is an acceptable pairing for when you need more damage rather than bulk. This however can get annoying due to Kami’s LS requiring you to stay above 80% HP. | ||
| 2/102/1, 25% resist, +2s movetime, 7×6 board | This can be useful if for some reason you can’t combo well enough on a 6×5 board, or need to overcome some sort of insane combo shield (Eir and Floor 7 of Snake come to mind) | ||
| 3/90/1.5, 25% resist, +4s move time | Honestly don’t ever bother to do this, it makes your sub pool restrictive and you have less damage/HP than Vraska x Vraska with no payoff. |
Team Building
In General
Team building for Vraska is a tricky task, as you cannot take a cookie-cutter approach to team building as you would for other leads. There are 4 things that must be taken into consideration when choosing subs for Vraska:
- Dealing with RCV issues. Vraska has a lot of trouble healing with heart orbs occasionally, find a way of dealing with this issue.
- Maximizing HP; The beefier the sub, the more HP is multiplied by 4x.
- Dungeon specific utility; Do you need more damage via killers? Do you need awoken unbinders? Do you need a shield for gravities? Do you need a Fujin?
- Being Wood Attribute; Honestly if it isn’t wood (or dark/wood) don’t bother using it as a base.
Notice how unlike most leaders Vraska does not use a VDP. The reasoning for this is because your survivability is massive, and there is almost 0 chance that you will 1 shot a relevant end game VDP spawn with a 144x multiplier. Just chip it down slowly, and prepare around execute HP thresholds.
For End Game
I would highly recommend utilizing killers and triple 7c subs. Assuming you stay over proper HP requirements (ie.145k for AA Goemon), damage is your number one priority. 144x is still fairly low when you’re against spawns with upwards of 250 million HP, so appropriate killers tend to get the job done faster and easier.
Stray away from subs that only fill one role, like cards that are only single orb changers, or cards that only unbind. Utilizing every single sub slot to their fullest potential is most important.
Regarding RCV
Because Vraska has no RCV multiplier, some players will experience a major issue in content such as A3 or AA, which contains lots of gravities. In general, there are 3 ways to overcome this:
- Use actives (Max HP% heals or RCV multis) one time. For a leader like Vraska who has a massive pool of HP, actives like these are very useful. However, RCV may get tricky.
- Stack RCV and Heart OEs. This can be especially effective with something like 2 Eirs, which I would highly recommend every Vraska player to grab at some point. This guarantees enhanced hearts from skyfall, and they fill multiple roles as (Unbind, heal orb generator, and damage with <50% awakenings). Healing is less reliant on actives.
- A Kuroyuri system, which can constantly heal you for 40% max HP every turn provided you have haste. Kuroyuri on top of a 1CD sub would have 13CD, and you have 12 turns of healing. 1 active that gives haste would allow you to cycle these actives repeatedly. This can be expensive however (1.5mil MP) and requires 1 CD subs, such as Tardis and Gunma.
Team Examples:
Disclaimer: These teams are only examples, and are not the only ways to clear the following content. Team building should follow the strengths/limitations of your own box.
Arena 3
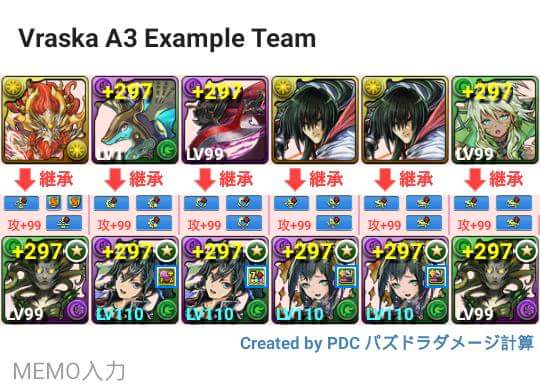
This team is super consistent, barring that you get RNG trolled by Noah Dragon and Zaerog. As long as you fully combo every board, there are very few spawns that will get in your way.
Obviously this build is a bit unobtainable, and is totally overkill for this dungeon, but it allows for a super safe clear. Notice how I opt to prioritize the first couple of points over the latter when it comes to choosing my subs.
Nees is a very nice HP stick, and can deal a decent amount of damage with the 7c super awakening. I prefer the healer killer Nees to have this 2nd 7c for more consistency in other dungeons, such as 3P arena. The other plus about Nees is that it heals based off of max % HP, allowing for quick recovery in a pinch.

Double Eirs exist in order to be a reliable source of recovery. ~1300 RCV, combined with heart OE awakenings leads to heart TPAs healing a significant amount. They can also come in a pinch with the <50% awakenings. 1 Eir with can suffice however, since this content isn’t as demanding.
The majority of utility comes from the inherits; Indra is there for radars to account for RNG (ie Noah Dragon), and to be pseudo SDR. Diena exists as an emergency burst and as a stat boosting inherit. Zuoh is there as a board changer. Finally, 3 fujin actives are always safe for A3, since you can always damage control Sopdet properly.
Note that technically you can damage control below Parvati’s, Vishnu’s and HeraDra’s damage absorbs. Fujins are only there for convenience for farming.
Arena 4
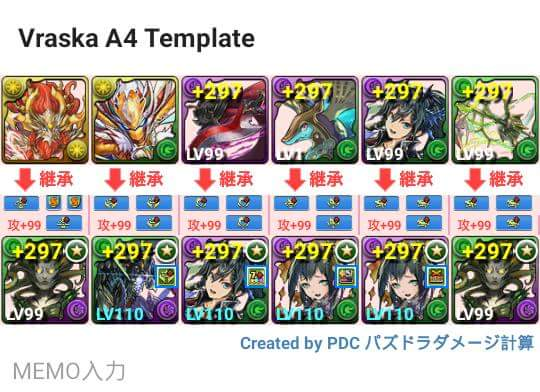
Notice how I opt to bring in a Rag Dra with God killer SA with 3x God Killer latents. This is for an easier time against Tsubaki floor 16, and the norns as a whole.
The Nees and the Eirs fill the same roles that they did for A3; both as HP and RCV respectively. Rag Dra is there for a damage spike, decent base with haste if absolutely needed, and even then overall a strong sub that acts as a board change with haste.
Admittedly, if I had the option to, I would bring an OdinDra with Rathian equip instead of the tape Eir with Nees inherit, just to ensure a safer time against Rushana. However, this team is easily capable of overcoming the 10 turn bind against devils if needed, and can technically tank without the HP multiplier.
Awoken Raphael is there as pseudo SDR, but also as insurance in case I would rather prefer the 30% healing for 3 turns over the rainbow board and haste, or I would need to shield myself from a hit that I couldn’t tank.
Rathian equips are a nice QOL feature; chances are you’ll find a friend or 3 that will have this, considering someone with a bulky LS like Vraska benefits from poison resist greatly.
Alt. Arena
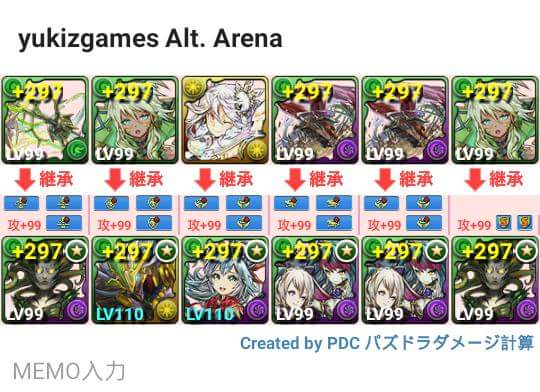
Note: Corresponding video can be found here. Thank you to yukizgames for allowing me use of their material.
yukizgames’ build seems to be fairly consistent, with the only possible hiccups I can see are with Hashihime. The team successfully utilizes the power of basic comboing and TPAs in order to deal with the majority of the floors.
Notice how having even only 1 Rathian equip increases the survivability of this team dramatically, considering half the dungeon spawns poisons. Fujins are there in case of Starling and Sopdet, since stalling on Parvati is super safe. Diablos equips are there to increase overall damage to all spawns which is admittedly a very whale, yet smart choice to improve consistency. Alternative choices would be to use Facet is used as a burst against Metatron and Kali. This can be replaced by Carat, and would be a stronger burst.
I would recommend using Balanced Killers on GNey rather than God Killers, due to the fact that without it, Hashihime might be a bit difficult to kill reliably. I would highly recommend finding a Vraska friend with 3x balanced killers as well, just for increased consistency.
Theoretical Team

The interesting thing behind this team is the idea of Kuroyuri system, since it allows for a very large safety net in HP and increases your survivability dramatically (as long as haste is used). Damage is mostly concentrated on the RagDra and the two Vraska. See the section regarding RCV for more info.
Note my preference of TPA SA on the Tardis. The subs for this team could also be fully farmable if I replaced the Tardis’ with Super Gunmas.
Game8’s Template

It’s interesting to note that this is a ‘generic’ template that involves a Ney, a seasonal collab chase card and a 6* DBDC.
Vraska thrives on whale subs that lets you reach activation and restores max % HP. game8’s template really tries to shove that in people’s’ faces.
(Sidenote: game8 has 2 other builds, but both are absolutely irrelevant and don’t deserve attention)
A List of Possible Vraska Subs
Disclaimer: The following is purely opinion based off of personal experience. If you feel like this catalog should be altered in any way, please contact me. All pictures link to a padx article of the corresponding card. If you do not have cards rated highly on this list, you can still run Vraska, but your team will have less QOL compared to using the higher rated subs on this list.
A guide to using the following lists:
Board Changers: Bicolor (Wood, Dark), Tricolor (Wood, Dark, x), Tetracolor (4 colors) and Rainbow (All colors + Heal)
Max HP% Heal: Heals you a % based off of your Max HP.
Orb Changer/Maker: Changes/Makes one or more colors that help towards activation.
Stat Stick: A card used as a base due to having high stats that benefit the team. Examples of this would be Hexazeon (HP), Nees (HP), Eir (RCV), and so on.
Utility: Can refer to either Killers, Fujins, Shields, + combos, or awoken unbinders. Often dungeon specific.
Haste: Actives that charge the skills of other subs.
Amazing stats: Refers to weighted stats of 1100+.
Great stats: Refers to weighted stats of 1000-1100.
Decent stats: Refers to weighted stats below 1000.
Amazing spread: HP/RCV is amazing while still having an acceptable amount of ATK/RCV.
Decent spread: HP/RCV is lackluster but acceptable.
Horrible spread: ATK is the main focus of the stat spread, which is poor since awakenings have more of an impact on offense, while HP/RCV is what determines Vraska’s survivability.
Disclaimer: Stats will be judged after limit break if applicable. Despite a card having ‘great stats’, the stat distribution may be poor. If you don’t have any cards that fit within the weighted stats of the following, chances are you could use any subs that you want and clear the majority of content at your level.
All ratings are focused around end game dungeons such as A4, AA, and annihilation difficulty dungeons.
Wood Main Attribute
| Monster | Rating | Type of Sub | Notes |
| 5 | Tricolor w/ Heal, Max HP% heal, Utility | Amazing stats (HP+ATK). Tricolor board with heal is extremely useful. Max HP% heal component of active synergizes well with Vraska’s leader skill. RCV SA can help with healing. | |
| 5 | Tricolor w/ Heal, Utility | Decent stat spread with synergistic awakenings. Active unlocks board and is a tricolor with heal. 2x RCV is especially helpful for teams that may struggle with healing. Balanced typing is good for killers. | |
| 4.5 | Rainbow Board, Haste | Amazing stat spread. DKali board with haste is amazing. Killers make him a great candidate for end game content. Also is a short enough CD to charge a base in longer dungeons. Absolute nuke against Gods. | |
| 4.5 | Orb Changer | Amazing stats with decent spread. Great active on a short CD. Awakenings are great, especially with 7c SA. Perfect for a short CD base if needed, if not as an emergency heart maker | |
| 4 | Utility, Max HP% heal, Haste | Amazing stat spread, 50% max HP heal for a 9 CD active is nice. Makes end game content such as AA/A4 much more consistent with a full awoken/regular unbind. | |
| 4 | Utility | Amazing stats with massive HP. Extra time is always good, especially on a 1 turn CD. Can also be a great base for, say a Kuroyuri inherit, or anything dungeon specific. | |
| 4 | Utility, Haste | Decent stats but horrible HP. Fujin effect with haste can be valuable in many dungeons. Offensive awakenings are valuable however. Can be bound. | |
| 4 | Tetracolor w/Light, Heal | Decent stats, but great offensive awakenings. Active gives Vraska activation. Triple 7c is a very strong offensive option. Can be bound. | |
| 4 | Tricolor w/Fire, Utility | Great stats with decent spread. 4 TEs = utility, 7c + Dragon Killer helps with damage. Many great offensive SA options. Damage control against spawns like Sadalmelik may be difficult. Can be bound. | |
| 3.5 | Bicolor, Utility | Amazing stats with decent spread. 15 turn bicolor board is decent but mostly unnecessary, or is too long for longer dungeons to be particularly useful. SAs don’t bring much to the table. | |
| 3.5 | Max HP% heal, Utility | Amazing stats with decent spread. Good short CD allows Ceres to be used as a base or as pseudo RCV. Can be used as a 3SB base with SA, or can help protect against gravities with L shield. | |
| 3 | Utility | Amazing stats with great spread, 75% shield can be useful against gravities. Color absorb null can also make things easier in certain dungeons. Awakenings leave something to be desired. | |
| 3 | Utility | Decent stats with poor spread. 2x Poison Resist awakenings + 1 Rathian equip for 100% Poison Resist. Fujin active can be valuable in certain situations. TPAs may make damage control difficult. | |
| 3 | Utility | Great stats with RCV bias. 2x Devil Killer. Unbinding active has a short CD for good candidate as a base. Shield SA or RCV SA make for great utility as well. | |
| 2.5 | Overall Stat Stick, Utility | Decent stats with HP leading spread. Considered a stat stick only in co-op due to double co-op boost. 4 TEs can be beneficial but no offensive awakenings. Long CD active can break activation. Can be bound. | |
| 2.5 | Overall Stat Stick | Great stats/spread, with double co-op awakenings. The one issue with this is that you need to use a lead that thrives mostly solo in co-op to get the full benefit of this sub. Active is mostly irrelevant for end game content, CD is long. Can be bound. | |
| 2.5 | Orb Changer | Decent stats/spread with somewhat synergistic awakenings. 6 turn CD single orb changer helps with activation. OE skyfall helps with RCV, but can lead to issues with damage control. | |
| 2.5 | Tricolor w/ Heal, Utility | Decent stats but horrible spread. Awakenings don’t synergize with Vraska. Tricolor works great with Vraska. The 2 turn shield can be crucial in defending against gravities. Can be bound. | |
| 2.5 | Tricolor w/ Heal, Utility | Decent stats but poor spread. Lacks offensive awakenings. Active synergizes well with Vraska. The unbinding portion of the active can be useful as well. UUEvo Oichi suffers the same problems as Awoken Oichi, and instead shares different utility with +2c. | |
| 2 | Rainbow Board | Amazing stats but horrible spread. Awakenings don’t synergize well with Vraska. DKali board is great to guarantee activation, but honestly you’d be better off running Ragnarok Dragon and not grabbing killers due to TPA having more synergy. | |
| 2 | Tricolor w/ Light, Haste | Great stats with decent spread. Decent CD for tricolor board with haste. Despite 7c and 2x TPA, 2 OE awakenings can make damage control difficult. RCV SA can help for teams with recovery problems. Can be bound. | |
| 2 | Orb Changer | Great stats but poor spread. 7c and 3x (+1 with SA) TPA awakenings can work well with Vraska, but may cause issues with damage control. Can be bound, but has unbindable SA. | |
| 2 | Utility | Decent stats/spread., but lacks offensive awakenings. Utility active can be nice for content with lots of awoken binds. 5 turns of unbind may not be enough for some content. Better used as an assist. | |
| 2 | Orb Maker | Decent stats/spread. 4 TPA awakenings can work with Vraska but don’t necessarily synergize well. Active helps activation with short CD. Can be bound. | |
| 2 | Orb Changer, Haste | Great stats but horrible spread. Wood skyfall can either mess up your continuous activation in longer dungeons, but could save you in situations like Kaede skyfall in A4. Awakenings are mediocre. Can be bound, but has unbindable SA. | |
| 1.5 | Orb Changer | Great stats with RCV leaning decent spread. Short CD to be used as a base. Awakenings have little synergy with Vraska. Counter attack component adds 1 turn of CD to a single orb changer. | |
| 1.5 | Orb Changer | Decent stats but poor awakenings/spread. Short CD can let it be used as a decent base. Active can ruin activation. Can be bound. | |
| 1.5 | Orb Changer, Utility | Decent stats/spread but awakenings don’t synergize well with Vraska. Active is a single orb changer with delay. Cooldown too long to be used as a base. | |
| 1.5 | Orb Changer | Great stats with horrible spread. Awakenings are however all over the place. Short CD active helps with activation, and can be used as a base. Can be bound. |
Dark/Wood Subs
Note: I am choosing to only including Dark/Green subs in this list, rather than any/green subs due to the lack of synergy with Vraska’s leader skill and activation.
Inherits for Vraska
Like every other leader in the game, inherits purely depend on dungeon specifics and what you would need the most. This section will examine valuable inherits for Vraska teams in commonly cleared dungeons:
Arena 3
For Arena 3, the majority of your consistency runs around how many Fujins you have similar to most farming leads. Fortunately, due to how outdated Arena 3 is as a dungeon, a 144x multiplier is plenty to clear through the majority of it. Along with the fact that you can tank rage hits from every single floor outside of the radar 3s (DKalis hit for 150k), this allows for a lot of flexibility in subs.
However, since this dungeon has a lot of spawns with damage absorbs, this is the following inherits I would run in every A3 Vraska team:
- 3 Fujins, to overcome Parvati, Vishnu and Hera Dragon extremely quickly. Damage control against Sopdet, Parvati and Vishnu is completely possible, but the latter 2 take a while to chip down. Vishnu can be impossible to kill if you’re using Eirs due to gravities and 50%.
- A 2 turn long burst; this is to be popped before the Radar 3 spawn, since Heph Dra can be a troublesome spawn due to Vraska being wood.
- A Fenrir inherit to cancel out Vishnu/Hera-Ur’s jammer skyfall, but is completely optional.
- Rathian equip can be invaluable against poison orbs, which alongside gravities are your only real threat. This is also optional.
Arena 4
Arena 4 inherits tend to revolve around the subs that you are running. Utility is often based around the floors that give your team the most trouble. Sometimes Vraska teams may run burst inherits to help against floors with high defense. In other cases teams may struggle against the Norns as well. However, the following are actives that you will want to have either covered by subs themselves or their inherits:
- A burst, whether if it’s to deal with high defense floors like Sylph floor 5, or to try and 1 shot the Norns (floor 24) with FUA.
- Poison Resists are a must, and absolutely make this dungeon a breeze. Even with only 40-60% poison resist, your survivability is much better. Jewels of Creation floor 12 are a joke with 100% resist.
- A hard awoken unbinder to increase consistency against Rushana (floor 15). It is possible to stall with both leaders bound depending on your team HP, but requires stalling.
- A shield active for Ena’s (floor 23) 115% gravity. Using latents can work but you need 14% worth of dark resist.
- An Oichi style inherit that increases combo count can help against Oichi/Ena as well.
- A max HP% restored for x turns active can be valuable as well (Kuroyuri, Awoken/Revo Raph)
Alt. Arena
Alt. Arena is much more difficult/demanding of a Vraska team than the previous two dungeons, mostly due to how everything hits harder, and is much bulkier as well. Some common trouble spots are with the Green Mask floor 11, Hashihime floor 16, and without God Killers the Kalis floor 21. Starling, Sopdet and Parvati make up your fujin spawns, which can be very annoying.
In order to deal with this new mess, here are what I would recommend for inherits:
- A burst, as usual. High HP/DEF spawns can be really devastating, especially for Hashihime, since you’re most likely dead if you don’t somehow kill her before she puts up the 75% shield.
- Having a color absorb null for Hashihime would also be a great idea.
- At least 2 Fujin inherits would be wise to have, if not 1 G/x Fujin base. This is because of the short time that Fujin has to come up in between Starling and Sopdet. Parvati isn’t really worried about since you can stall for plenty of time if you get all 3 Fujin spawns.
- Poison Resists, as always, although I would strongly recommend due to his ability to deal with the Green Mask floor 11, or Sopdet itself. Poison orbs will always be an issue for Vraska.
- A shield active would be wise, since with it there are plenty of rage hits that you can tank that you couldn’t otherwise.
- A hard unbinder like Odin Dragon would be valuable considering the number of 6 turn awoken binds in this dungeon. Fortunately you can stall 1 turn on most if not all of these spawns and use a standard 5 turn awoken unbind. You might be able to get away without this while utilizing the Kuroyuri system, but be prepared for a slower clear.
In General
I strongly believe in the idea that there is never a ‘one answer fits all’ option in PAD in any situation. Because I know people will ask though, here is how I would prioritize assists on Vraska.
- Poison Resist Equip. is preferred due to its active having extra utility.would also be acceptable due to its full heal. while having a low base CD works as well. Poison resists are always nice to have, assuming that the content you’re clearing has any.
- Absorb Nulls. Whether if it’s a Fujin active or a Color Absorb Null (is preferred for stats), if the dungeon you’re clearing requires this utility, it’s nice to have it on your friend lead, especially if you don’t have it yourself. Ignore this if the dungeon you’re clearing doesn’t need it, or if you can damage control.
- Board + Utility. No, this doesn’t mean having Vraska on Vraska. Actives like (shield), (+2c), or /(Max HP% heal) are much stronger to have, as they let Vraska serve for the most part the same purpose, but add more much utility. The unlocking component of Vraska’s active is only crucial in some content. If you valued the active that much, you’re better off running unskilled.


