How to Doge (or any combo lead)
If you can’t match more than 5 combos on any board consistently, this guide is too advanced for you, and you should find a more basic video tutorial of sorts.
Contents
Basic Definitions
by: maximumJank
Combo: A match of 3 orbs of the same color
#c Board (i.e 7c board): The number of surefire combos on the board.
Board clear step: A cycle in which the board freezes, clears the combos, and makes the rest of the orbs drop.
Cascade: An arrangement of orbs that results in multiple board clear steps
Half Board: The default board size is 6×5, a half board is 3zz wide and 5 tall (3×5).
Left Board: The left half board.
Right Board: The right half board.
Full Board Solve: An arrangement of the board which results in the maximum possible number of combos, AND the optimal positions of remaining orbs for skyfall opportunities.
Team Design
- Determine how many TE you need to be able to full board solve 90% of the time.
- Either have 1x gunma, or 2x diaochan on your team. (Egyptian1 only)
- Add monsters which have high damage and also have enough TE to satisfy #1
- When possible, use monsters with tricolor board changers containing the dominant colors. Otherwise, shields are great.
- Include monsters with high HP.
Example Anubis Team (what maximumjank uses):
Anubis (Zuoh), Gunma (R. Susano), Amatsu (R. Karin), Azathoth (aza), Azathoth (Haku)
Example Blue Hunter Team (what maximumjank uses):
BH (Void/Utility), Amatsu (R.Karin), Azathoth (Uuvo Indra), Azathoth (aza), Azathoth (Haku)
Disclaimer: Unless you have a giant hatred for your life or way too many dark pys, it’s not recommended that you use 3 Azathoths.
How to Practice
- Put as many time extends on your team as possible. Don’t forget leaders like Myr, Yomi Tama, or Uvo Yomi (not awoken or revo). Start slow and understand how orbs move and pack efficiently.
- Enter the first level of endless corridors.
- Match.
Brute Force
Brute forcing is when you take a full board and only match combos all in one board clear step (i.e no cascades). This method is the most basic way to solve the board, and you should be able to do this consistently before moving on to more complicated setups.

For a right handed person, solving left to right allows you to check your solved work more easily, whereas right to left allows gives you a better field of view when matching, because of where your palm is over the screen during the solve. Choose whichever is more comfortable for you, and mirror the instructions below accordingly:
The general procedure is as follows (assuming 8c board):
- (Left board) Make 2 horizontal combos (Light, Dark)
- (Left board) Make 3 vertical combos (Red, Green, Blue)
- (Right board) Make 2 horizontal combos (Dark, Light)
- (Right board) Make 1 vertical combo against the edge of the board. (Dark)
- (Right board) Rearrange the remaining orbs setting them up for skyfall.
Generally, you want to match combos that are the easiest to match. However, some pitfalls include:
- Connecting 6 of the same color accidentally (blob matching)
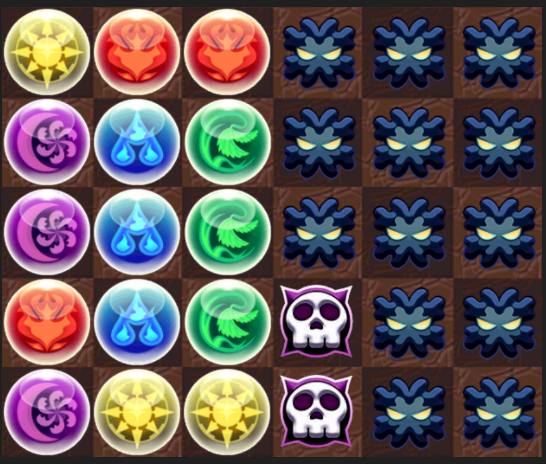
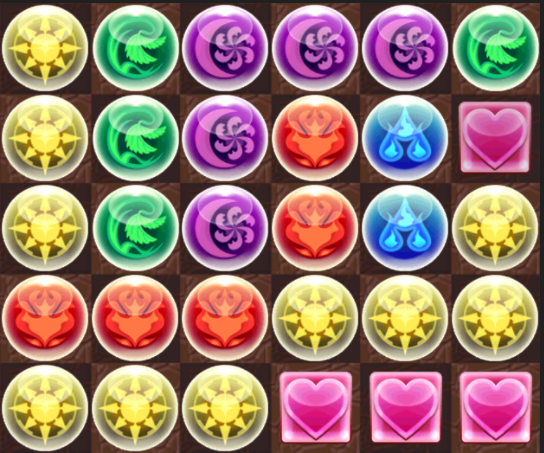
- Setting up for skyfalls vertically on < 9c boards (reduces skyfall chance by 50%, see graphics below)


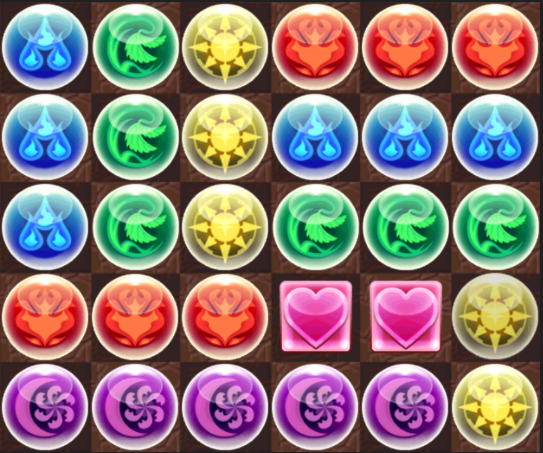
The poison orbs indicate positions that have 1 opportunity of being matched after a board clear step. Left BAD, Right GOOD.
There are two other noteworthy boards which you can form:


The main difference between the above boards are where the horizontal combos go – when practicing the left example, remember to to form both horizontal combos first before moving onto the vertical combos. Doing soyup prevents derelict orbs from being stranded in the corners.
Counting Orbs
Counting orbs is essential to Anubis’s survival. Often times, you need to know whether you have a board that activates his leader skill – as such, you need to be able to quickly determine if you have 8c or more.
Methodology
- dFor each orb color, count the number of orbs of the color modulo 3
- Sum up the remainders for each orb color. Or count on your fingers.
- 1-3 = 9c, 4-6 = 8c, 7-9 = 7c, 10-12 = 6c
Example

2R, 0B, 2G, 2L, 0D, 0H
2 + 0 + 2 + 2 + 0 + 0 = 6 orbs leftover = 8c board.
Advanced Setups
The optimal packing of orbs in a 6×5 board can be often achieved by solving the two half boards one and a time. In this section, we will focus on ways to describe and solve a half board.
2 Board Clear Step Setups

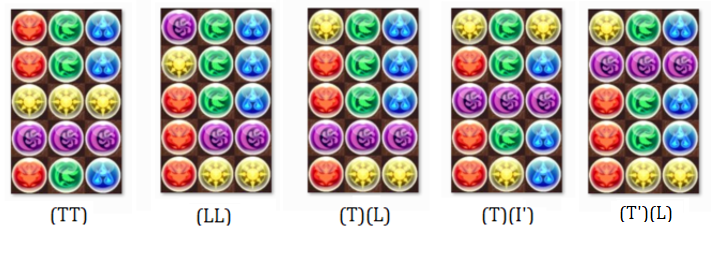
There are 4 types of setups that produce an extra board clear step, and their corresponding rotations. All of these setups are safe to use in regular play, however do note that in practice, the L and J setups are often easier to arrange on the fly, whereas T setups usually require a fair amount of diagonal movement if the conditions aren’t right.
2 step board clears always produce surefire combos, with the additional cascade skyfall bonus. Use these regularly whenever the board is more conveniently arranged for these setups.
2+ board clear steps
We can describe boards with higher number of board clear steps with the same primitive types described above. In order to accurately describe the board, we introduce the following notation:
( ) – A set of orbs cleared in the same board clear step
L/I/J/T – The type of setup that produces and extra board clear step
The number of board clear steps is designated by the number of groupings ( ) there are plus 1:
Examples
The number of boards that exist which produce 3 board clear steps is too many for the purpose of this guide. Here are some of the more practical ones that you can incorporate into your play:
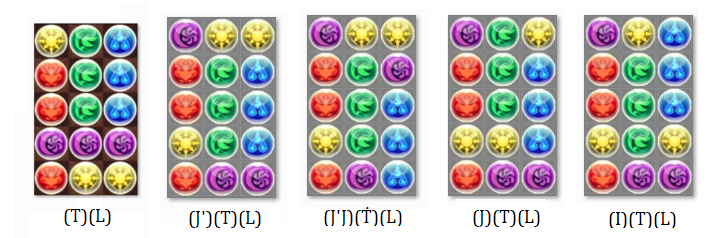
Side note: If you’ve noticed, all the practical boards listed above end in L. L type cascades (and hence J, since they’re mirrored) are considered a lot safer because they are positioned against the edge of the board, which reduces the chances of the cascade being interrupted by skyfall.
Cascading
Why bother?
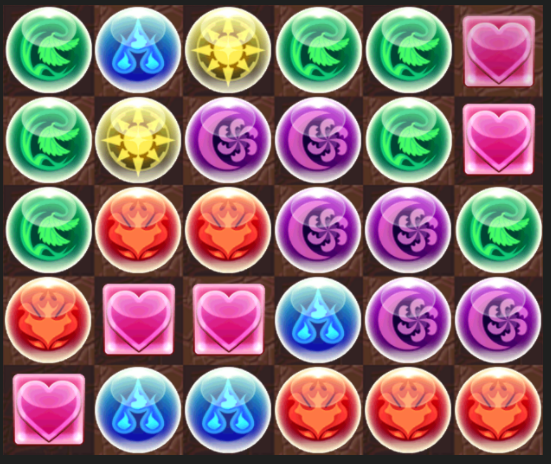
Cascading increases the number of board clear steps, and each board clear step results in a higher number of orbs passing through a position set up for skyfalls. Consider the following scenario:
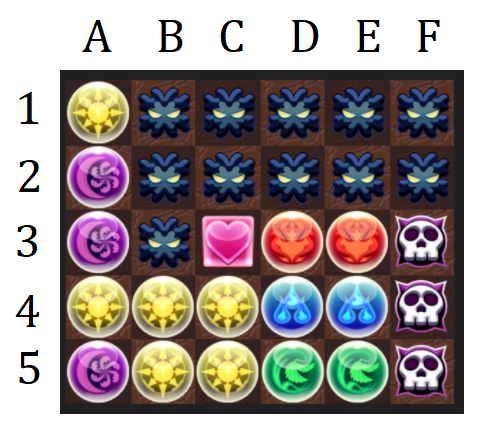
The poison orbs indicate positions that have 1 opportunity of being matched after a board clear step. However, given the current cascade setup, notice the C3 and C4 cells will have 3 and 2 orbs respectively pass through them by the time all board clear steps are complete. As such, because of the cascade setup, we have increased the number of skyfall match opportunities from 6 to 9, a 50% increase in this case.
TL;DR cascading increases the expected number of combos for the turn.
How?
Turns out, we defined some nice setups in the section above. Generally, it is sufficient to make one advanced half board setup, and brute force the other half.
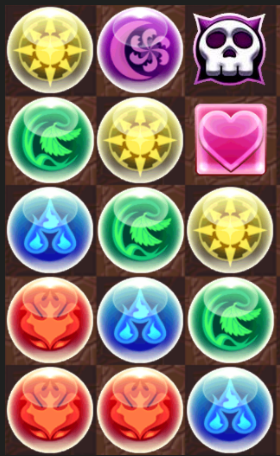
However, 2+ board clear steps are inherently risky, because they can be interrupted by skyfall. In order to mitigate that, you need to identify key positions that would disrupt the cascade, and fill those in with unmatched orbs from the solve.
Example:
In this half board setup, the poison orbs indicate the positions that can disrupt the cascade. If a light orb fell into the bottom poison orb spot, we would lose 1 board clear step as the light orb cascade (L type) will not connect. I leave the key positions for each cascade setup as an exercise to the reader.
Horizontal Cascading?
Example:
A lot of players do this; however, this way of arranging the board leaves the remainder orbs far away from each other, reducing the chances for skyfalls connecting. Though it might look cool / fun to do, not only is it difficult to catch mistakes when they happen, but orbs also get stranded in hard to reach corners, and often results in misses of surefire combos.
Don’t do them.
Setup / Retrace Boards
A retrace is when one solves the board, but breaks up the combos by drawing a simple path around the board than can be reversed the next turn. This reduced the time required to solve the board, and is an effective way of using a free stall turn from many enemies.
There are many ways to do a retrace board; In a futile effort to standardize the way people do them, I will present one method, and follow it up with several useful board transforms from this position.
Standard retrace
The standard retrace is done on the left half board.
Procedure
- Make 4 horizontal combos, stacked from the bottom of the board. Try to make them all different colors.
- Draw a giant “U” starting from the top left of the half board and ending at the top right of the halfboard: (A,1) -> (A,5) -> (C,5) -> (C,1)
- Match 1c on the right board to charge skills.
Before retrace After retrace

Transforms
All transforms listed here are performed from the standard retrace.
Warning
If some of the retraced combos are of the same color, some transforms will blob. To be safe, in those cases, unravel the setup board and attack normally.
| L Transformhttp://pad.dawnglare.com/?s=jsdrLK1 | |
| L’TI Transformhttp://pad.dawnglare.com/?s=sXhkYw1 | I’TI Transformhttp://pad.dawnglare.com/?s=QM7SUi1 |
Advanced Boards
Fast Tricolor Solve
The optimal boards for tricolors often involves crazy cascading, which are difficult to memorize and execute in practice. If there is no more than 14 orbs of one color, and no fewer than 6 of another, the following method will produce the maximum number of surefire combos for the board.
Procedure
- (Roughly) Count Orbs and rank them in the order from most to least.
- M = Most, A = Average, L = Least
- Arrange the left half board in the following pattern:
MAM
MAM
MAM
LLL
MMM
- Adhoc the right board with horizontal combos, making sure not to blob any combos.
Cascade Unbind
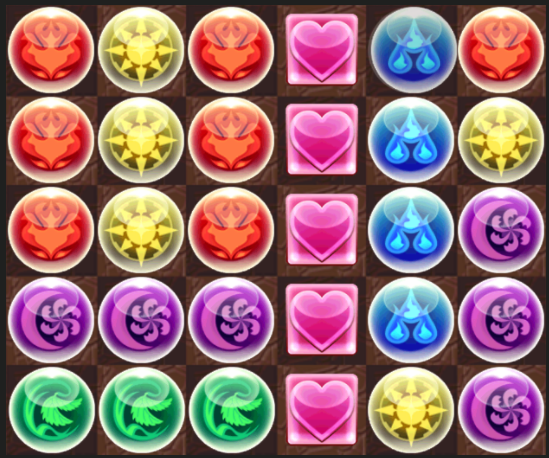
A special mechanic in the game is that a bound card will activate their skills or deal damage if it that been unbound before the next board clear step. For example, this is especially useful when the leader (blue hunter) is bound, where you want to leader skill to activate and kill the floor. The easiest way to do this is to make a row of hearts, and form an L cascade.
Requirements
- 6+ Hearts on the board.
- Enough row unbind awakenings to unbind the bound card.
Example

Follow Up Attack
The follow up attack is used to kill enemies with resolve. Given that this takes 5 hearts to perform, it automatically caps the max combo count of the board to 9. There are two suggested ways to organize the FUA board. Given the layout of the board, one might be easier than the other – optimize for successfully making the board. As Anubis, more often than not you will have to rely on a 1 combo skyfall to activate the leader skill.
Approach 1
Set FUA on the side of the board, and solve the remaining 5×5 field.

Approach 2
Solve a half board, place the heart column on column 4, and form two combos in the remaining 2×5 area.
Mass Attack
Another situation that arises is when only a single monster has the damage potential to kill the floor (e.g, 3x predra killers). In order to kill all the monsters on the floor, it’s possible to use a mass attack to hit all the targets.
The options for the mass attack board are similar to the follow up attack board, but there are a couple more noteworthy arrangements.
L Mass Attack
It’s advised to form the L combo as late as possible in this setup. Generally, this is useful when a half board can be solved without involving the color that is being mass attacked.
Horizontal Mass Attack
This setup is similar to the row unbind setup. Form the mass attack at the bottom or top edges of the board and match the remaining field. Be sure to plan and place an odd numbered orb in the corner spot next to the mass attack.