This guide is focused on how to build an OP th12 base. I will be constantly updating it as the meta changes. Community feedback is appreciated! If you think something should be explained that i missed, feel free to say so.
Contents
Table Of Contents
- Value distribution- page 2
- Regular defense comps- page 5
- Inferno comps- page 8
- Deadzones- page 13
- Channels- page 16
- Pathing- page 17
- Defenses- page 20
- King and queen placement- page 31
- Traps- page 33
- Trash buildings- page 40
- Inside an attackers mind- page 46
- Skeleton building method- page 47
- Live build- page 48
Value Distribution
The major defences are the town hall, infernos, eagle artillery, and the queen. These are classified as a “major defences” because they are the most important defences when designing your base.
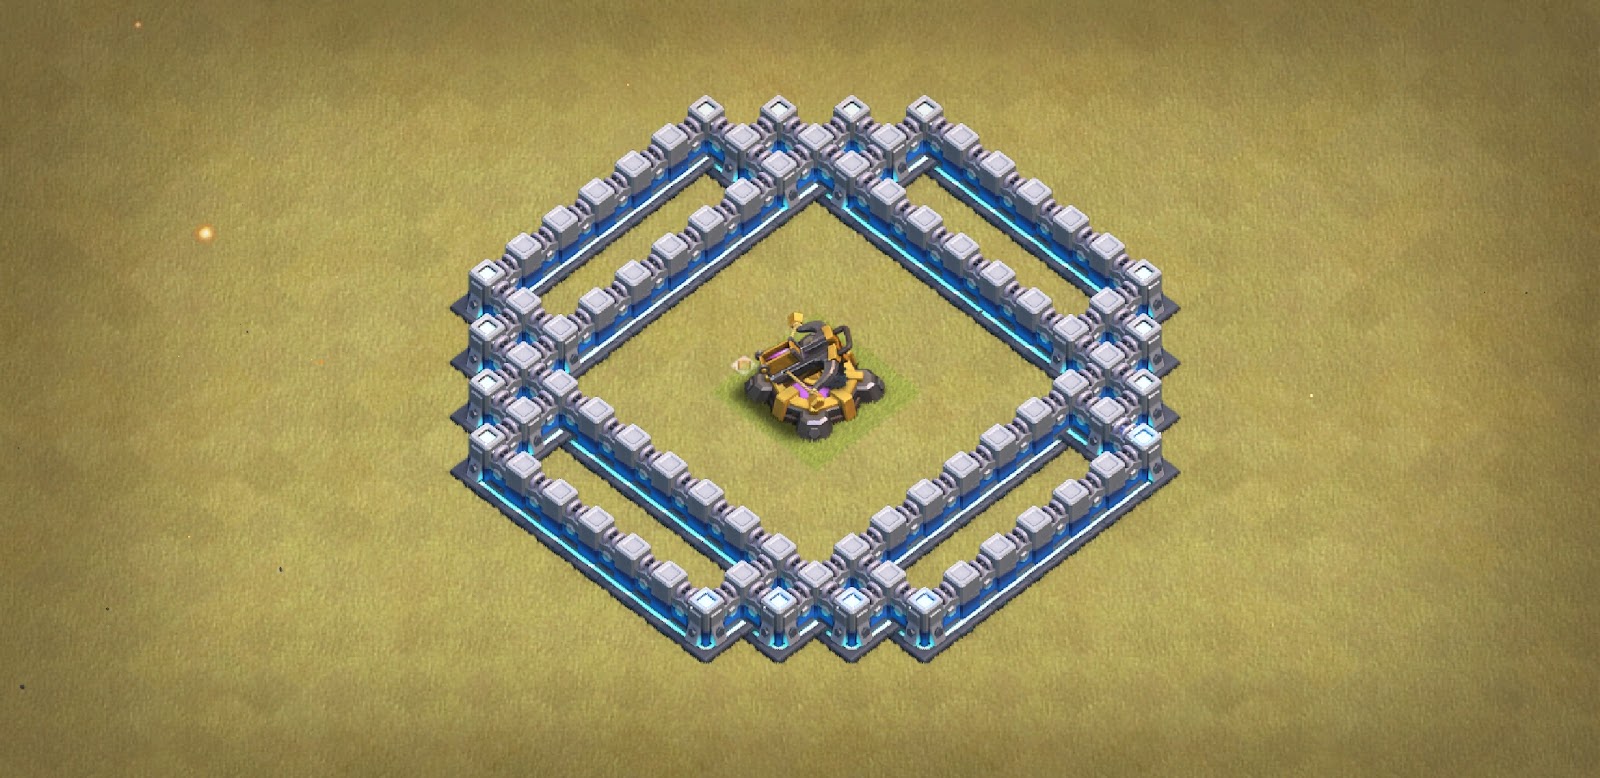
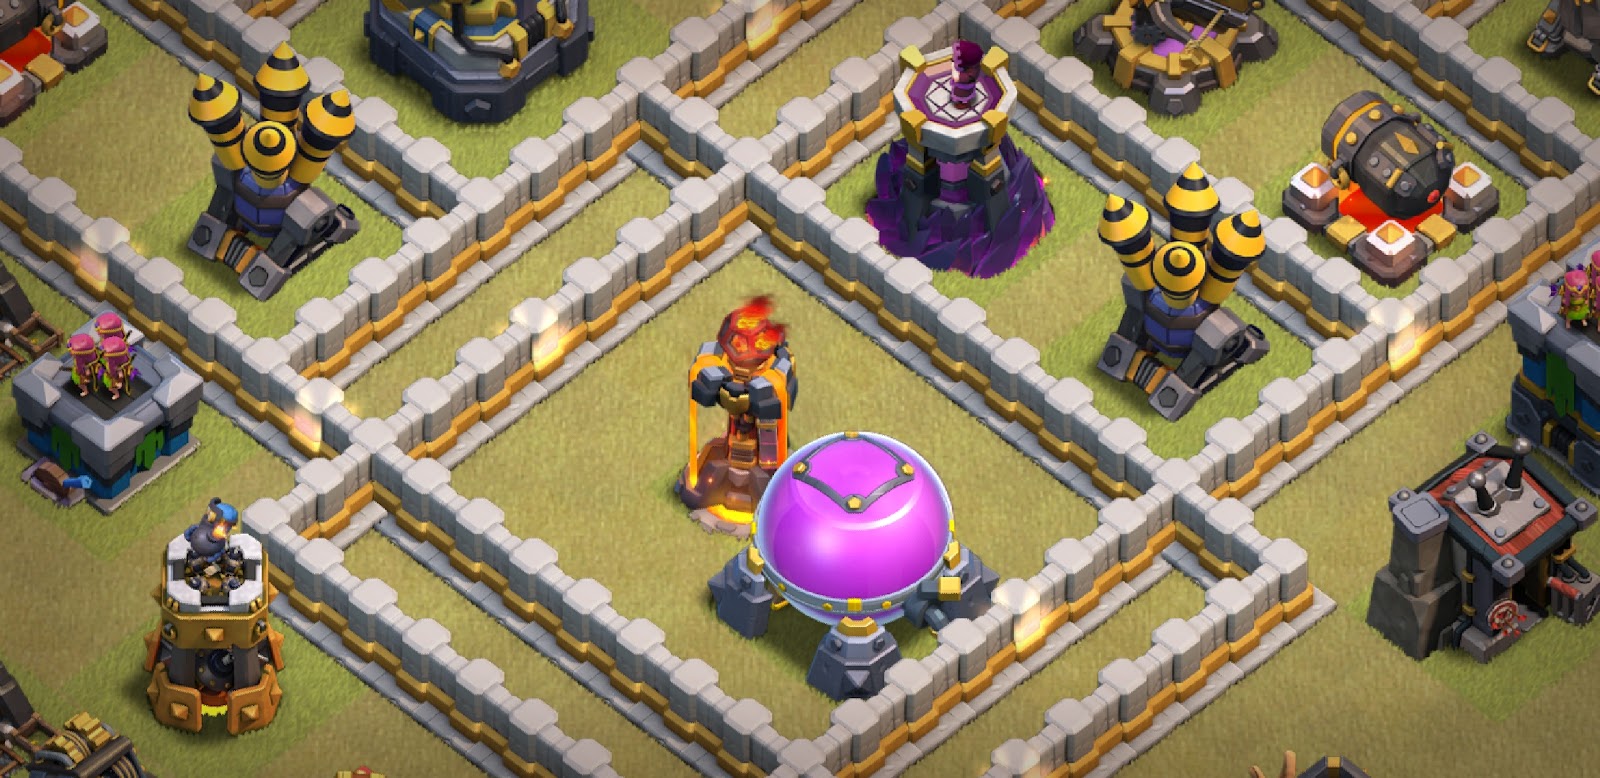
So when i say reachable i mean that the queen can grab it. The queen is unique because of her long range, this is her full range-

This means that if the queen is outside of the walls, she cannot reach the inferno. Here are examples for a 3×3 and 4×4 building-

Try and think of your major defences as reds and blues. The infernos are blue, while the eagle artillery and queen are red. The town hall falls into a grey area, meaning depending on the base it can be acceptable to call it a blue or red.
So generally the rules are
- No two blues can be reachable from the same compartment.
- A blue and red can be reachable if it isn’t easy to queen charge them.
- 2 reds can be reachable as long as a sui can’t get them and it isn’t easy for a queen charge to grab them.
- Neither blues or reds should be walkable or easily suitable.
- A jump spell shouldn’t open up the whole base. If it gives access to 3 blues, or 2 blues and 2 reds, then your base will likely be easily 3 stared.
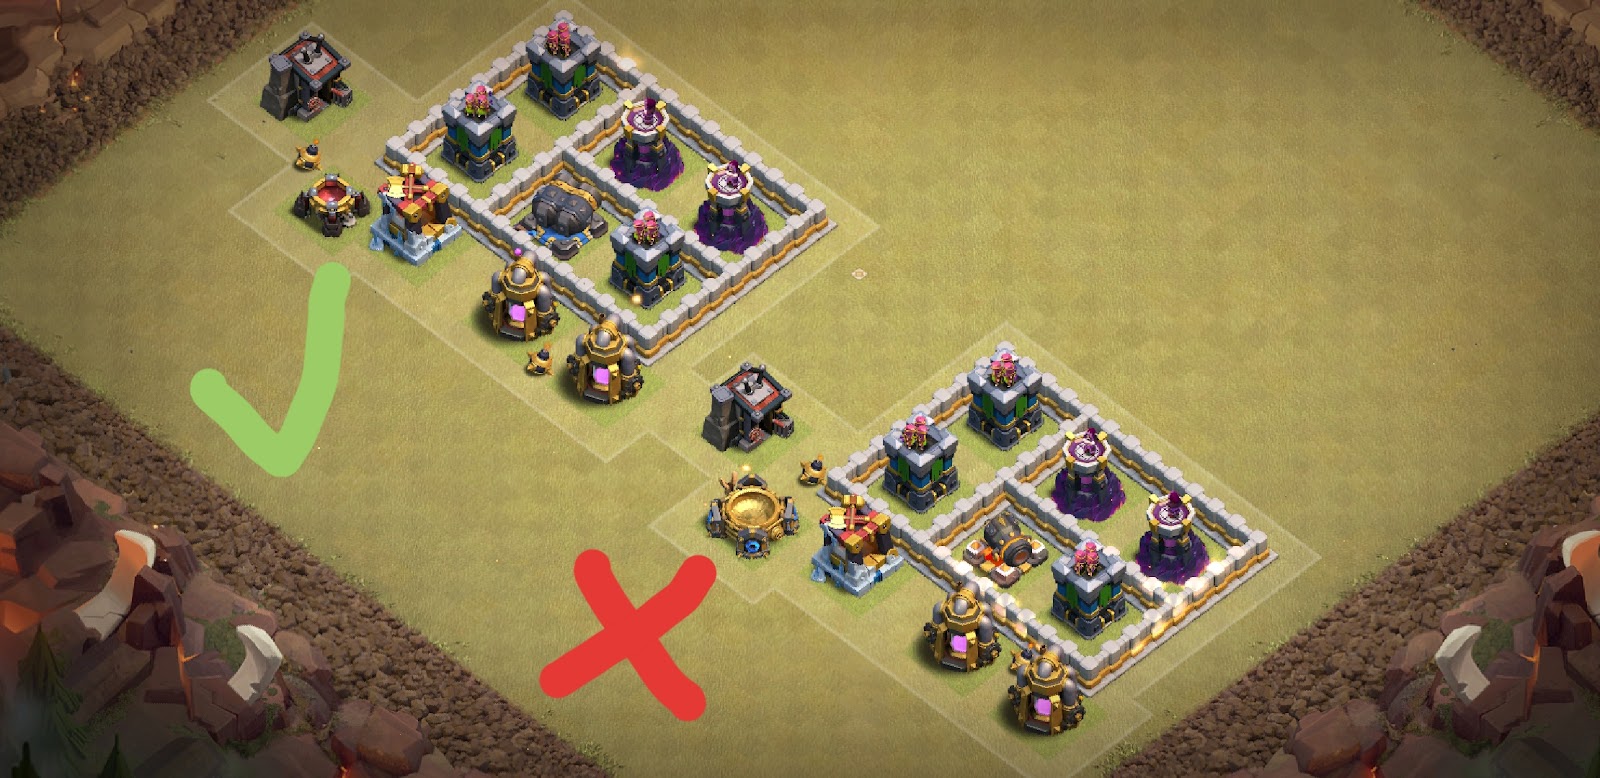
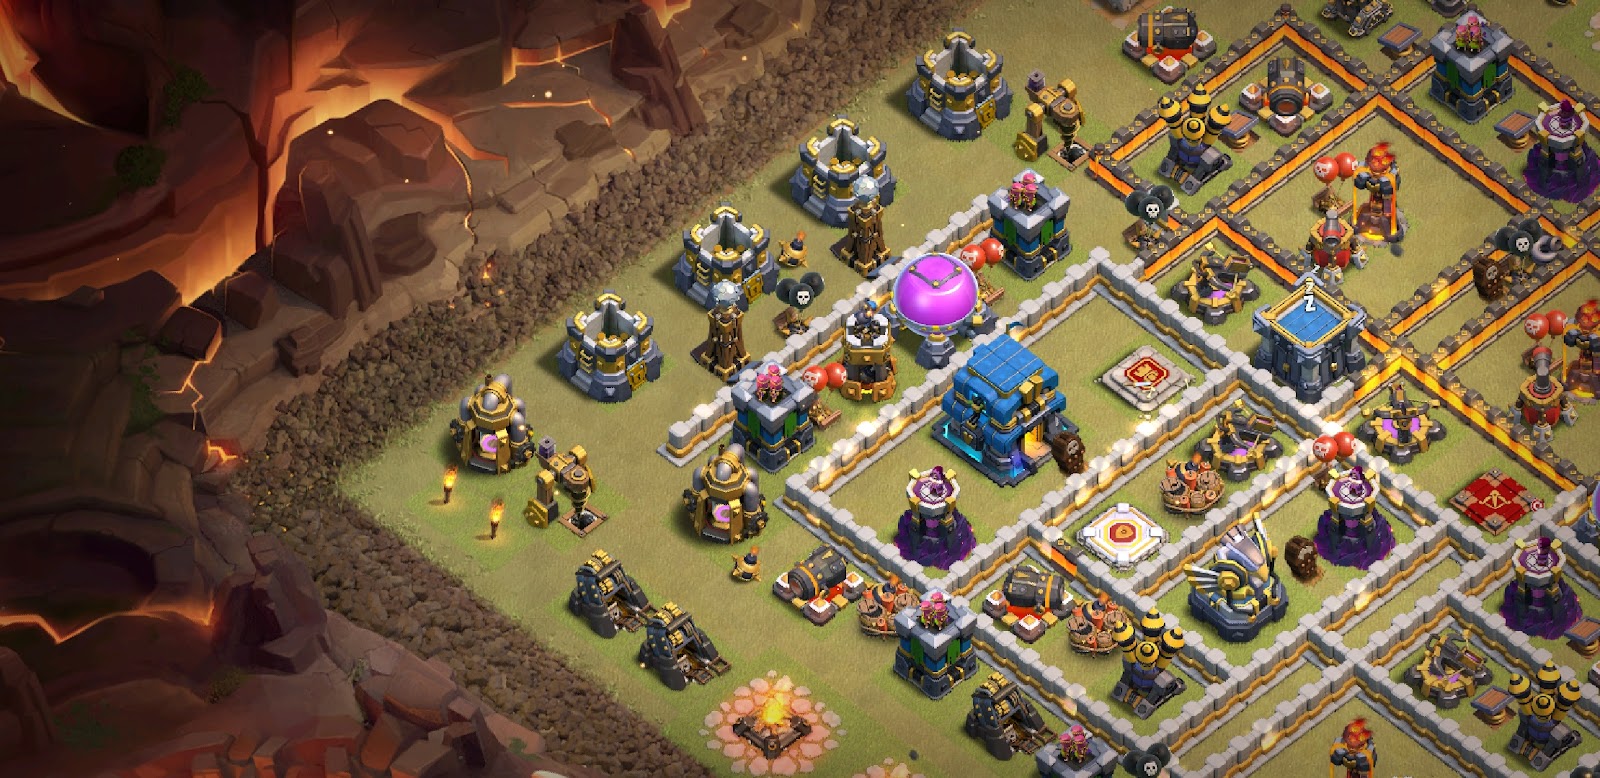
Here is an example good of value distribution

Notice how this base follows the rules
Two blues can not be reached from the same compartment, there are reds and blues reachable from the same comp, but a qc is very difficult, and that nothing is easily grabbed with sui heros.
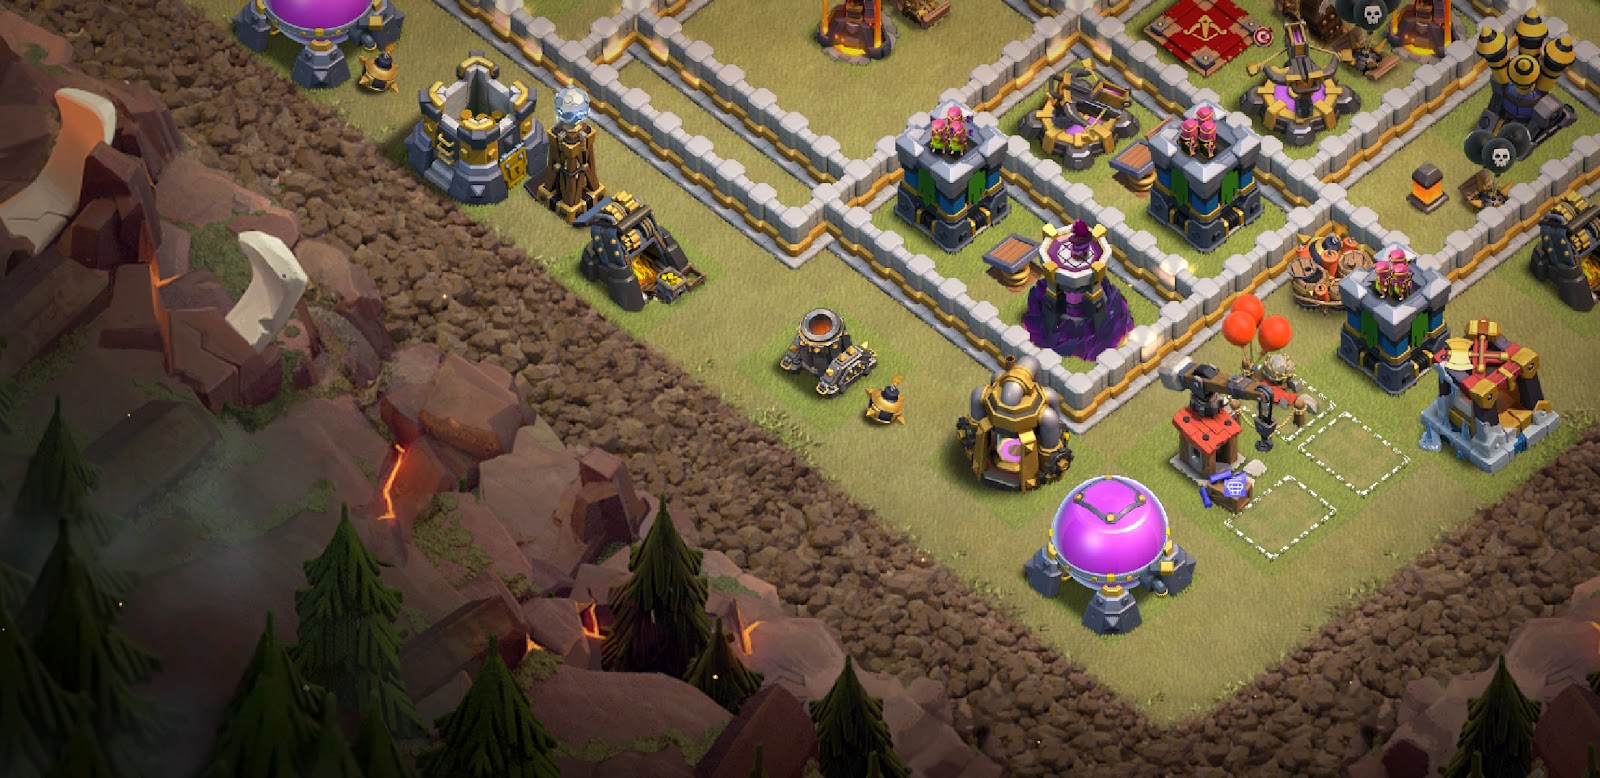
Here is an example of bad value distribution
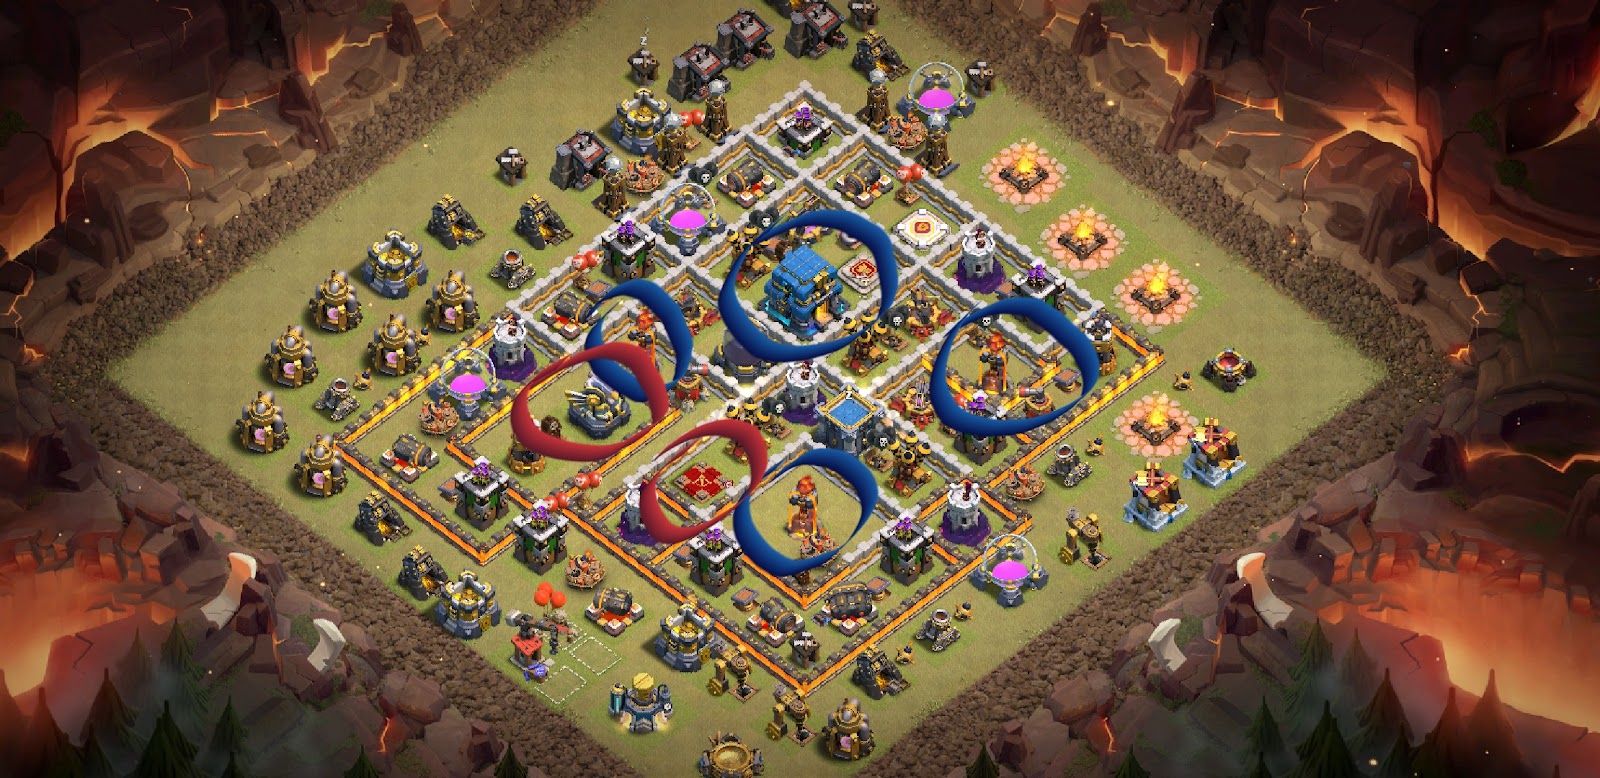
Notice how this base doesn’t follow the rules
The town hall and infernos can both be grabbed from the in-between compartments on either side, also the eagle artillery, other inferno, and queen are all reachable from the one tile deadzone.
Regular defense comps
9×5 (one tile space) and 10×5 (two tile space)

These are generally solid comps that are used to connect major defence comps. You should generally have quite a few of these in your base.
These comps are favored by many because of how versatile they can be with trap placement and pathing. Also they aren’t huge, meaning they don’t give away large sections of the base with one wall break.
5×5 and 7×5

Having smaller comps like this can be useful for defending a queen charge. The wall breakers will open up this small compartment and will not get much value. These should be used singularly.
For example-

Take notice on how if the attacker wall breaks the 5×5 comp the queen charge will not be able to get the whole section, doing this can force a jump.
9×9
At th12 this comp isn’t as popular because it is difficult to keep a good value distribution with such a large comp. But it can be helpful in baiting a qc, these shouldn’t be used in the middle of the base, have them on the outer shell.
These are standard comps for base building, it doesn’t mean that other comps can’t work for your base.
Inferno comps
The goal with inferno compartments is to path the troops away your infernos towards other defences.
Here are a few examples


A few things to consider when building inferno compartments are troop pathing, stone slammer, queen range, and value distribution.
Troop pathing
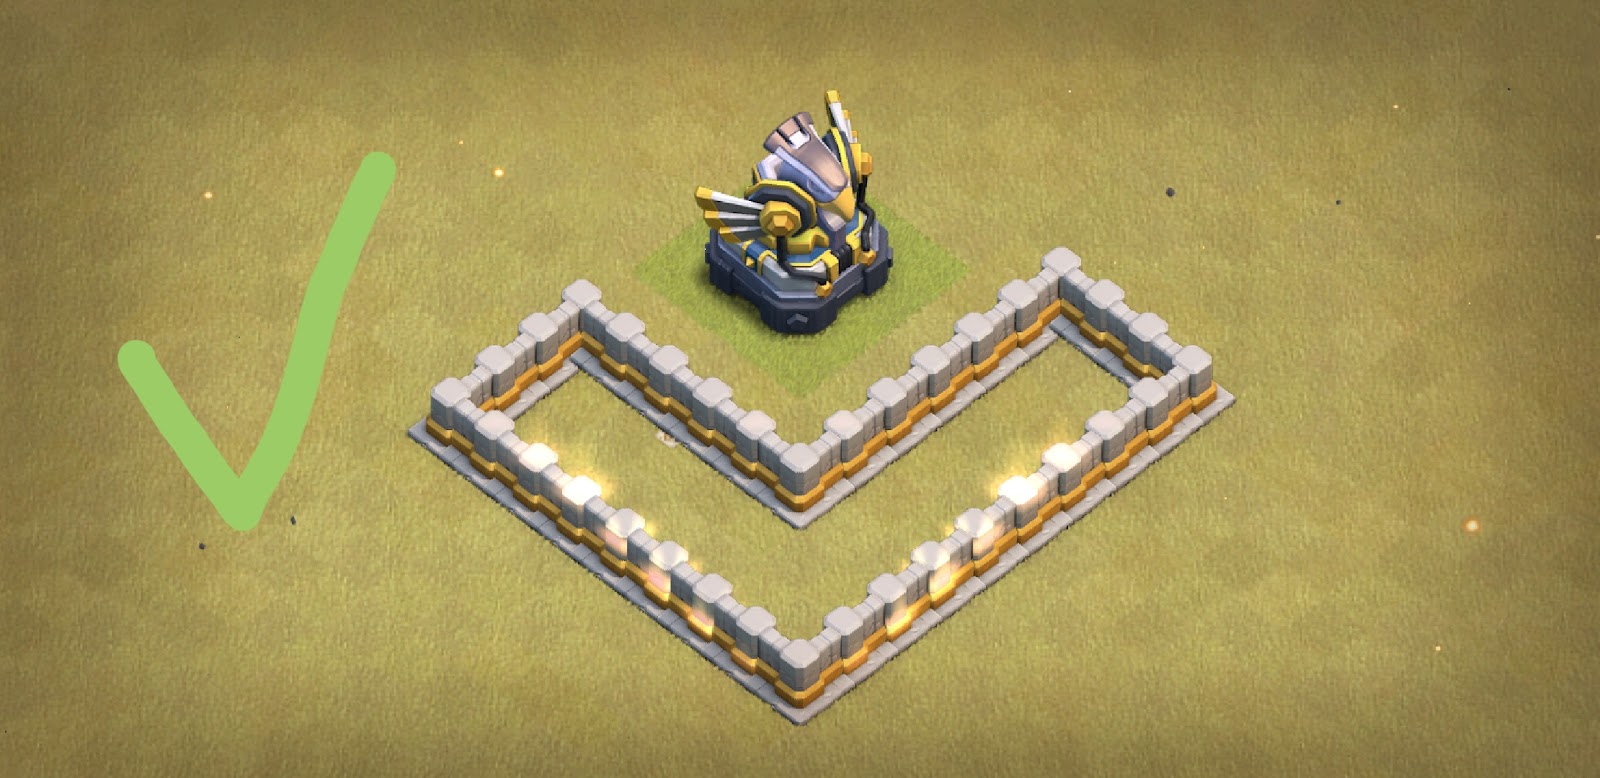
You always want to think about where the troops will go, and how to path them the way you want. For loons, hogs, and the slammer you need to have defences going around the inferno such as this-
Notice how there is no way a slammer or defense targeting troop would path to the inferno tower because of the defences around it. Because troops will path around it the inferno will be able to deal damage longer.
This is the walkability range of an inferno tower-
Value distribution
Because these comps will often be large, you need to take extra care in making sure these follow the value distribution rules said above.
Deadzones
Utilized correctly, dead zones can vastly improve your base. You have three main things to think about when creating dead zones, value distribution, pathing, and location.
Value distribution
A deadzone should not give away half of the base. When building dead zones try and think about what would happen if a queen got in there, if half of your base would be gone then it’s probably too big.
Pathing
Dead Zones are an effective way to split up troops or path them away from major defences.
Location
Dead Zones are probably the best way to prevent massive overkills by attacks such as pekka smash. Keep in mind your town hall location and value spread when placing dead zones, as these are the main factors that determine where an attacker will start.
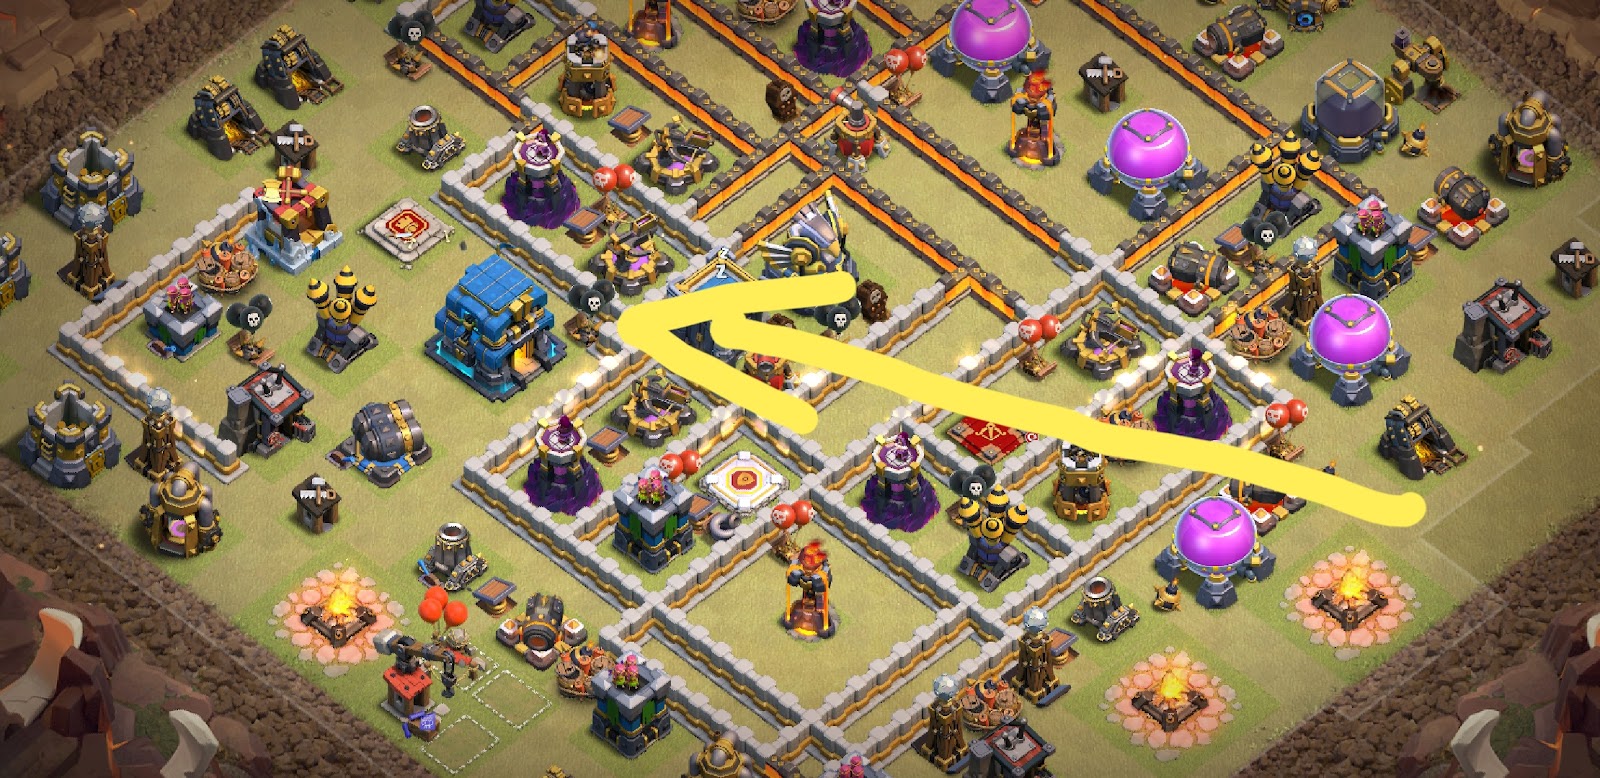
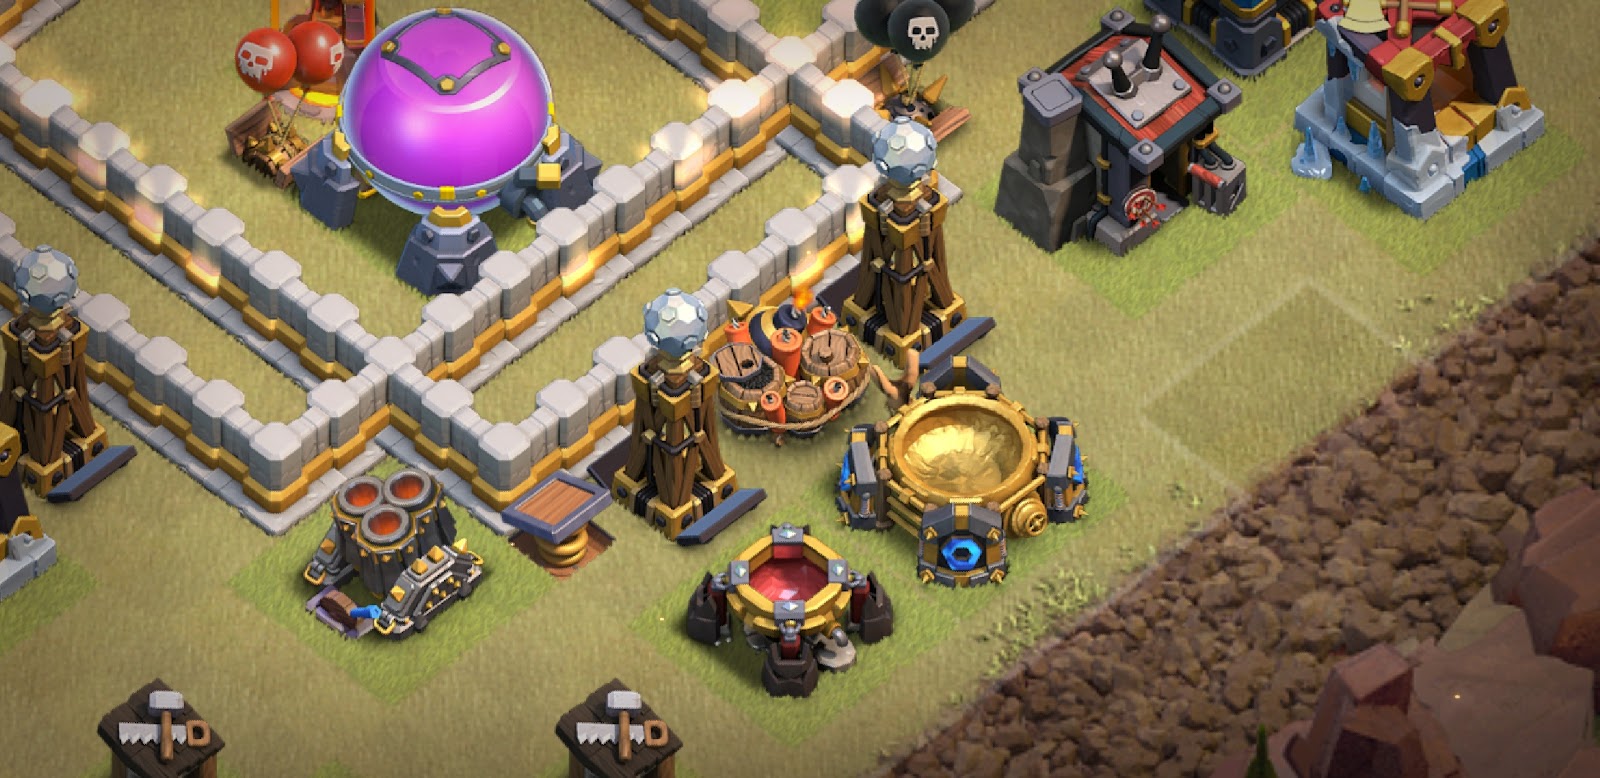
Also don’t forget that a queen can reach things over a two tile deadzone! Here is an example of how to place a defense so it will not be targetable over a deadzone-


Don’t forget, three tile dead zones are an option, you just have to put walls or trash buildings in them!
For example-

Take note how on this base the inferno at 6 is separated from the rest. This means that if an attacker comes from any other end it will be difficult to take down the inferno. But the more important thing is that the dz follows the value distribution rules.
Channels
Channels can be a very effective way of splitting up troops, and are very infamous for ruining a pekka smash. There are three things to consider when making a channel, value distribution, location, and accessibility.
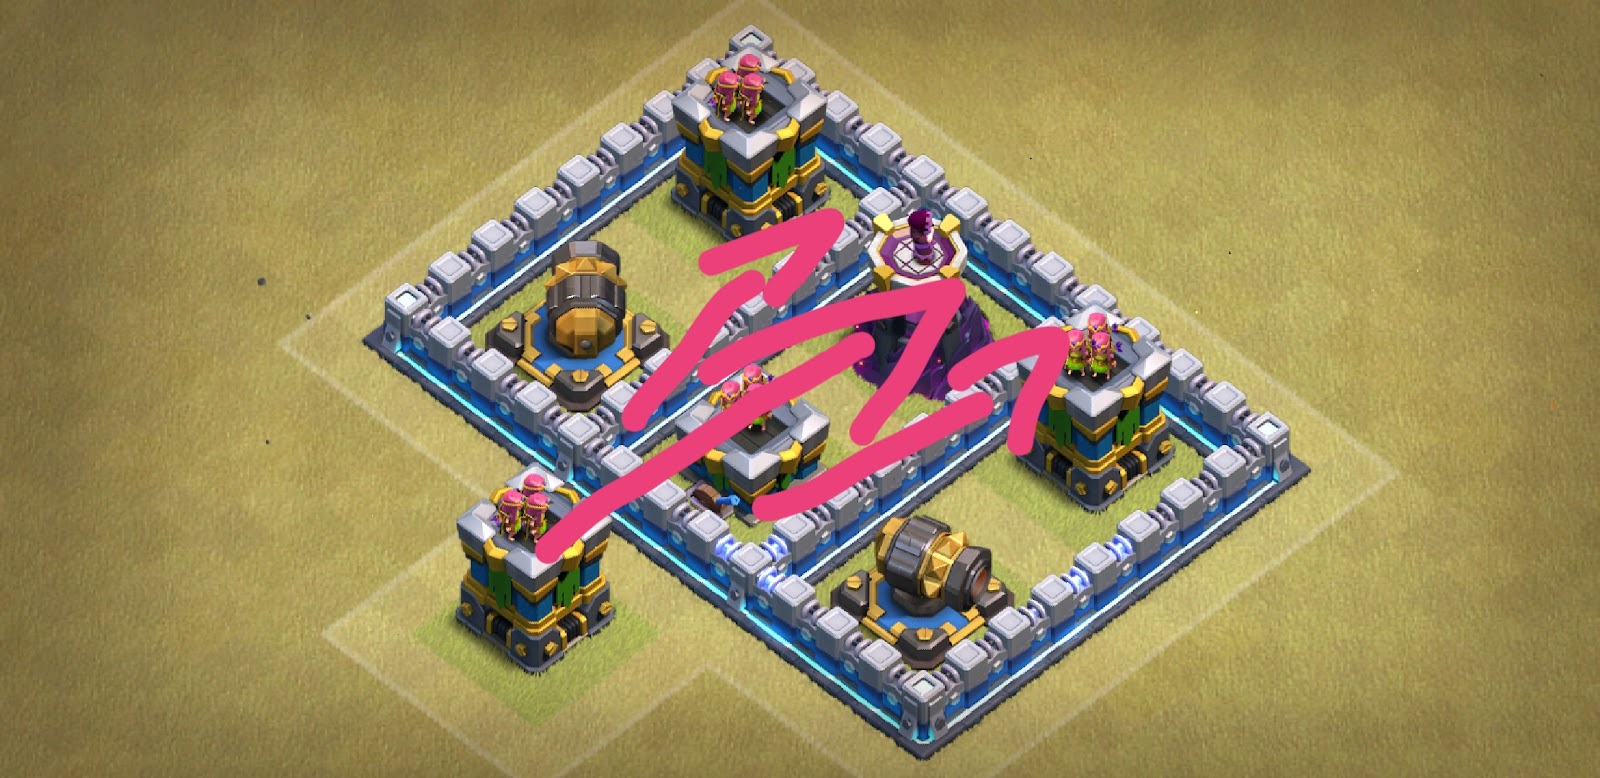
Here is an example-

Accessibility
Take notice how it would be a literal nightmare to try and force a queen into the channel. This is important because often channels will have good value in them.
Location
Personally if I’m going for a channel build i like to make it in the middle, but this isn’t mandatory. Many people like to have a small channel separating an inferno comp, which can be just as effective.
Value distribution
Ok, channels are your one exception to your value distribution rules. Take notice how technically 2 infernos and a queen is available, but see how any kill squad or qc would never be able to get into there. Because it is almost impossible to abuse the value distribution there, it is ok to have it like that.
Pathing
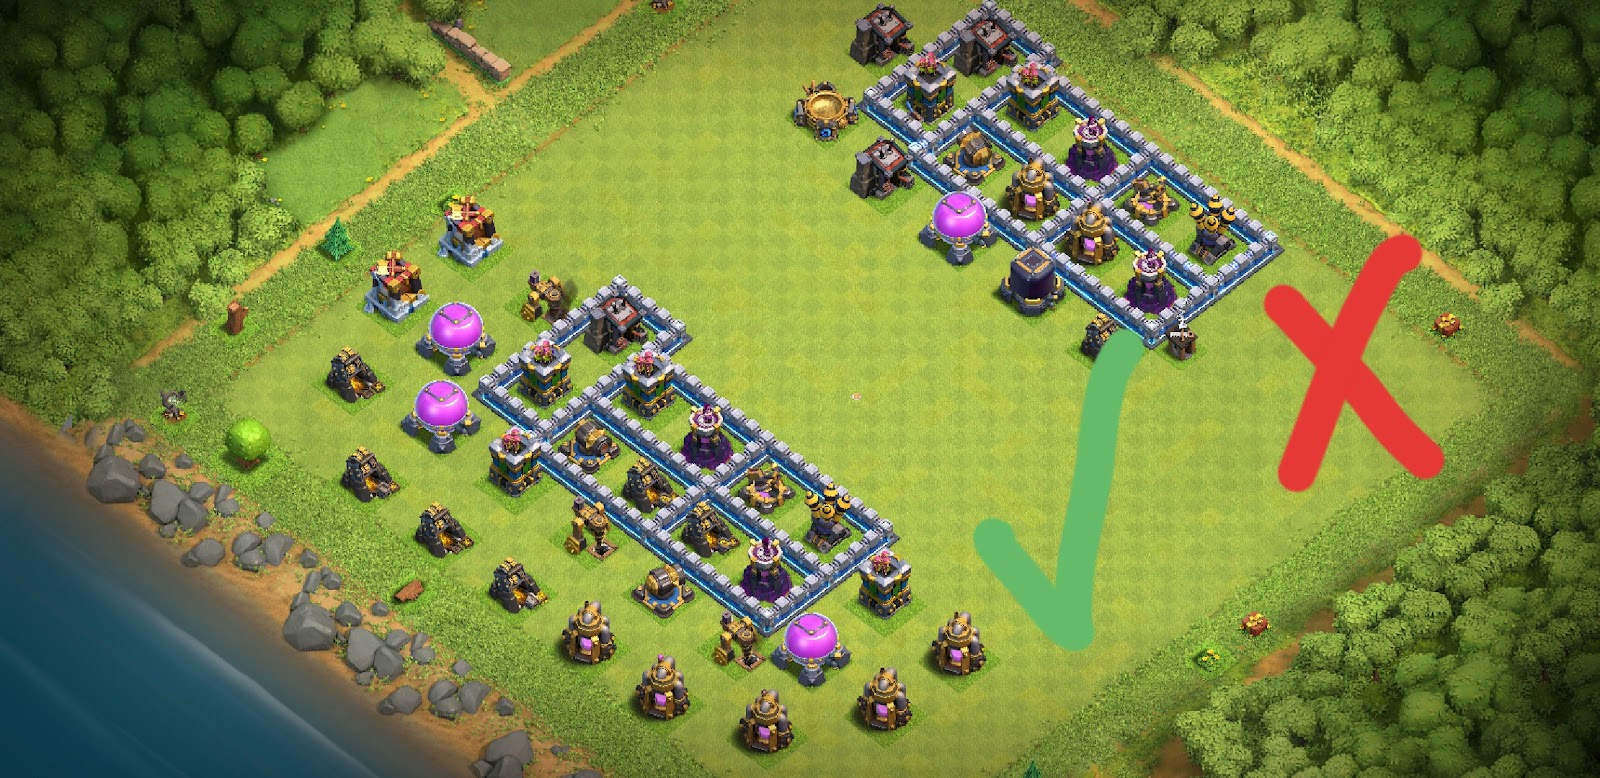
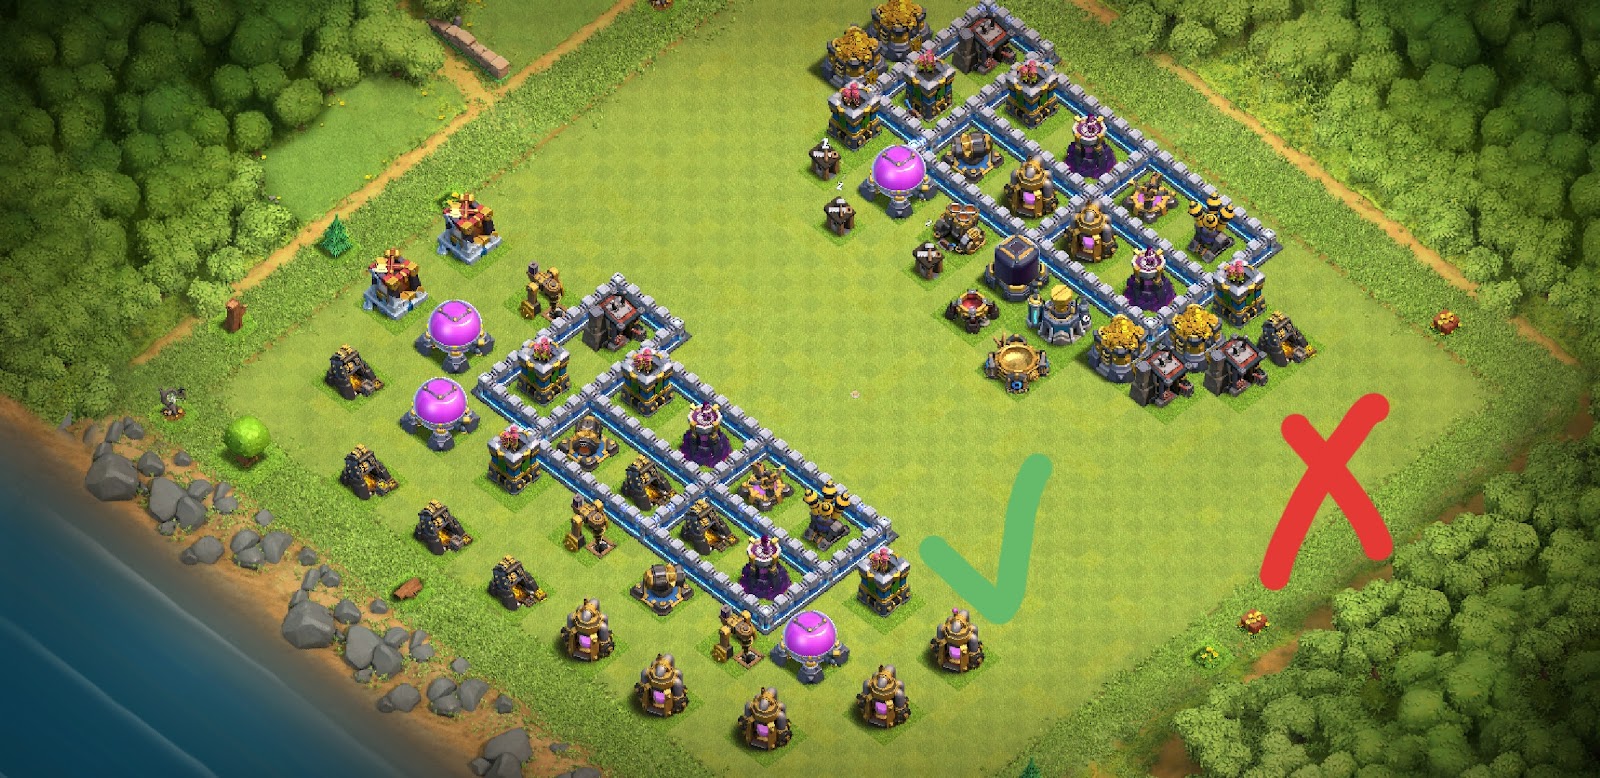
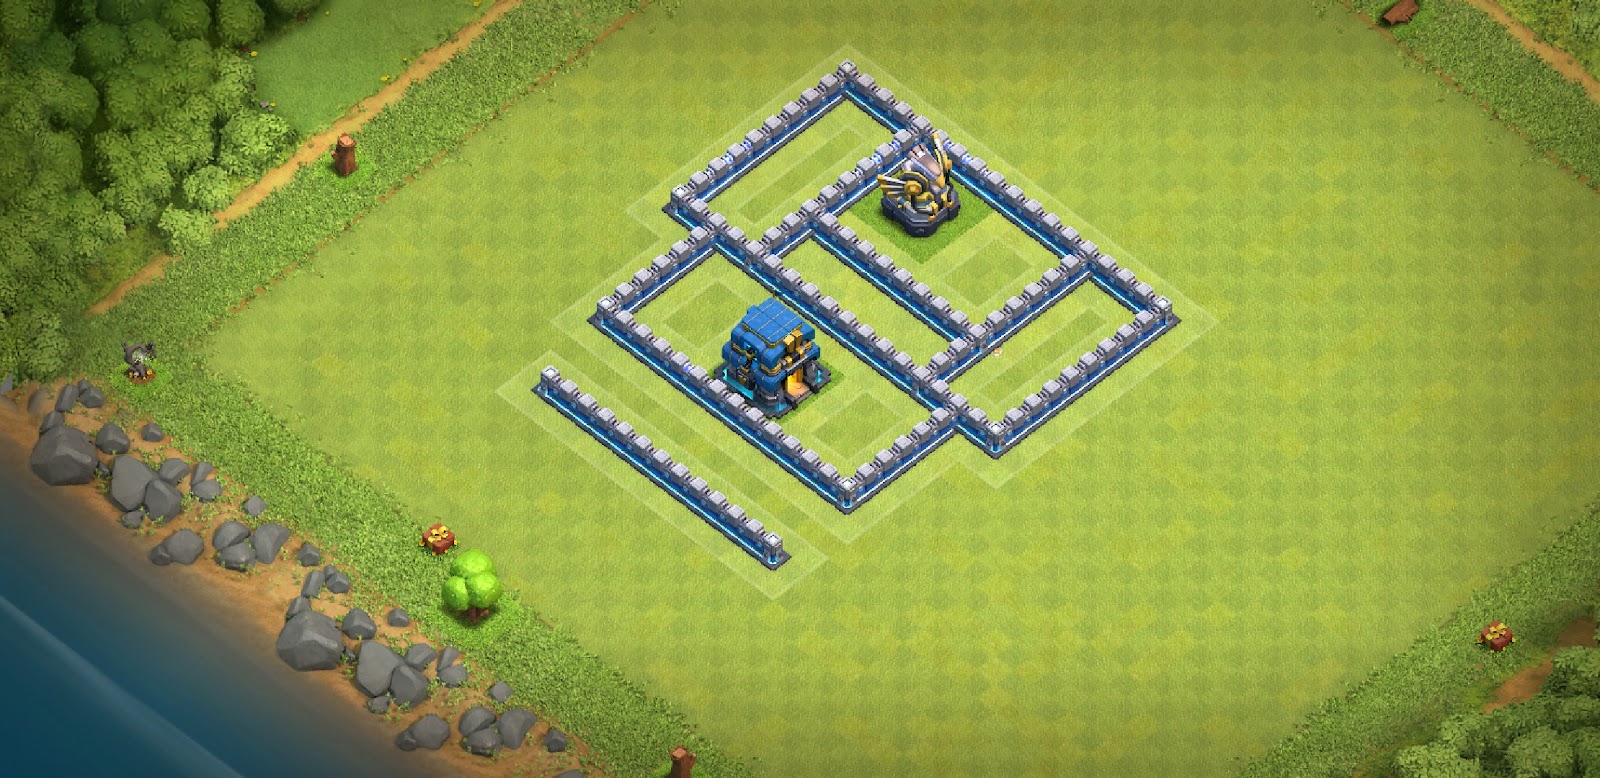
When placing your compartments try and think about pathing. When placing them try and think about how the wall wrecker will path, as you want it to go through as many walls as possible.
For example-

Notice how in the top example the wrecker will have to go through an extra set of walls. Always make sure to use your compartments effectively!
Don’t forget that the wall wrecker and blimp go to the town hall, and the slammer targets defences!
Pathing-continued
You can use non defense buildings to make defense targeting troops path the way you want. Here is an example-

Notice how in the 1st example a mass of hogs/loons could just plow through that with no worries. In the second example the non defense building will split up the group and make pathing less predictable. Having difficult pathing is what transforms a good base to a great base.
Defenses
Town hall
The town hall is arguably the most important defence at th12, as its giga bomb can one shot many troops. There are a few things to think about when designing a town hall comp, mainly suiability, stone slammer pathing, value distribution, and location.
In the current meta I like to have my town hall on the outer shell of the base. I find that if done properly it is more effective than having your town hall inside. Because of the town halls high dps and warden forcing ability, this should normally be on the backend.
Here are some examples of good town hall compartments-
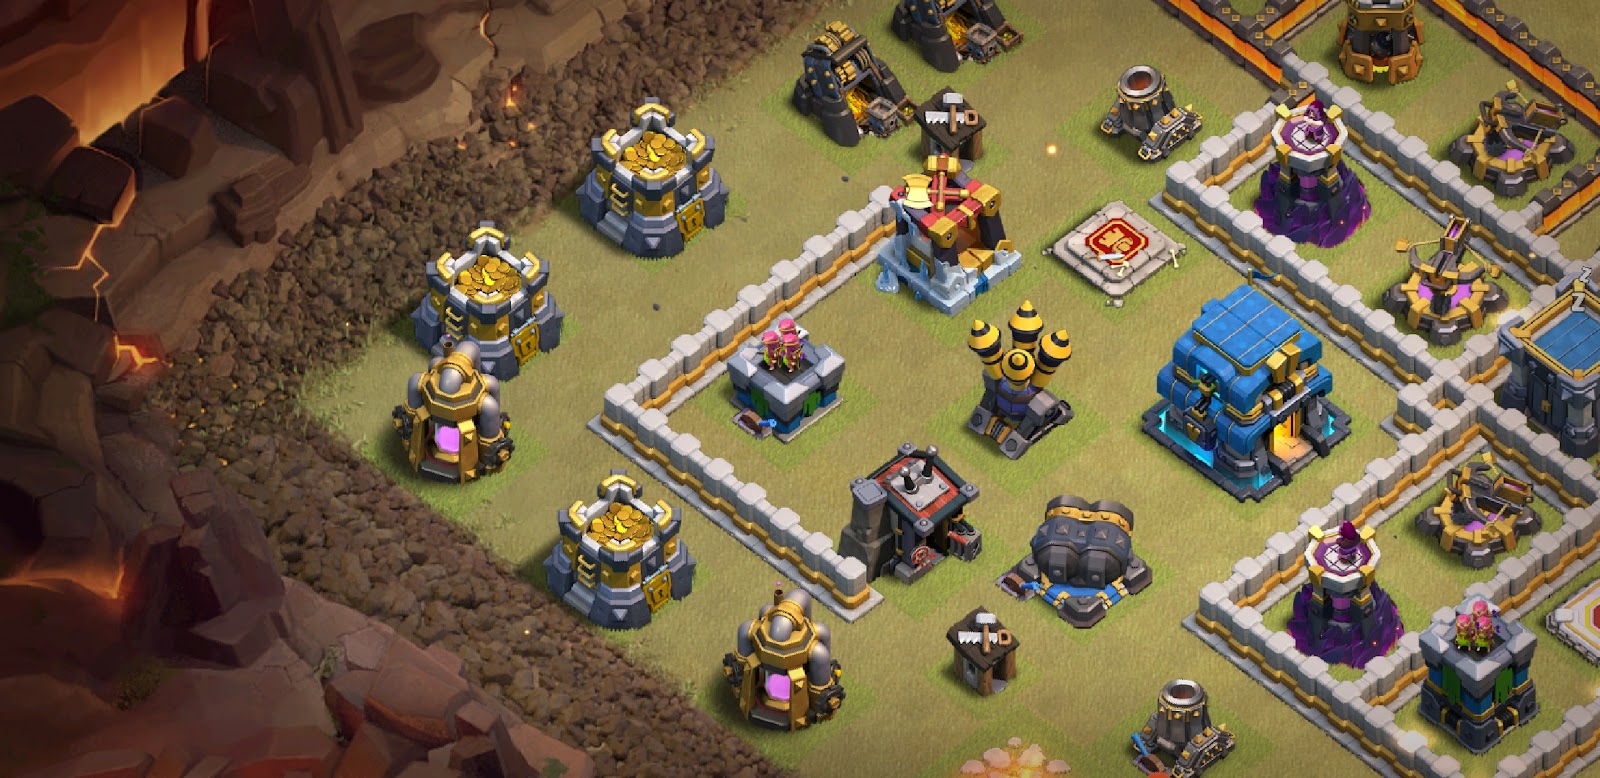

Notice how the walls prevent a sui, and that a stone slammer can not easily get the town hall.
Inferno Tower
These should always be set to multi because of how powerful bats and witches are in the current meta. If you choose to have a single targeting inferno an attacker will take advantage of it.
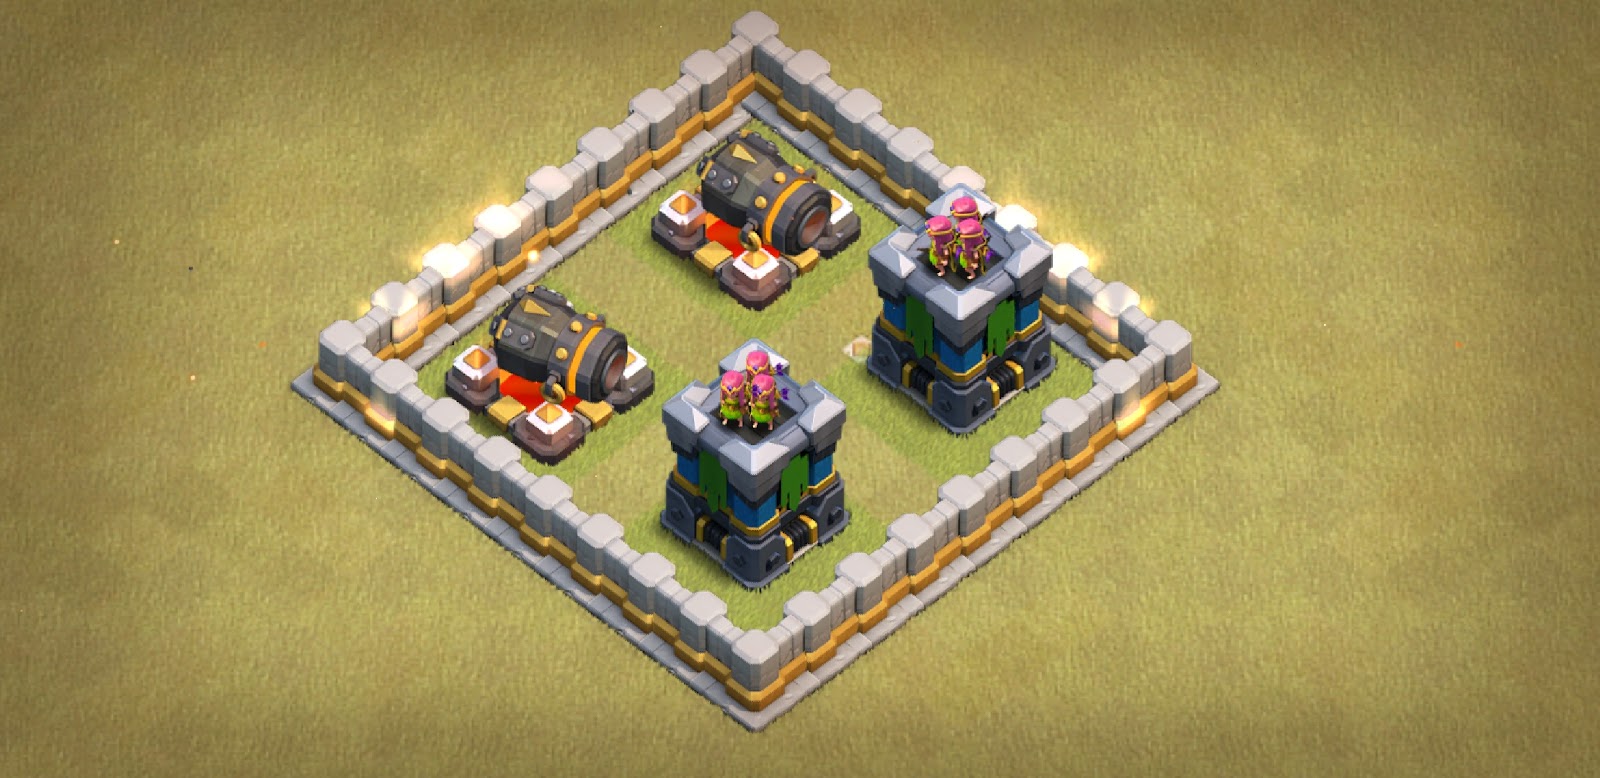
Generally these should be in a triangle shape, being evenly distributed throughout the base. But you could opt to have an inferno farm, which is where you have two/three infernos in back to back compartments, such as this-

A setup like this gives very high dps in one area, often making a backend lalo/hog attack very difficult and spell expensive.
Eagle artillery
The eagle artillery is one of your most valuable defenses, and should at least be in the second lair of walls. You should have some sort of splash by your eagle artillery so no bats or skeletons can easily grab it.
The eagle is also a probable target for an electrone attack, so when building the eagle area make sure it isn’t tightly packed, as edrags will get a lot of value if it is.
Xbows
In the current meta the majority or all of your xbows should be set on air and ground. Xbows shouldn’t be walkable in locations that a qc is likely.
Personally in the current meta I like to have my xbows in a farm, meaning that they are clustered together like this-

Having your xbows like this makes queenwalks very expensive ( spell wise ) and risky to attempt. Generally the town hall is a good place to have an xbow farm next to.
Air Defence
Air defenses are mainly meant to defend three things, hounds, drags, and healers.
Hounds
For optimal hound pathing your ads should be in a rectangle shape, having them evenly distributed throughout the base. Here is an example-

Take note that it doesn’t have to be a perfect rectangle, just kind of in that shape.
Drags
I like to have one or two of my air defences in the second lair of walls to defend against drags. Having them in the second lair of walls means that drags get targeted for longer, thus killing them more effectively.
Healers
If you think a qc is likely in an area having an air defense to target healers is smart. To set this up you want to make sure the queen’s path is offset by the ad, here is an example-

Ok, so the pink is the queen charge, and the blue is showing the air defense. Notice how while the queen is dealing with the inferno and cc, the air defenses will be picking off her healers. What makes this a really good example is that the queen can’t reach the ad from any of the compartments she is going through.
Wizard Towers
Splash distribution is very important due to the rise of bats. Your wizard towers should be evenly distributed throughout the base, and should never be freezable with an inferno tower.
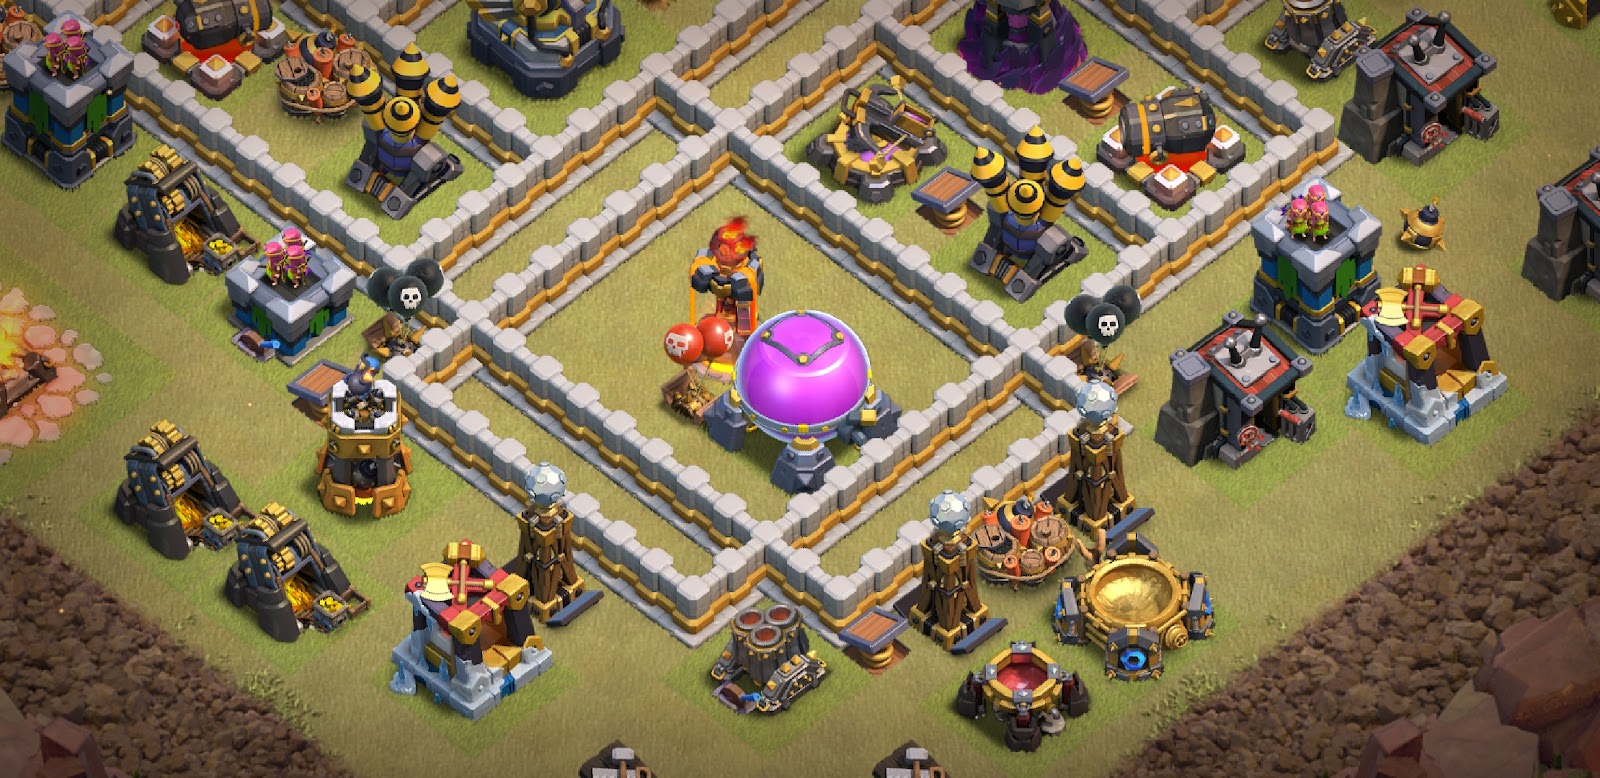
Here is an example of an inferno and wizard tower being freezable-
Here are two examples of a non freezable inferno and wizard tower, notice how the diagonal tile is different from the linear ones.


Also keep in mind ice golems when placing these. You don’t want a wizard tower being tanked by an ice golem. To prevent this you can either place wizard towers in the 2nd lair of walls, or adjust your outer ring of defences accordingly.
Air Sweepers
Air sweepers are very important as with poor placement, queen charges, electrones, and lalo will dominate.
Generally you want these facing in opposite or semi opposite directions, as the coverage needs to be fairly even for optimal efficiency.
If you think an electrone attack is likely on your base, it’s a good idea to have one facing the queen as that is what most attackers are looking to get. The other sweeper should be facing either the town hall or inferno tower in a place where lalo is likely to start.
Generally you want the sweeper range to end just outside the base, here is an example-

Having the range end outside the base makes sure that the sweeper doesn’t come in too late.
Bomb Tower
A bomb tower has two main uses, to cover the queen from skeletons, and to act as an extra giant bomb.
In the current meta mass hog is a popular attack. What the attacker will do is bring 40+ hogs and basically spam your base, they will normally take out your queen with a skeleton spell. To prevent this your queen needs to have some kind of splash close to her, and since the bomb tower only targets ground it is perfect for the job.
Keep in mind that the bomb tower is also a giant bomb, and should be treated as such. Space these away from each other and other giant bombs, as having them clustered will give the attacker a lot of heal value.
Archer Tower
The archer tower is one of your not as important defenses. I mean, they are important and placement should be thought through, but these aren’t top priority when building.
At th12 many of your archer towers will be in the outer ring of defences, as this frees up walls for things such as dead zones and more elaborate major defence comps. Try and keep these fairly even throughout the base, as they are good at taking down drags.
Your geared archer tower is like a xbow, with a smaller range. You can use this to help prevent a sui, or just increase the damage in a valuable spot.
Here is an example-

Notice How a sui is more difficult because of the placement of the geared defence.
Because many of these should be outside of the base, you have an opportunity to disrupt pathing. For example-

Notice how you can use outer defenses to path troops the way you want. In this case i used them to path things away from the inferno, but you can use them to path away/towards anything.
Cannons
These are basically a ground archer tower, and everything I said above applies ( besides being air targeting )
The only difference is that the geared cannon is very good at killing a wall wrecker. Simply have this in a likely starting place of a pekka smash and likely the wrecker will not get as far as you would expect. These are also effective at killing tank troops such as the golem and ice golem.
Mortar
Mortars aren’t really that useful unless you’re defending goblins, always have these in the outer layer of defences.
The only thing to really consider with mortars is to not have them bounceable, see trash section for details.
Defencive clan castle
Your defensive clan castle is one of the most versatile defences in the game. You can use different combinations of troops to prepare for different attacks.
There are two main types of fills. A damage cc is meant to be a nasty surprise for the attacker, and can ruin a backend. A time cc is meant to slow down a sui or queen walk/charge, this can lead to a time fail.
Here are some good th12 clan castle fills-
Hound-2 loon
This time fill is mainly targeted towards a queen charge, as she will get stuck on the hound and loons, which could cause a time fail.
Double drag
This damage cc is meant to be a nasty surprise for attacks such as a backend hog/loon. The reason for this is that in the current meta many attackers will expect a hound, and plan their whole attack around that.
Double witch-baby-loon
This time cc is more versatile, as it does a bit of damage and slows down troops. It can be nasty for a backend or effective on slowing a queen charge.
Other cc combos can work, but in the current meta these are very effective.
King and Queen placement
Your king and queen are very useful when defending, as they have unique aspects. The king has so much health that it’s impossible for most troops to take him down by themselves. The queen’s high dps is notorious for ruining attacks.
King
Because of the king’s vast health, he is very useful to stop queen charges and suis. I would recommend that you place your king by the town hall, just because that’s what many attackers are looking to get from a sui/queen charge.
Here is a good example of king placement-

Queen
Because of the queen’s high dps and inability to be targeted by loons and hogs, she is a top priority to get with a kill squad. To prevent a cheap queen grab she shouldn’t be suiable, and should always be in a fairly central location.
Here is an example of good queen placement-

Traps
Giant Bomb
These should always be between 2 defences. In addition to having these inside the base a great place to have them is in the outer layer of defences, as often the attacker expects to heal inside the base, and it can be a surprise to have to use a heal on the outer layer of defences.
Here are some examples of good giant bomb placement-

Also these generally shouldn’t be by infernos because those are your biggest dps dealers and will be healed over in most cases, basically in the current meta you want to out heal your opponent, making it to where you have spaced your gbs so they don’t have enough heals to cover them all.
Spring Traps
Spring traps are your main defense against hogs, because of this you want these to be primarily on the backend, or opposite side from a kill squad entry.
These should always be between 2 defences and generally these defenses should have a 1 tile gap between them, as having them like this means that no matter what way the hogs are coming from, it will be just as effective.
Here are some good and bad ways to place spring traps-

Tornado Trap
The tornado trap can devastate attacks if used properly.
Personally I believe you should always have this between two major damage dealers ( inferno and town hall ). The reason for this is it creates a situation where no matter where the attack comes from, the troops will be stuck within the range of a high dps defense. The trap should be at least 3 tiles away from any major defence, as you don’t want troops to continue attacking while it’s activated.
Here are two examples of good tornado trap placement-


It’s always important to try and have this on the backend, as it’s way more effective on the backend versus a kill squad or queen charge. Also keep these away from air defenses, as you don’t want hound pups to waste it.
And don’t forget to make sure that hogs/loons will path to it!
Air Bomb ( red )
Red air mines, or RABs, are considered the most important trap when defending loons.
So when placing these there are two main rules.
Always have these by defences, as loons are defence targeting troops. And keep these away from air defenses because you don’t want hound pups wasting them. For reference: a hound’s pup diameter is about the same as the air defense’s range.
Also try and keep these evenly distributed throughout the base. And you can double up on these to force a heal.
RABs go great with infernos and wizard towers because those three elements of splash demolishes loons.
Seeking air mines ( black )
Seeking air mines, or SAMs primarily are used to defend three things, hounds, queen charges, and the stone slammer.
Hounds
For hounds it’s quite simple, just have them by the air defenses so when hounds path to them they get popped.
Queen charges
So defending these is a little more complicated, as you have to predict where the opponent will start from. Generally a safe bet is to find where your highest concentration of value is, then place the SAMs inside or by the first layer of walls. I don’t place them in the trash because they will easily get triggered by a coco loon.
Stone slammer
So this is quite similar to the queen charge paragraph above, you need to be able to predict where the attacker will choose to drop a slammer. Generally if you have an exposed inferno or town hall those are likely locations for a slammer to be dropped.
Small Bombs
Small bombs should be used to kill wallbreakers. To do this you should have them on the third tile away from the wall on a linear line, and on the second tile on a diagonal line.
Here is an example-
Do not use witch bombs as these are not meta anymore!!
Teslas
Good tesla placement can ruin attacks. You have three options when placing teslas, you can make funneling difficult, have a tesla farm, or have a troll tesla.
Anti funnel teslas
There is nothing better than watching an attacker funnel fail on your base, especially after you meticulously arranged the trash. Funnel teslas are there to distract defense targeting troops, and to pick off a funnel bbd/wizards.
Here is an example of a good funnel tesla-

Tesla farm
A tesla farm is a group of teslas ( 3 or more ) all in a single place. These normally should be on the backend of the base, and shouldn’t be easy to pick out in scout mode.
Here is an example of a tesla farm-

Troll tesla
These can be useful in creating time fales. A troll tesla is a tesla placed in a corner of the base, away from everything else. These are only useful for the first attack on your base, as an attacker can take it out with two loons loon if he knows the location.
Trash buildings
Trash buildings are one of the most critical (and most overlooked) aspect of a base. To have good trash placement there are three main things to think about, making funnels expensive, bounceability, and funnel by key defences.
Making funnels expensive
The last thing you want is to have an amazing base with poor trash. If an attacker can clear a whole corner with a single baby dragon or a few wizards then he can have more good troops ( hogs, loons, ect..) in his army.
To prevent a cheap funnel try and have your corners more complex. Here is an example-
Notice how in the bottom example a single bbd or wizard wouldn’t be able to take out all the collectors before the archer tower killed it. In the top example notice how a single bbd would easily clear the whole corner.
Bounceability
The most difficult part of placing trash is making sure people can’t get an easy funnel with a bowler bounce. To make sure they cant you haft to place higher hp buildings ( storages, dark drills, outside defences ) in the inner layer of trash, and lower hp buildings ( collectors, mines, barracks, spell factories, camps ) in the outer ring of trash.
Here is an example-

Take note of how in the bottom section nothing is bounceable, while in the top section the arrows represent everything that is bounceable.
Pro tip- you can use defences to make sure a building isn’t bounceable. You just need to make it to where a defense kills the troop before it destroys the building.
Large Buildings
So large buildings such as camps, the siege factory, and laboratory have some special rules.
These buildings are large, and have low hit points. Because of that there are a few rules you should follow.
- Always have these on the outer trash ring
- Never have these bounceable
- And use these to your advantage, used right these make funneling very difficult.
Here is an example-

Notice how after the camps are destroyed, the troops will path to the left or right, not going straight.
Mortars
Mortars are the one defense that can be bounced from collectors and mines. To prevent this you can place them behind your large buildings, or place them in a single lair trash line.
Here are examples-

Funnel by key defences
If you choose to have an inferno or town hall slightly exposed, make sure funneling there is a nightmare. As if it isn’t, attackers will take advantage of it.
In these examples take notice of how it would be very, very expensive to funnel in these areas-

Edrags
Because of the dragon’s chain lightning, your trash should have proper spacing.
Here is an example-
Notice how on the bottom example the two tile space makes the edrag’s chain lighting ineffective, but on the top the edrag would be able to clear the whole area with ease.
Inside an attacker’s mind
One of the most difficult things to do is understand what attackers are looking for and how that correlates to your base.
Pekka Attacks
Generally the attacker is looking for a boxy base with large compartments, also without many dead zones and channels. Having boxy bases with predictable pathing allows them to just spam their attack place some spells and watch the three star happen.
Queen Charge
With a queen charge the attacker is looking for 2 or more major defences in close vicinity. This is why the value distribution and walkability rules are so important, because the one time you don’t follow them an attacker will take advantage of it.
Hogs/loon
The top priority for these attacks is creating good pathing with your kill squad or queen walk. Generally the main goal is to make an L shape for your backend. It’s important to implement complex pathing to split troops up, as in the current meta loons are so overpowered that if you can get that L shape, it’s an easy attack.
Electrone
Generally the attacker is looking for a compact area with lots of value. To prevent these you can have good spacing and value distribution and place air skeletons accordingly.
Drag and Minor attacks
So generally the attacker is looking for a narrow base, with trash that is easy to funnel with a king so the troops stay in. with drags they are also looking for exposed air defenses.
Skeleton Building Method
You will generally start out with a certain major building comp in mind ( th, it, ea ), this comp is usually inspiration from other builds.
After you’ve finished your 1st major building comp you start making regular comps around it ( keeping in mind the value distribution rules )
After all comps are done and your happy with the general design, start with the other defences, then trash, then the traps.
After everything is done and your happy with it get a review from an experienced player, As we all miss things.
Here is a very helpful video of a guy making a base live- https://youtu.be/27GT3YXXI5I
Go check out Augie’s guide when it’s released, it will go into great detail for starting a build!
Live Build

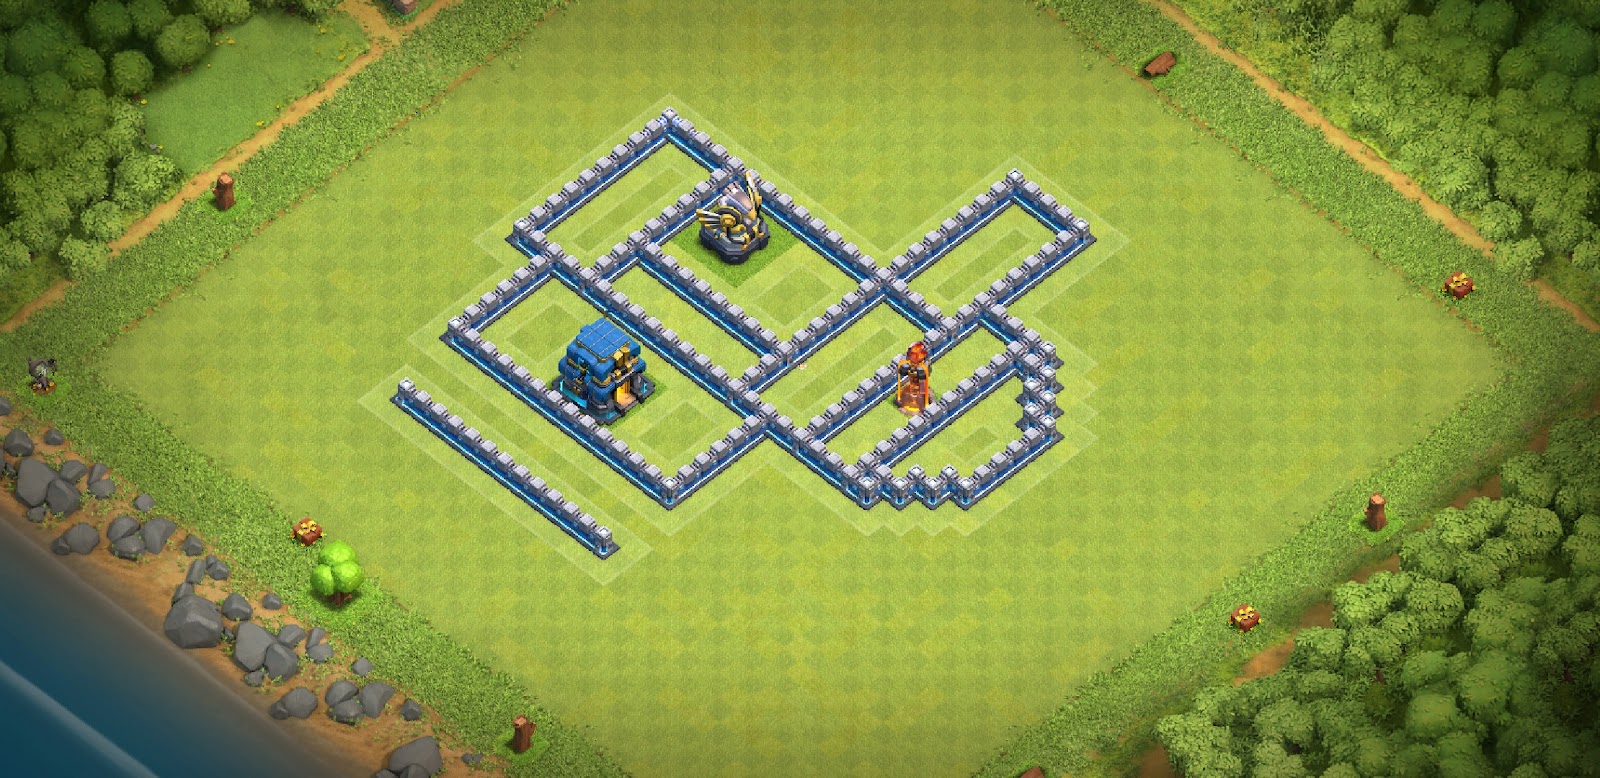
Ok, so I start out with a major defence comp i liked. In this case it was a town hall comp.
I start thinking of how I want to develop the base and where should i place my major defences. I add on an eagle comp and some regular comps.
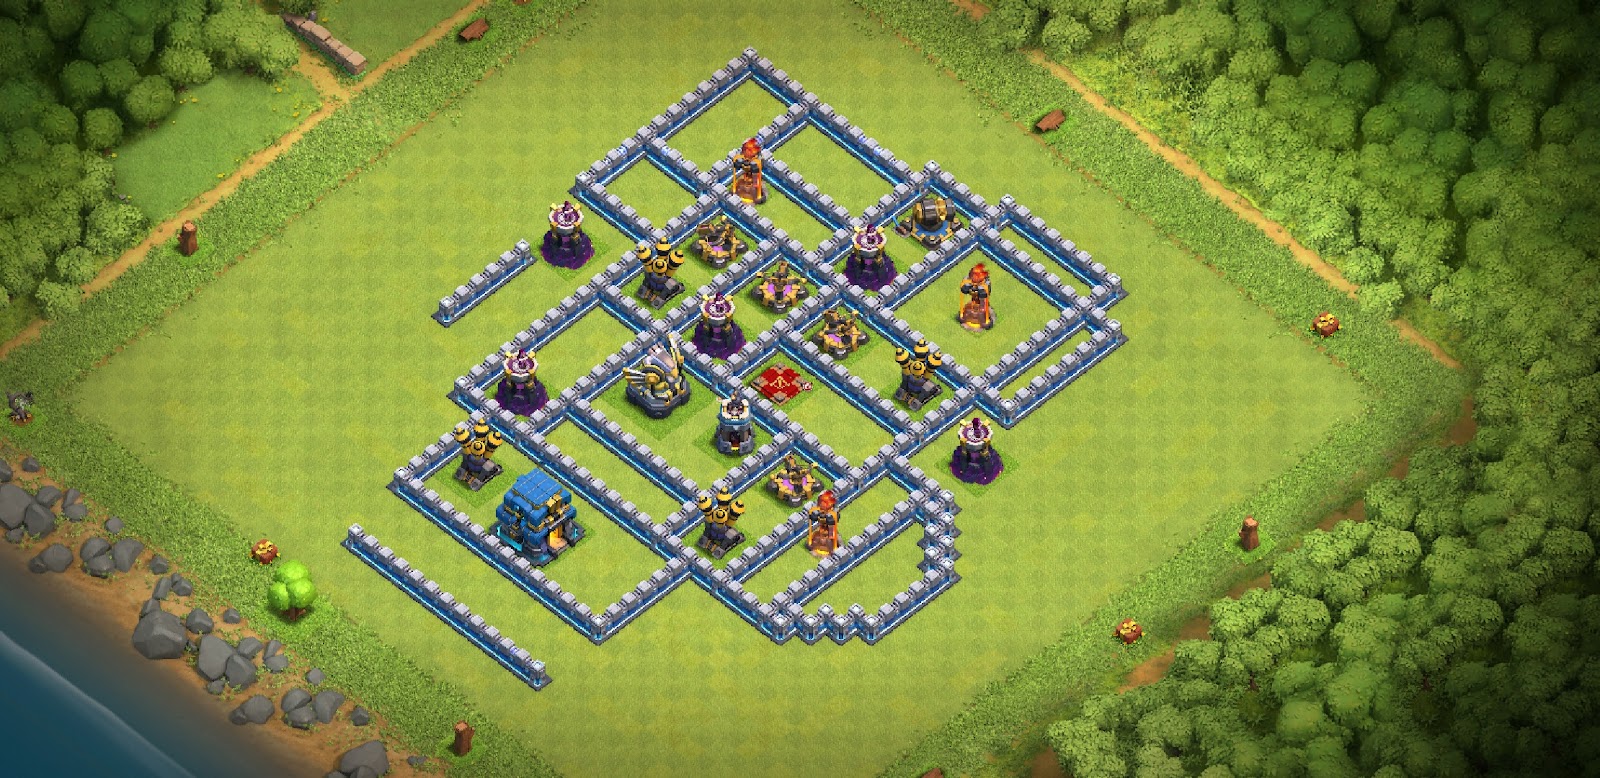
Now i add on my first inferno comp. I’m keeping in mind the value distribution rules as i am going.

I add on the second inferno comp.

I place the last major defence, and notice I need to rearrange my 9x9s and 9x10s to make my value distribution and pathing better.

Here is how i rearranged those comps

Ok, so now that i’m happy with the general design i start to place some of my buildings.
Because of the way i had my inferno towers i had a hard time placing the wizard towers. I ended up having them like this.

I start to place my outer defenses and trash buildings.
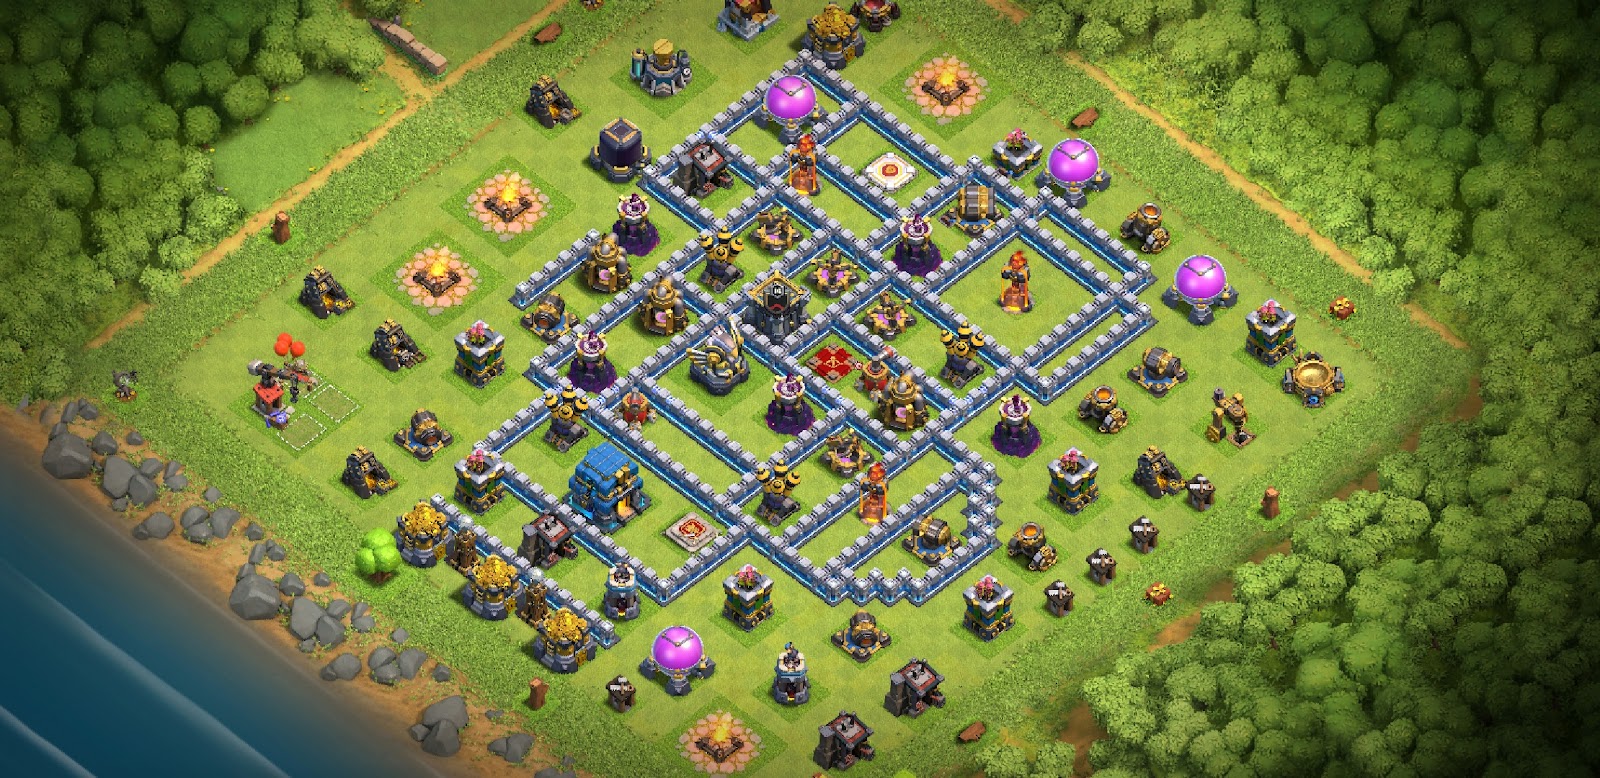
I finish the trash buildings.

And then i place the traps and adjust some minor things to finish the build.


