Firstly I want to say a massive thanks to Blue and JDizz for proof reading this short guide, alongside others who helped test this base or further proof reading this guide!Introduction
So before we get into my step by step build guide, it is important to note that in this guide that I’m assuming that the reader already knows basic trap placement and the basic fundamentals of TH11 Base Building, this guide will consist of a step by step build, my thought process when building a solid base, advanced building techniques and I will also explain how to get base ready and prepared for league play, so without further ado let’s get straight into it…
- EA Placement
Your Eagle Artillery placement at TH11 is the make or break of a build, I personally have 2 ways of using my EA in my builds…
- Cored EA – Standard EA placement, overall solid against everything but not exceptional against anything either, one of the cons of this technique is the fact that due to the centralised placement of the Eagle, it gives the attacker various options if he/she were to enter with a charge, now a scenario like this is harder to manipulate into the builders favour because to force a certain entry with a cored Eagle, you have to offer up one of your other values, if you can predict entries, it makes trapping a base a lot easier and this is more difficult to do so with a cored Eagle but also note that the EA would go down much later on a charge opposed to an Offset EA
- Offset EA – Personally my favourite technique, Very easy to predict certain entries, very strong against KillSquads, PBB and other WW/BB attacks, can be weak to pekka smash and a backend lalo/hogs/miners but within the guide somewhere, I’ll explain how you can counter that, with this technique it’s a lot easier to get better value spreads and not only that but it can very easily bait an attacker to hit from a certain angle if the builder is clever with the placement of the surrounding defences and trash
Note: For this step by step build, I will be using an offset EA
2. Live Build
Skeleton Phase
For the live build, I will be separating the entire build into different sections so that different phases do not get mixed up with one another.

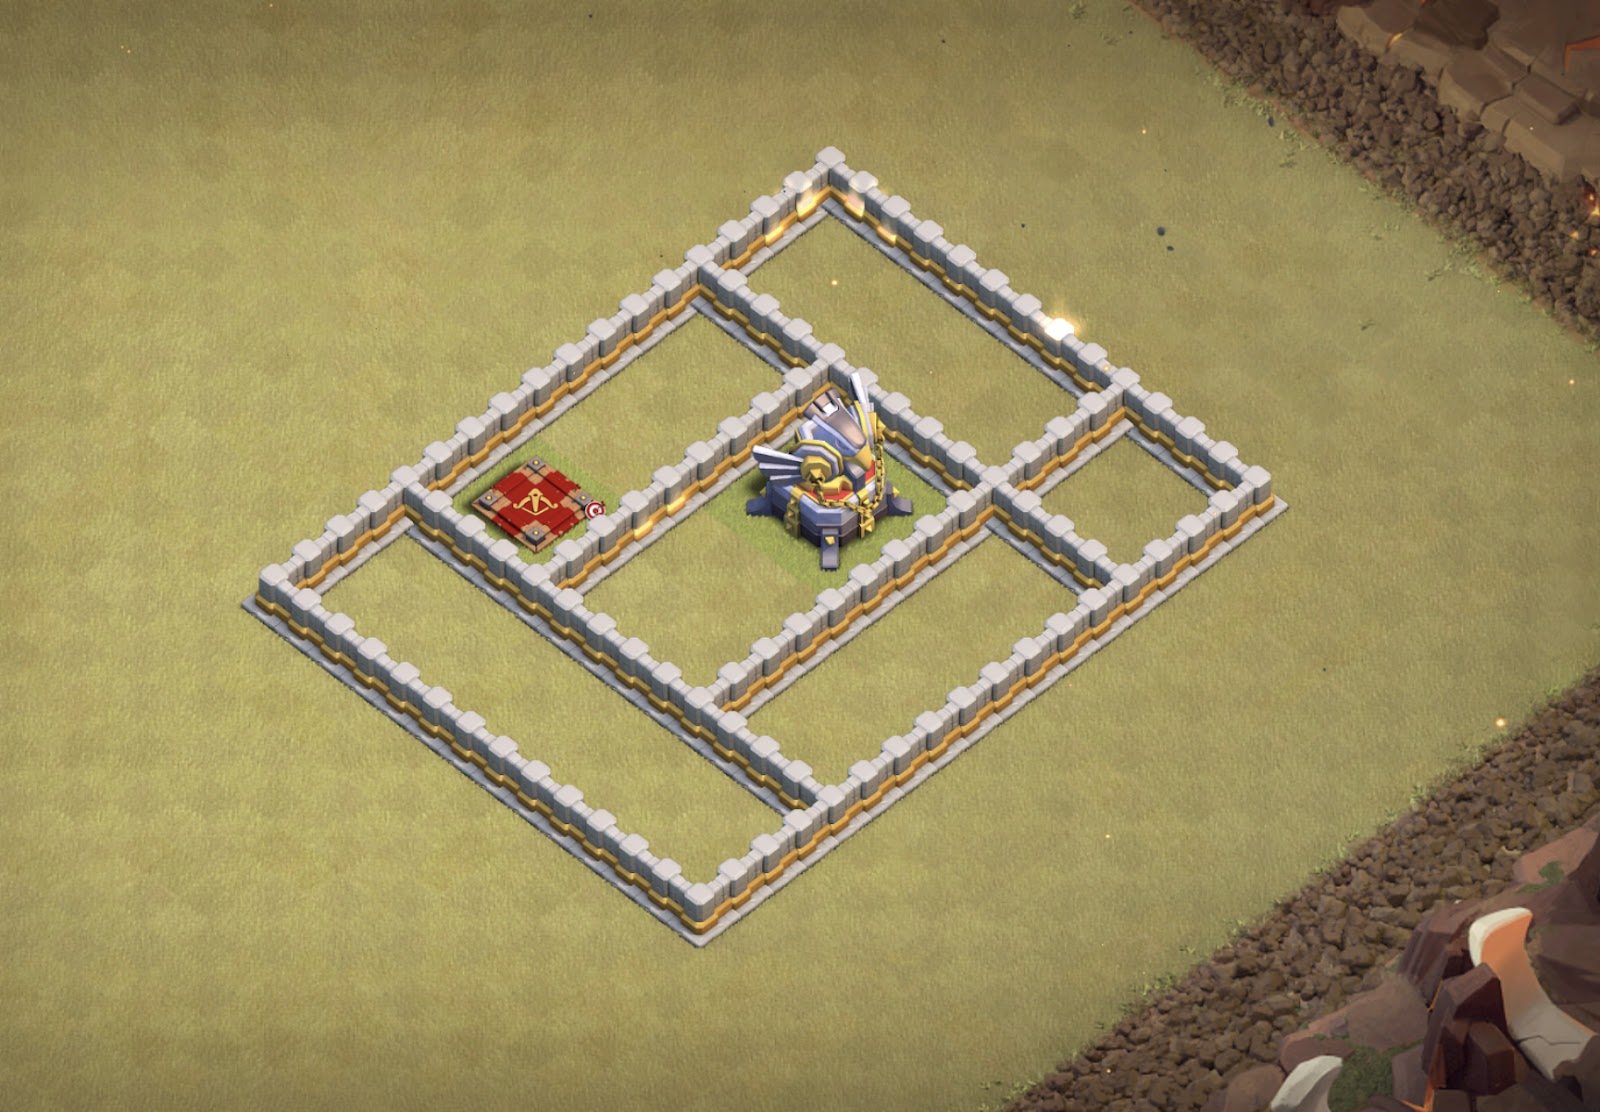

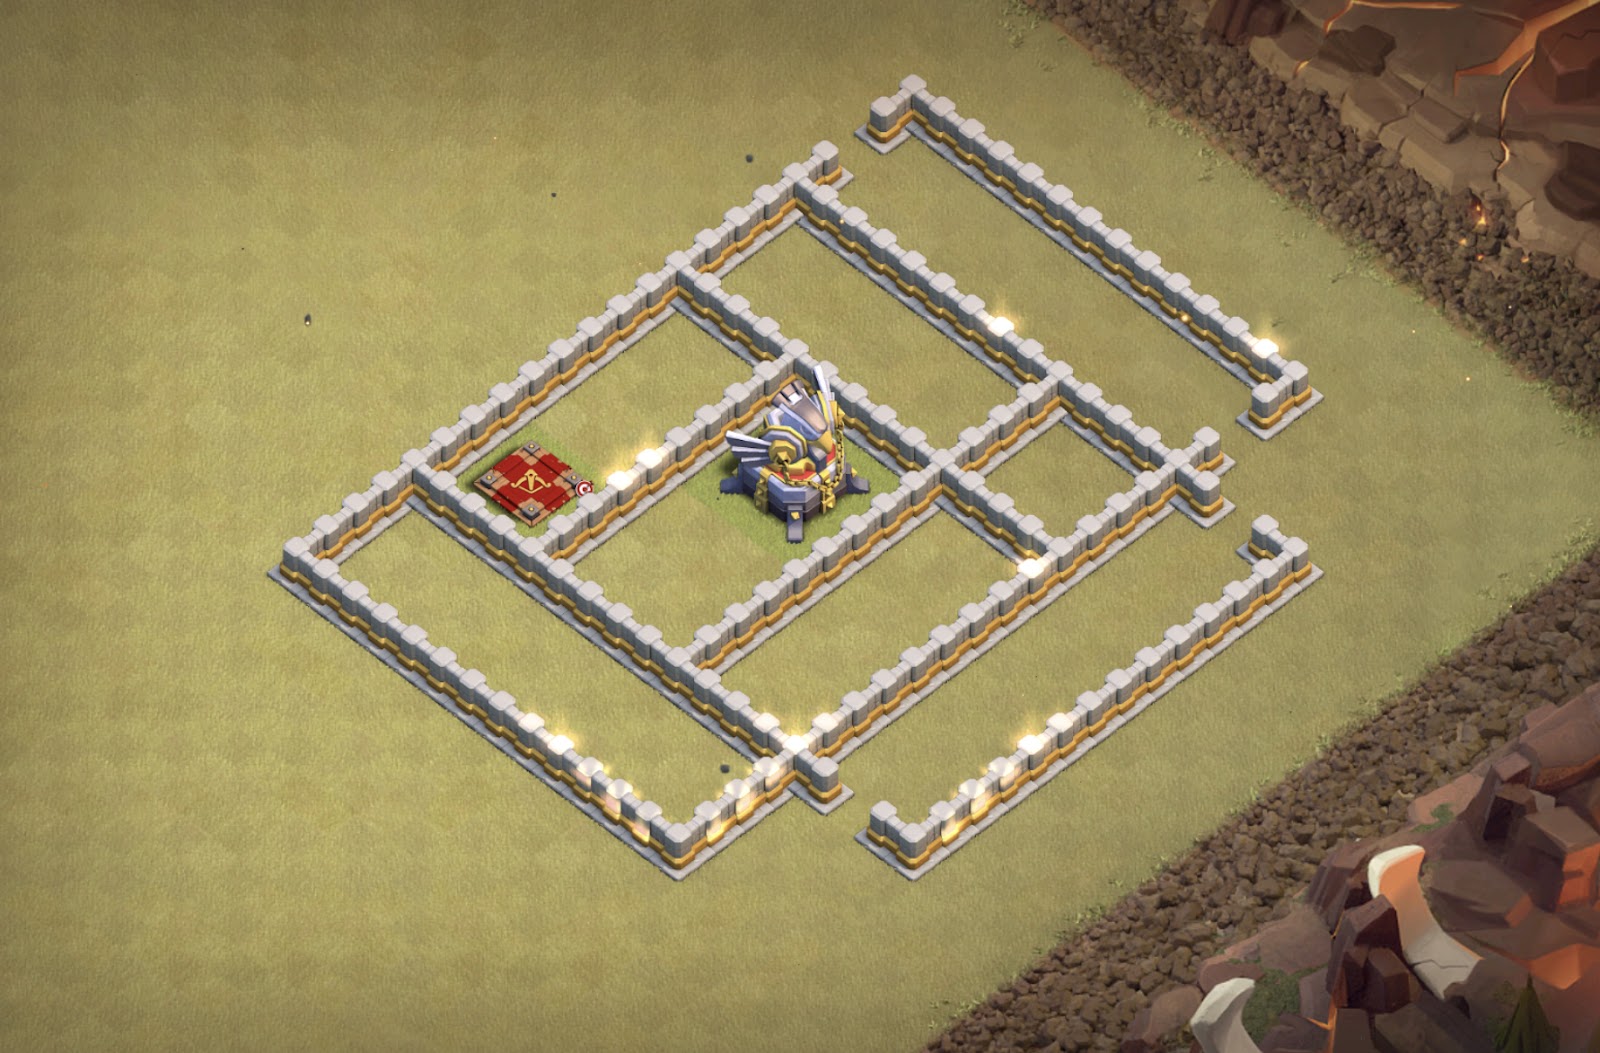


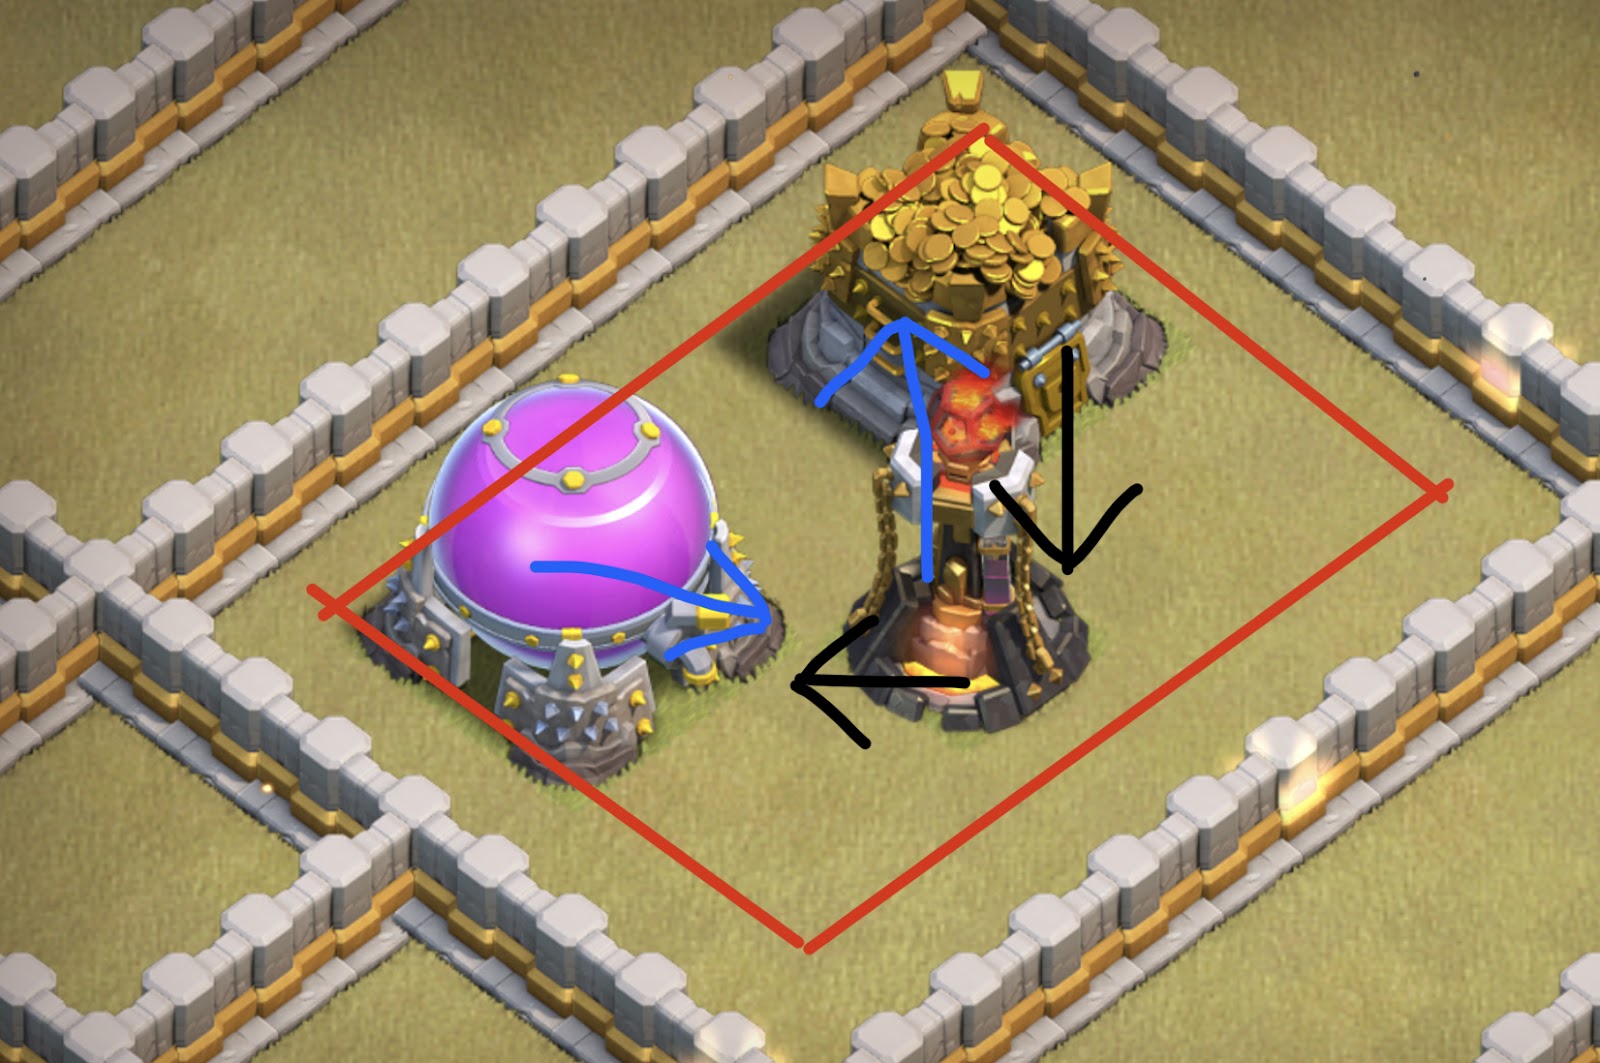
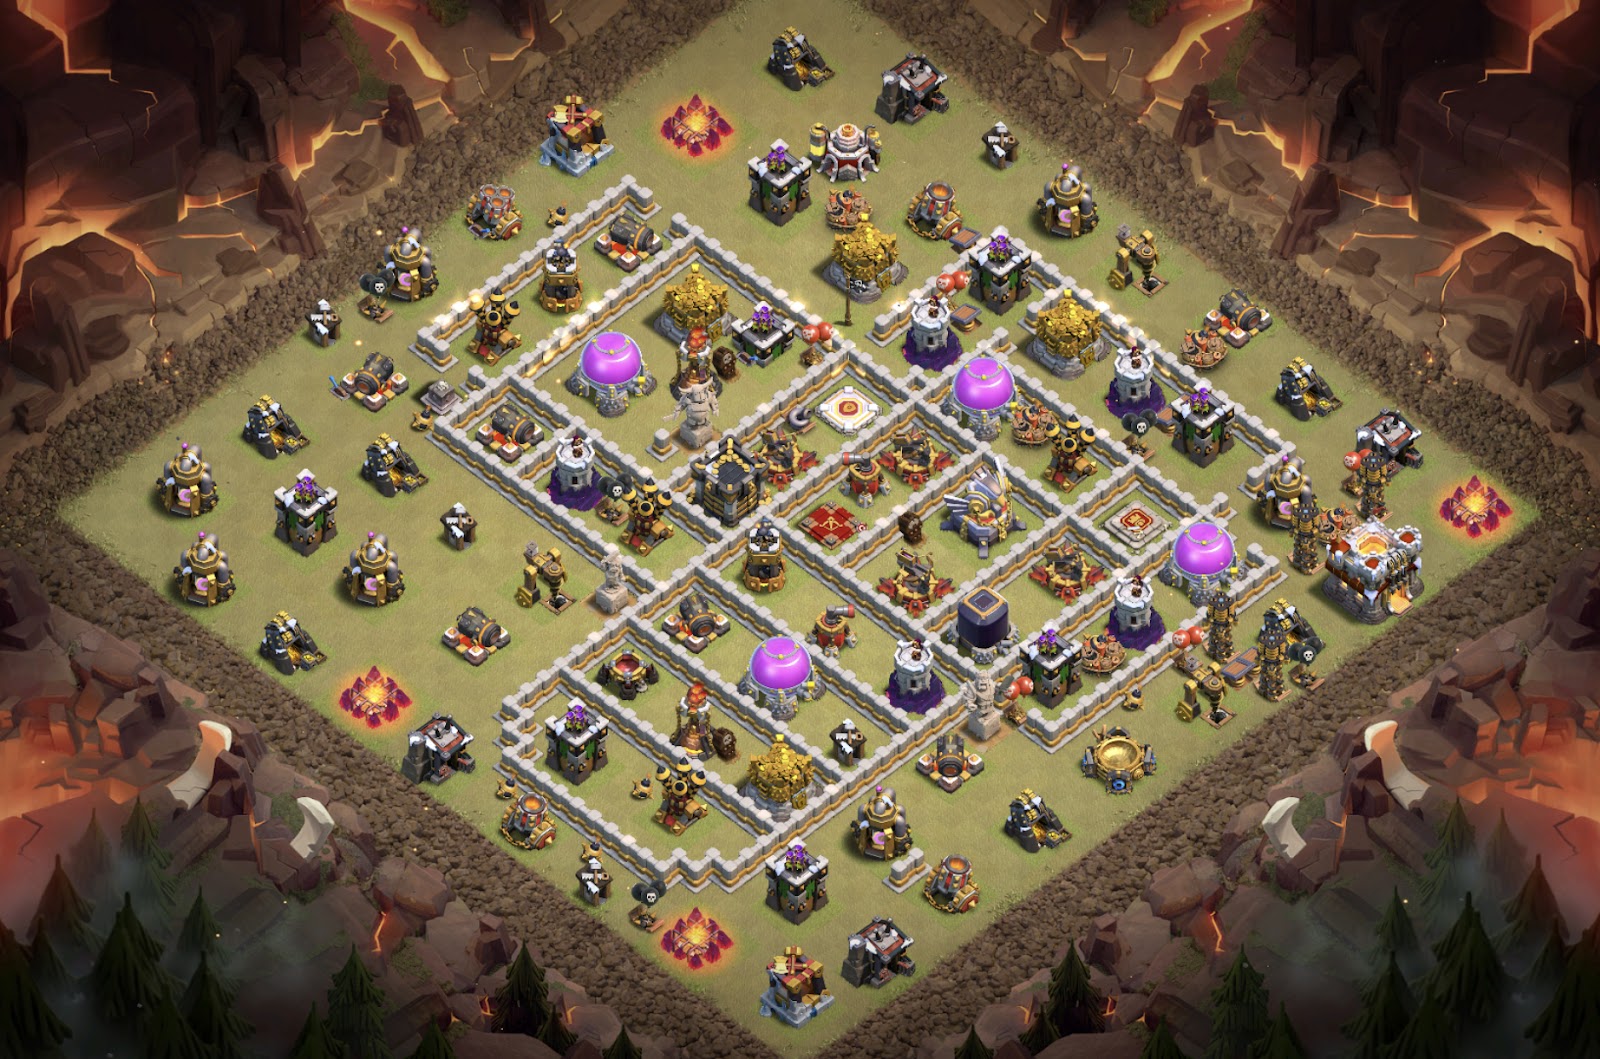
Okay firstly, we shall be starting with our EA compartment…I will be starting off my build with this set up, it’s very reliable, simplistic and very easy to branch out from, I personally don’t like huge 10×10 cores just because of the insane bowler bounce value an attacker can get from it, if you have a huge core, expect to get PBB’ed, another thing with large cores is the fact that I believe that it just gives the attacker to much access to the base for a queen charge (if the attacking queen were to stand inside the compartment), so yeah that’s why I decided to go with this setup.Now I build using the skeleton (producing a wall layout first before dropping in buildings that aren’t your primary values) , always have done, it’s just way easier to produce good builds at a much faster rate, once you get more experienced using this technique, you’ll be able to produce solid skeletons in under 30 mins, another advantage of using the skeleton method is that it makes it much easier to map out the rest of the base ‘like an architect’ as the great JDizz once said, anyways back to the build, I’ve re-enforced my EA and Queen with some compartments.However I do not think that it is enough solely due to the fact if I leave like it like this, my EA is sui’able with 1 WB Layer and also due to the fact that pekka smashers can easily jump straight into my EA with a jump without any funneling difficulties, so we’ll make it harder for those 2 strategies I mentioned above.Now using these moats, it immediately makes it harder for any incoming charge, pekka smash and they can’t sui shit now, always remember to only have 1 tile openings on moats or otherwise it requires less outside funneling to get units inside the moat, I personally do not like closed moats because they trap your queen inside of it and forces her to go into the base which is not what you want; moats are literally your best technique to completely mess up funneling. Here is an exampleSo on this annotated image, the red shows a pekka smash with 1 WB layer and a jump straight into the Eagle compartment but if they were to use this entry then it would also mean that the buildings highlighted in blue would also have to be cleared otherwise like shown in the 2nd red arrow, the troops, especially bowlers will definitely not mind taking a walk towards 3 o clock, obviously it’s impossible to completely defend a funnel but as a builder, it’s your duty to make it as hard as possible, Also note the fact that an attacker being able to take out EA+Queen,makes it easier for QC Hogs/LaLo so it’s important to make that entry as hard as possible.The next thing to do after ensuring that your EA is protected is to branch off to your first Inferno Tower, feel free to drop your IT in your skeleton (It’s one of your primary values), one of other reasons I use Skelton method to build is because it’s a a lot easier to manage value spread, now immediately from this image we can deduce that the IT is well spread away from the EA and Queen.So, at this point, I’ve branched out my 2nd IT, so pretty much, all my values have been dropped on the map and this is when you wanna decide the TH positioning, also some of you guys may have noticed that I’ve already dropped some storages up at 10 o’clock, now someone of you dudeskis be like ‘Oh shit his base gonna be crushed by Edrags’, the answer to that is No and here’s whyNow the secret to making this storage+IT set up not be shredded to bits by Edrags is to limit the chain value from Edrags to just this compartment, now any structures inside the compartment touching the walls will allow the Edrags to get chain lightning into the base which is what you don’t want happen because it allows the attacker to get too much value and take advantage of poor placement.
If you’re thinking, ‘why storages?’, it’s simple really, miners are extremely strong in the current meta and will shred bases if the opportunity is there but storages are quite literally the kryptonite for miners, they get slowed down so much by storages which gives surrounding defences enough time to really get to work on them.

Another reason why I chose storages is because this IT is near a KillSquad entry, now using storages I can severely slow down his push opposed to other trash or low Hp defences and slowing it down again allows surrounding defences more time to get to work on the troops but also it will probably stall for enough time for EA to get another round of bursts on the troops.Now the skeleton is finished, the best thing to do now is review the skeleton and evaluate the value spread, right now I think it’s looking pretty solid, if it doesn’t look right and you can’t change or make adjustments to fix the issue, now is your time to scrap, do not waste your time placing everything and trapping, The key aspect to every build is value spread, and if that isn’t nailed, you shouldn’t carry on with the build because the ones from my experience where I’ve carried on regardless of errors are the ones that haven’t defended too well for me, now you guys may ask, ‘how do you a skeleton is good?’ The answer is simple, take a look and assess the value spread
This is my checklist:
Can the EA be easily sui’d?
Are my infernos too close to each other? (Acceptable in certain value spreads)
How much value can a Kill Squad get from a certain angle?
How much value can a charge get from a certain angle? (by value I mean how many of those 4 values that are placed on the map)

If your answer was No to the first 2 questions and limited value to the last 2 questions, then you’re ready to proceed to the next step As some of you guys may have noticed, i extended the 2 o clock moat to give a charging queen/pekka smash more required buildings to clear in order to establish a solid funnel and get everything to drive into the base.
Fill In Phase
Now that the skeleton is complete, we are ready to actually fill it in and make something awesome.Right so as soon as the skeleton is finished, I start my ‘Fill In’ phase by placing WTs and ADs, these 2 types of defences are very crucial in terms of your build, increasing resistance against Air Attacks, such as LaLo, Dragons, Edrags, Slammers and etc.
AD Placement
In the current meta, LaLo is stronger than ever so try not to have a rectangle/diamond AD formation because it creates really nice anchor points for the LaLo
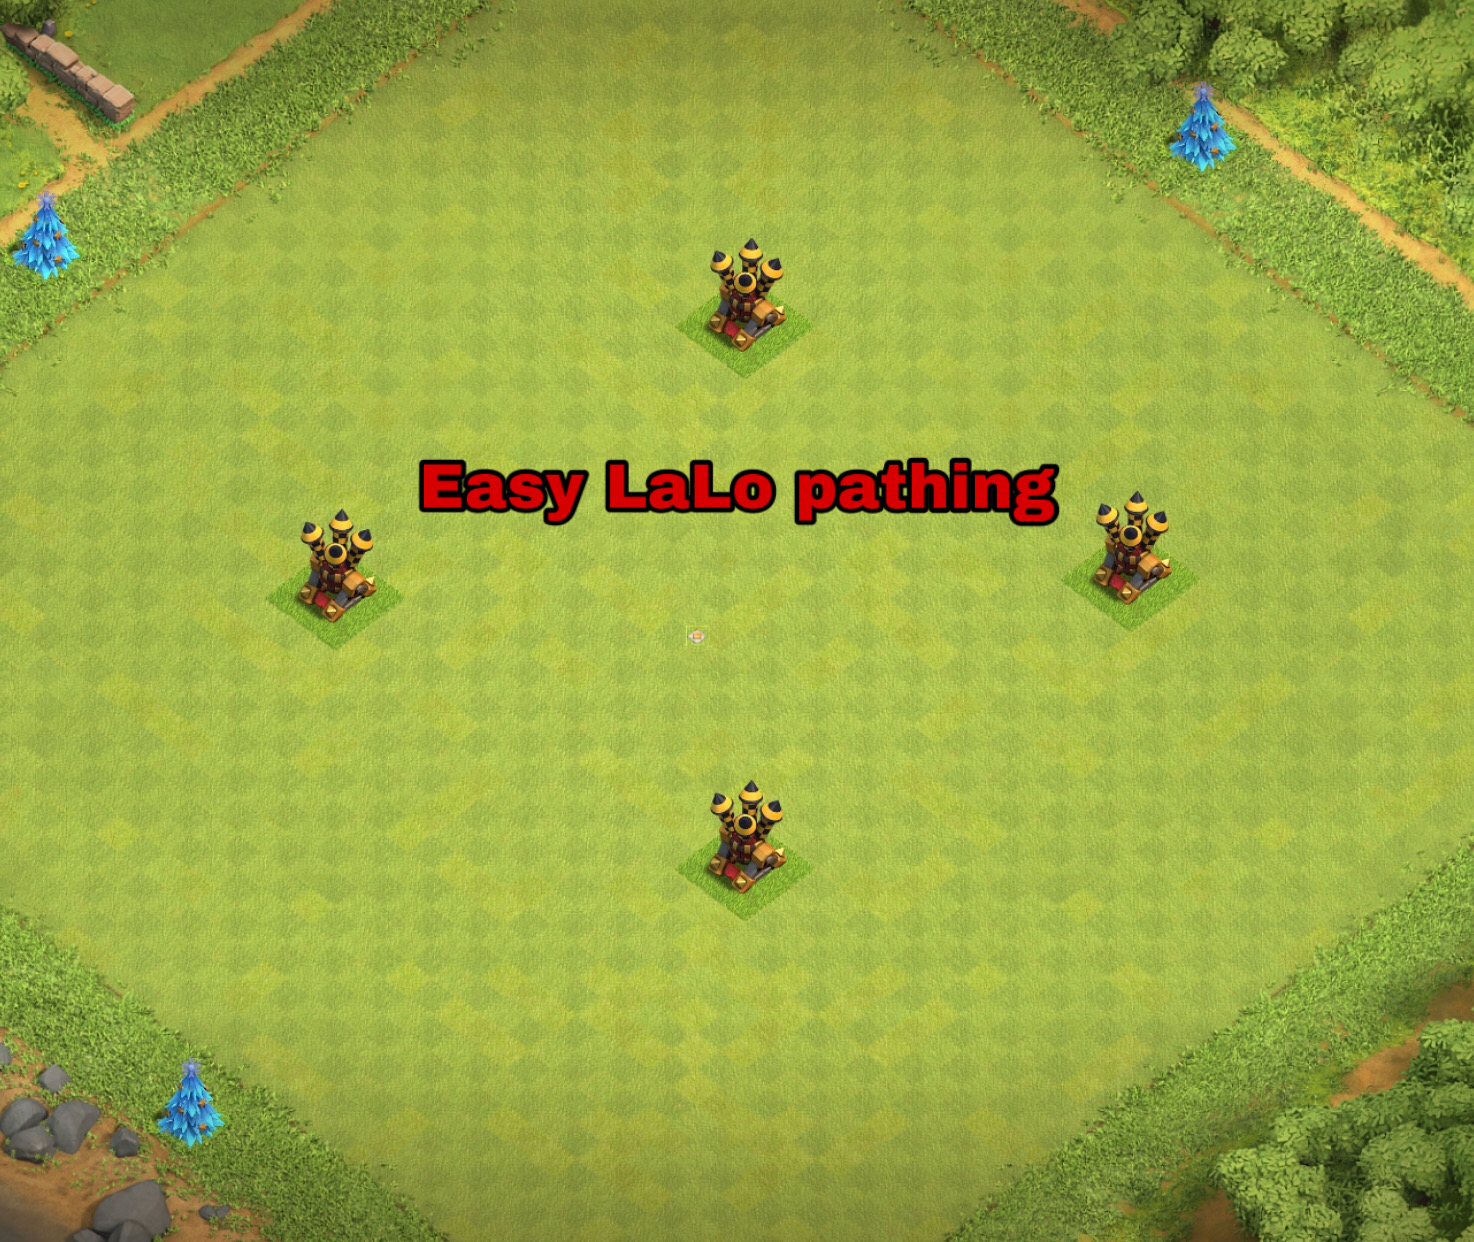

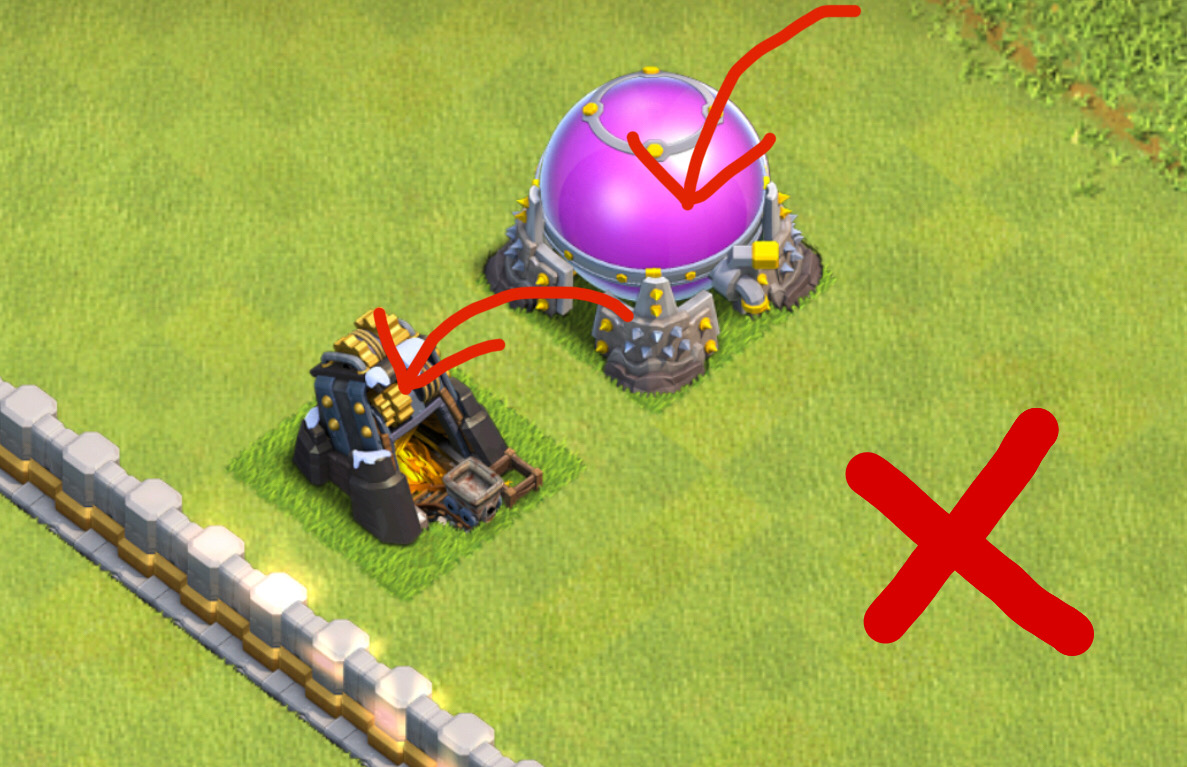
Now this is an example of easy LaLo pathing because the anchors are in a diamond formation and it offers really good tanking for the LaLo and very smooth LaLo Movement, Using a sui to take a out one of the ADs just offers really good pathing, here’s what I meanAs you can see on this image, a sui on any of the air defences just leads to a very easy execution LaLo

Using an AD formation like this means that the base will have areas where it will be difficult for loons to travel because the hound no longer offers the same tanking and clean LaLo pathing like the previous example.
WT Placement
So WT placement is pretty straight forward in the current meta, there are few rules that you should always follow when placing a Wizard Tower
Checklist:
Is it freezable alongside another IT or WT?
Is it tankable using an Ice golem from outside the base? (big error which makes a batwave a lot easier if you have multiple of these in your base)
Is it overlapping an AD? (Should only have 2 of those in your base maximum, anymore and it’s easy work for a LaLo)
Is it already in a spot with plenty of splash coverage? (Splash spread is vital at th11 unlike th10 and you must have splash spread throughout the entire base otherwise Dragbat attackers will take advantage of this and crush bases)

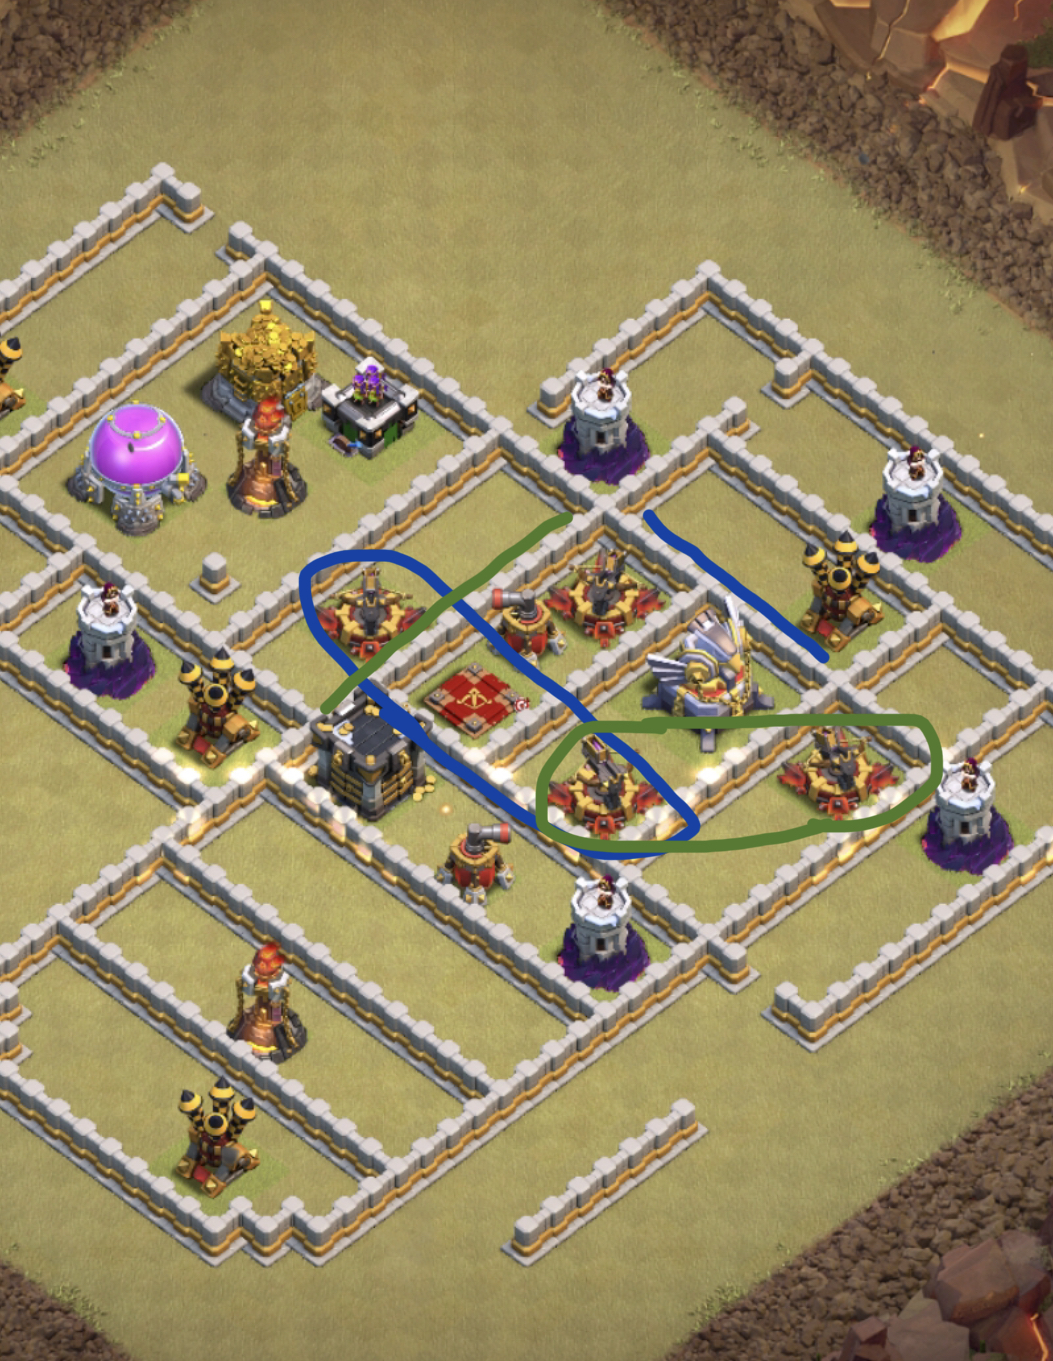
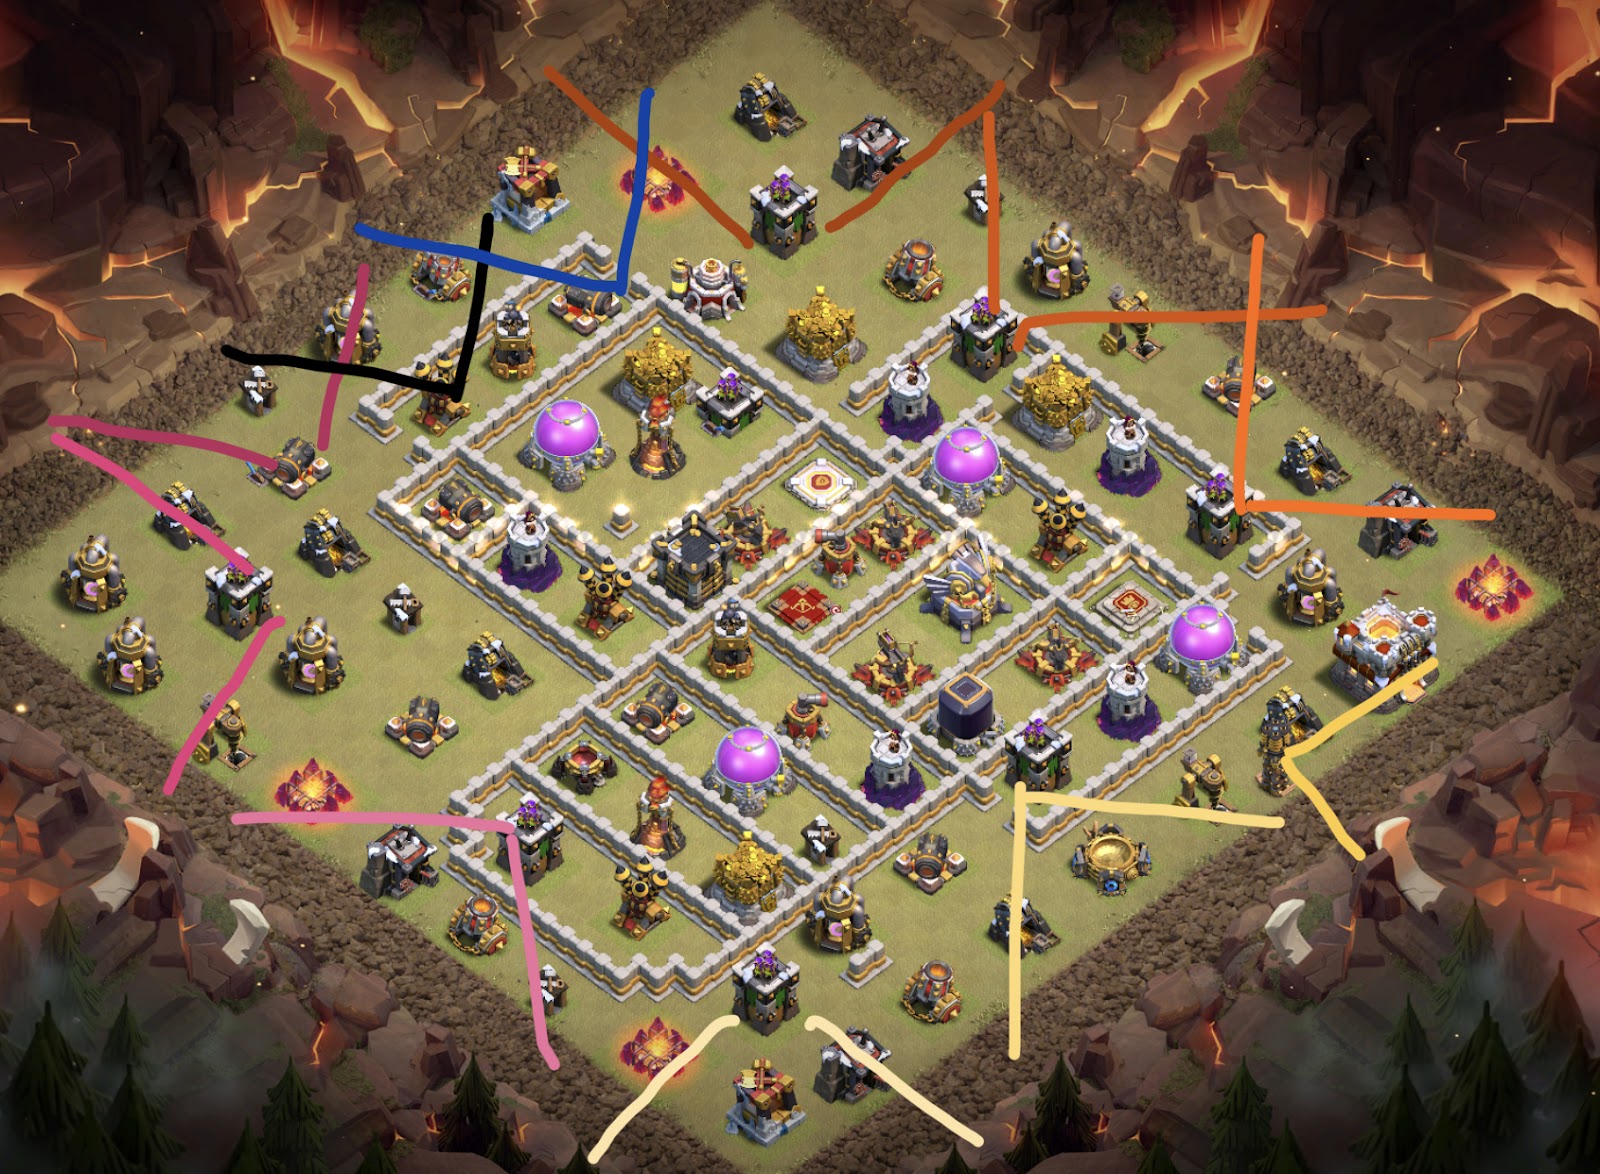
Next I placed CC, Sweepers and Xbows, these structures are of high significance because Xbows can be used to completely fuck up a charge from any given angle if the placement is right, what I like to do when placing Xbows is to make sure they’re covering Queen and EA (because they are the primary targets for a charge), another tip I have when placing Xbows is to make sure that the attacker shouldn’t be able to freeze 3 or more of them simultaneously, but it’s also important to make sure that an attacker can’t get 2 or more Xbows with any given charge, here’s an exampleAs you can see, I’ve colour coded 4 examples, the line being where the queen would stand and the circled Xbows showing which ones would still be up to force rages or queen ability, big up StewDog for being the founder of this OP Tip.
Sweeper Placement
Sweepers are pretty much one of the first things an attacker looks at for base identification when doing an attack with any sort of air portion, it’s crucial to make sure that your sweeper coverage is as tight and solid as possible.
A ‘good’ sweeper setup should cover at least Queen, EA and 1 IT, if it does not cover at least these values, then it’s not great and will possibly open up multiple different entries which as a builder you want to narrow down entries for certain strategies to 1 or 2 entries (1 preferably)
Geared AT
Now you guys are probably wondering why I’ve placed an AT so early and the explanation is simple, it’s a Geared AT, this thing is an absolute beast and it’s placement is key to get maximum value out of it, this thing shreds through anything extremely fast and I’m going to explain a little bit about its’ specific placement

These 3 defences combined is extremely Lethal to any type of troop, WT+ IT offer protection against loons/hogs/miners whilst the geared AT offers protection against more tanky troops like dragons that the WT+IT is weaker to.
One thing to note is that the Geared AT should never be next to an AD, ‘why?’ Because it’s just going to be tanked by a hound making it completely useless.
Okay, now every building of significance has been dropped in, I will now complete the rest of the interior of the design and will come back to talk about trash rings!

Okay so the interior of the base is complete, one thing to note is the Bomb Tower placement, you always want to have at least 1 of them beside your queen to protect from skelly attacks…
Now, let’s talk about a solid trash ring, I personally think that the term ‘solid trash ring’ means a trash ring with minimal bowler bounces, easy baby dragon funnelling, Anti E-Drag funneling areas in an area where EDrags may be a popular option but overall an exterior to the base that makes life difficult for the attacker.
OP Trash Tip
One of my personal methods of ensuring I have a solid trash ring is to make sure to be smart with AT and cannon placement.
Archer Tower- OP against any type of funneling, use these wisely as good placement of these will 100% not allow an attacker to get as much value as he’d like out of a funnel
Cannon- Best defence to counter bowler bounces and single wizard funnelling, it is important to not let a cannon be isolated on its own because it then is vulnerable to single loon funnel.

So now back to the tip, the tip is very simple and straightforward, when filling in a skeleton, only use cannons and archer towers to fill when the range of the defence is 1 tile pass the no building zone, here’s what I meanSo in this example, the cannon will protect any building in front of it from a bowler bounce or solo wizard funnel. I use this technique because it is the most efficient and gives every building multiple purposes for its placement. Here is another example but with an archer towerUsing this technique, I can ensure that the defence is protecting the interior of the base and the exterior from funneling which I’d say is pretty solid value.
Trash Phase
Okay now you’re ready to place your trash ring…
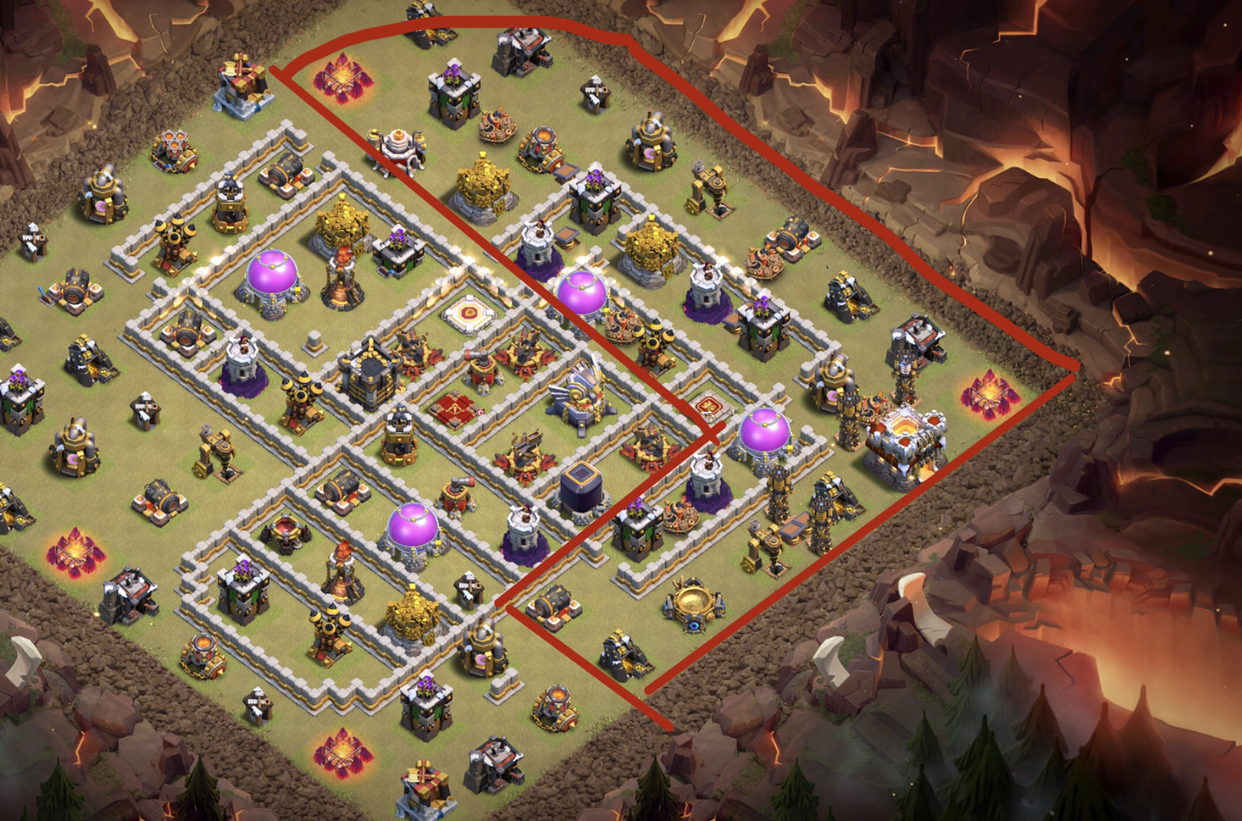
Now there isn’t much complication to this phase, like I mentioned above, try to keep good Archer Tower and Cannon coverage of all areas to ensure that the base is not weak to common funneling methods such as – Baby Dragons, Wizards and Bowlers, I’m going to finish my trash ring and show you guys what makes it solid.Now let’s go over the coverage of this trash ring…As you can see, from this annotation we can deduce that at pretty much the entire base offers protection against all the common funneling methods that I mentioned above, before we move onto the trapping phase, I want to talk about some basic trash techniques.
i. Anti E-Drag Funneling

So it is very common for E-Drag attacks to rush straight into the Eagle Artillery because it’s better to get it down sooner rather than later, now a good technique to limit the value that they can get and slow them down immensely is Anti E-Drag trash, now this may sound like a complicated term but it’s very straight forward, you want to have 2 tile vertical gaps between the 1st and 2nd trash layer so that they can only chain lightning 1 building at a time (vertically), it’s not awful to have a few horizontal chains because it doesn’t really affect anything of significance, also note that this technique works best with AD coverage because it allows the air defence to really get to work on the E-Drags so this is definitely a technique I’d use around your EA (Offset EA) and Near KillSquad entries because that’s also another spot where E-Drag funneling is common.

ii. Army Camp TechniqueSo this is a technique that I use in areas where people are likely to funnel, eg. KillSquad entries, QC entries and other funneling areas, it’s really good for messing up a funnel and forcing the attacker to go to plan B, what it does is, let’s take the image above as an example, if any troop were to be dropped on the army camp, there is 50/50 chance of the unit going left or right, even with a very precise drop point, there’s still a chance of the unit going the wrong way, so you should always take advantage of this and use it in areas where people will funnel.
iii. HP Arrangement

HP arrangement is very important when placing trash especially if the trash is unprotected by AT or Cannon coverage so a nice easy way to sort this is to have the structure with the higher HP on the 1st layer of trash to prevent both of them getting bowler bounced simultaneously, here’s an example to help you better understand
Trapping Phase
Okay so trapping is basically what determines how well the base will hold across any town hall level, it is important to make sure that every trap is placed with precision in order to get maximum results, I’d highly recommend ready the trap section in Derpy’s TH10 Guide if you do not know the basic trap placement techniques.
So without further ado let’s get into it…
So the first traps I personally place on the base are springs and giant bombs, these 2 types of traps combined can absolutely devastate a hog portion of an attack but to get the best placement in these traps we first have to look at what types of attacks someone would use on this fresh and how would they plan to execute it, firstly let’s talk about QC hogs, super strong strategy if the attacker can execute it, people use this attack in 2 methods…
- Wall wrecker for the initial charge, quite a popular option, safer option as ice golems inside wrecker will tank the DPS and allow the charge to get more value, also allows the attacker to bring more hogs and spells for the backend as the entry for the charge is completely covered by the wrecker, limited entries to use this method though
- WB/Jump/Both charge, much more versatile than the first option, requires more skill to execute, less hogs/spells for the backend but allows you to bring a slammer for your hog portion
Right so looking at these 2 options, I don’t think the 2nd QC hogs would be better on my base because the charge would have to come from 2 o’clock or 4 o’clock otherwise the first option is just better in terms of how much value the attacker can get and it’s a really expensive funnel due to the use of moats and the heavy dps would possibly mean that the charge would not survive the entire raid.

The 2nd Hog option for a fresh hit is KS Hogs, now this strategy is very easy to trap and defend against at th11 because you can predict the wrecker entries and the use of an offset eagle would mean that there’s a chance that the attacker may not get it down with the KS, so let’s look at potential KS and Wrecker Queen charge entriesSo these are the potential entries^And using this information, we can decide that this L shape is the best option to place our springs & GBs

So I’ve placed all small bombs now, no crazy techniques to use them but I will mention that it’s probably best to have SBs on the wall in the current meta because it’s harder to test wall break and no one wastes a rage for the first WB layer so I wouldn’t worry too much about raged WBs.

Skellies- Right now I’ve been having good results using 2:1 Ground to air, but the ground skellies aren’t necessarily for hogs like some of you guys may expect, they’re for miners, super OP troop in current meta, QC Miner, Mass Miner, all OP, take look at the 10 o’clock IT set up, the storage+ ground skelly is the ultimate stall combo against miners and allows the surrounding defences to get some work on the miners, Air skelly near queen is kind of a no brainer, just makes Electrone a lot more difficult, (Even harder paired with the warden HP boost)

SAM Placement– Here’s how I feel about SAM Placement right now, I believe that if an AD is inside the range of a WT, that the SAM should be directly on the AD because you want a guaranteed hit on the Hound as you want it to go down ASAP so that the WT can get some work done on the loons, but if an AD is not inside the range of a WT, you can have slightly more offset SAMs for a couple reasons, the Hound won’t have as much effect on tanking surrounding splash and having more offset SAMs can really mess up a funnel and such because it’s not exactly where an attacker would think they are, but also try to line up the SAM with hound pathing to get maximum effect.

RAB Placement- RABs should always be:
-Out of hound pop radius, use AD range as a template to help you place them
-Away from QC Entries
-Not in path of a hound drop point
-Near splash defences eg. ITs and WTs

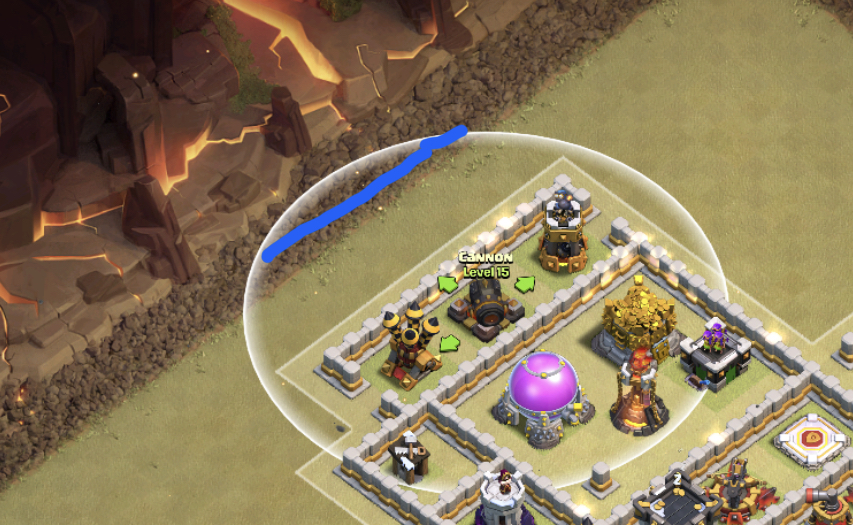
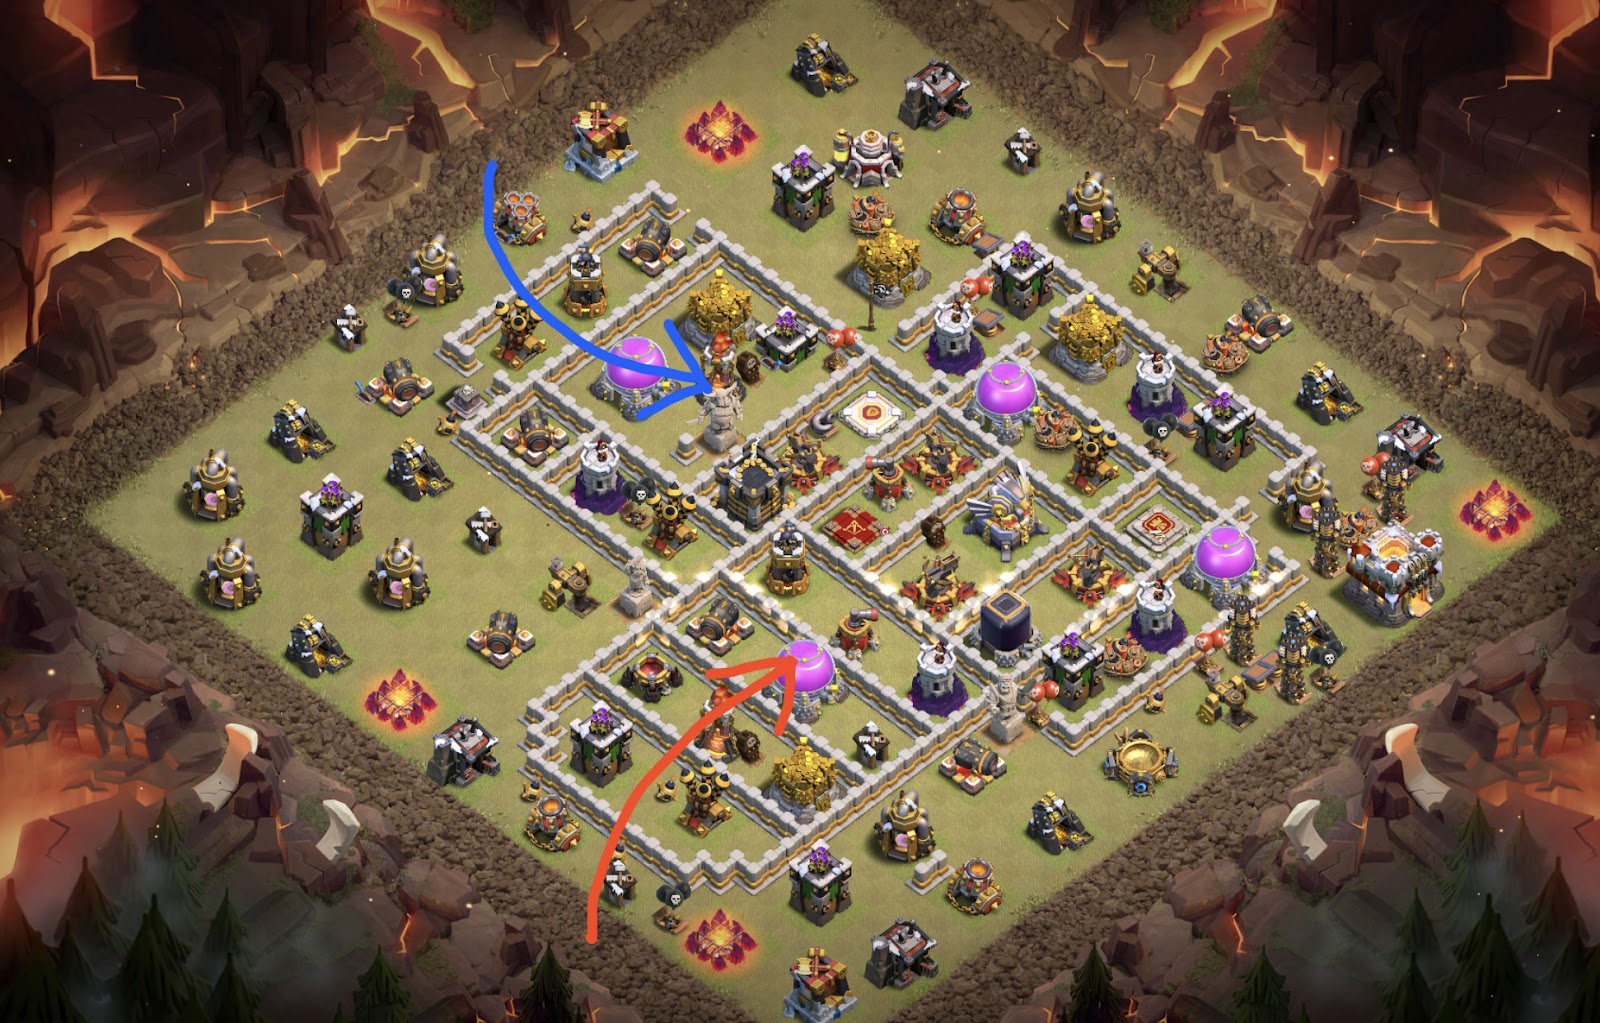
I purposely did not place any RABs in the path of that arrow because I already know that it’s going to be a common hound drop point due to the fact that the WT is tankable, using any RABs there would be a waste as they would just get absorbed by a hound, so if every one of your RABs follow the criteria above then you’ve done a solid job.

Tornado Placement- The tornado is your most key trap at TH11 and should always be away from ADs and have a multi-purpose, for example in my base right now, the tornado is defending against an incoming KillSquad from 10 o’clock but also defending against a backend LaLo which is good value, it would also defend a blimp electrone but the sweeper against the entry makes it unlikely for the attacker to try it.
Let’s go over some good and bad tornado placements and discuss why they are bad or good…


This is a bad example of a tornado placement for a very simple reason, the tornado is not meant for hounds so you do not want it next to an AD or in obvious path of a hound, also there are no splash defences in the area meaning that even if the tornado is triggered by loons or hogs, there isn’t anything to really deliver a lethal blow to the troops.This is an example of good tornado placement, lots of splash coverage in the area, loons/hogs cannot hit the IT whilst being spun and it’s a lot less likely to be triggered by a hound.
One last thing to note is that the Tornado should never be external to the base, ‘why?’- because it’s a waste as it’s likely to get hit by unimportant units.

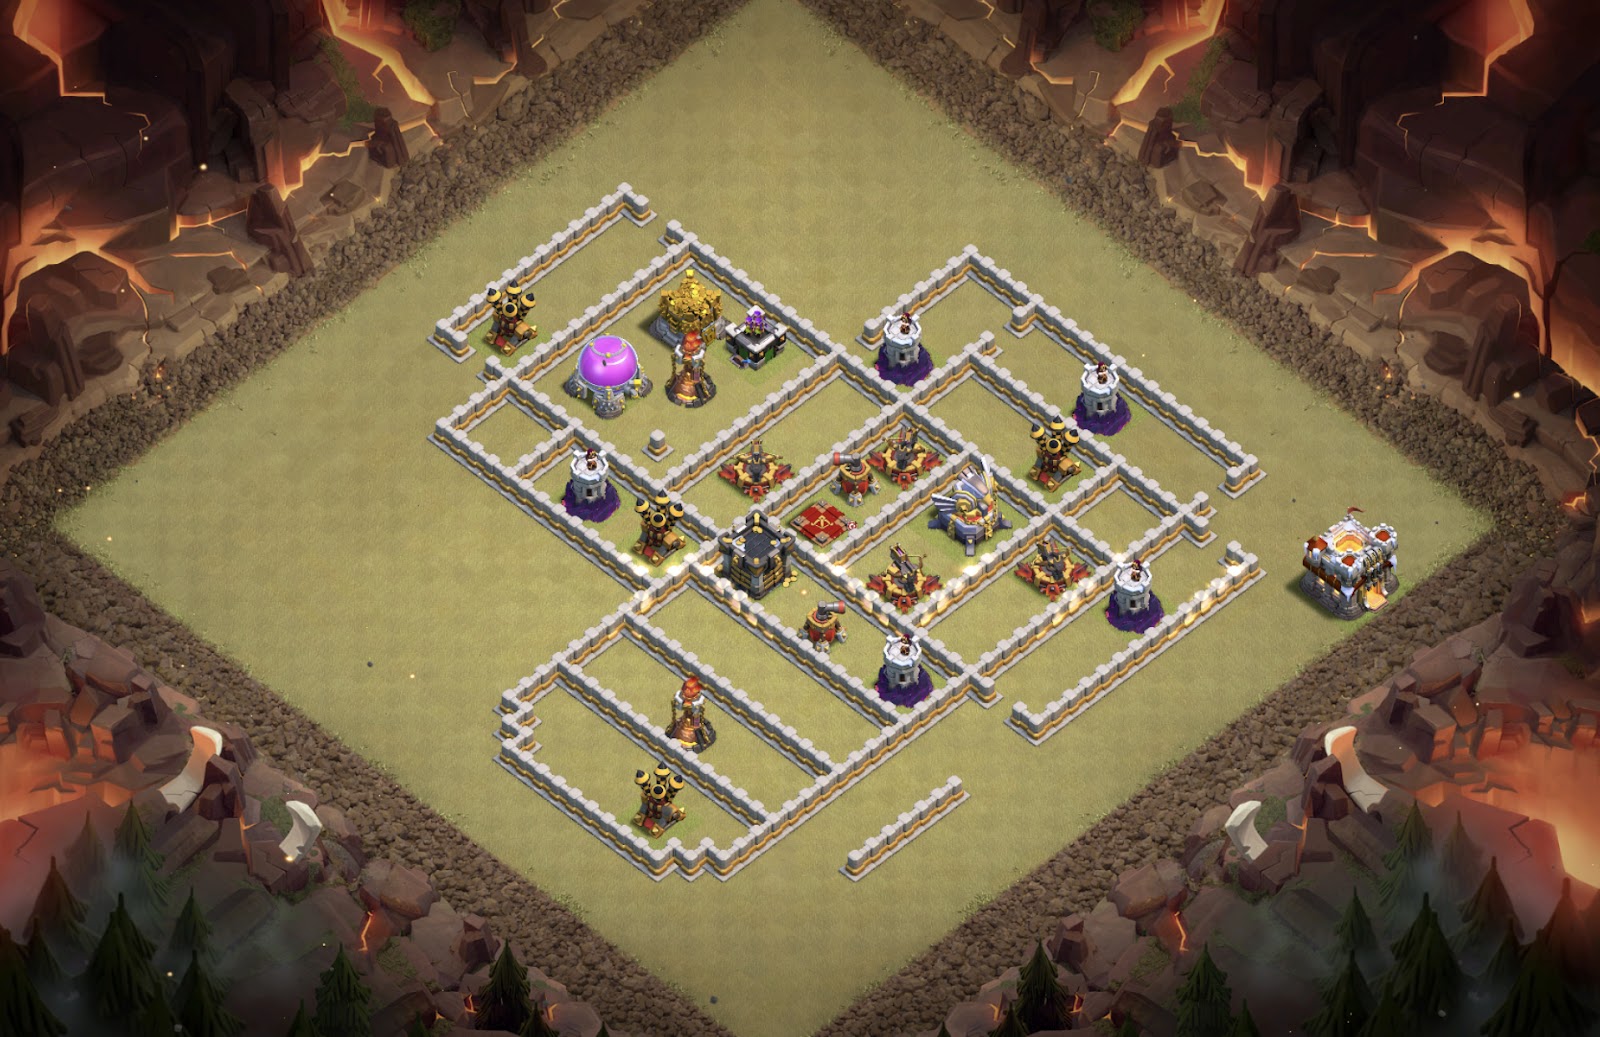
Now this is the first draft of the base complete!
- Testing & Adjusting
Testing a base is basically when you let your clanmates hit one of your bases and see how it does, being a good builder is being able to pick apart their attack and deduce which parts of the base is good and which is bad.
CC Fill
One of the key factors of your base defending is what’s in the CC, Now I really only use 2 fills for my TH11 bases
- Hound + Loon/Arch – Good against charges and Pekka smash and Pekkabobat, but is weak to any full air oriented attacks such as Electrone , DragBat, Sui Lalo, E-Drags and etc., but it also weak to any strats like mass miner or mass hogs which take advantage of a hound cc by not popping the hound and poisoning the loon/arch.
- Drag+ Witch/Arch – Overall good against everything, forces a rage for a charge but can be disposed efficiently and quickly, decent against DragBat and Killsqauds, but exceptional against strats like Sui Lalo but let’s be honest, you’re rarely going to see a fresh Sui LaLo, I’d recommend running this CC on funky looking bases.

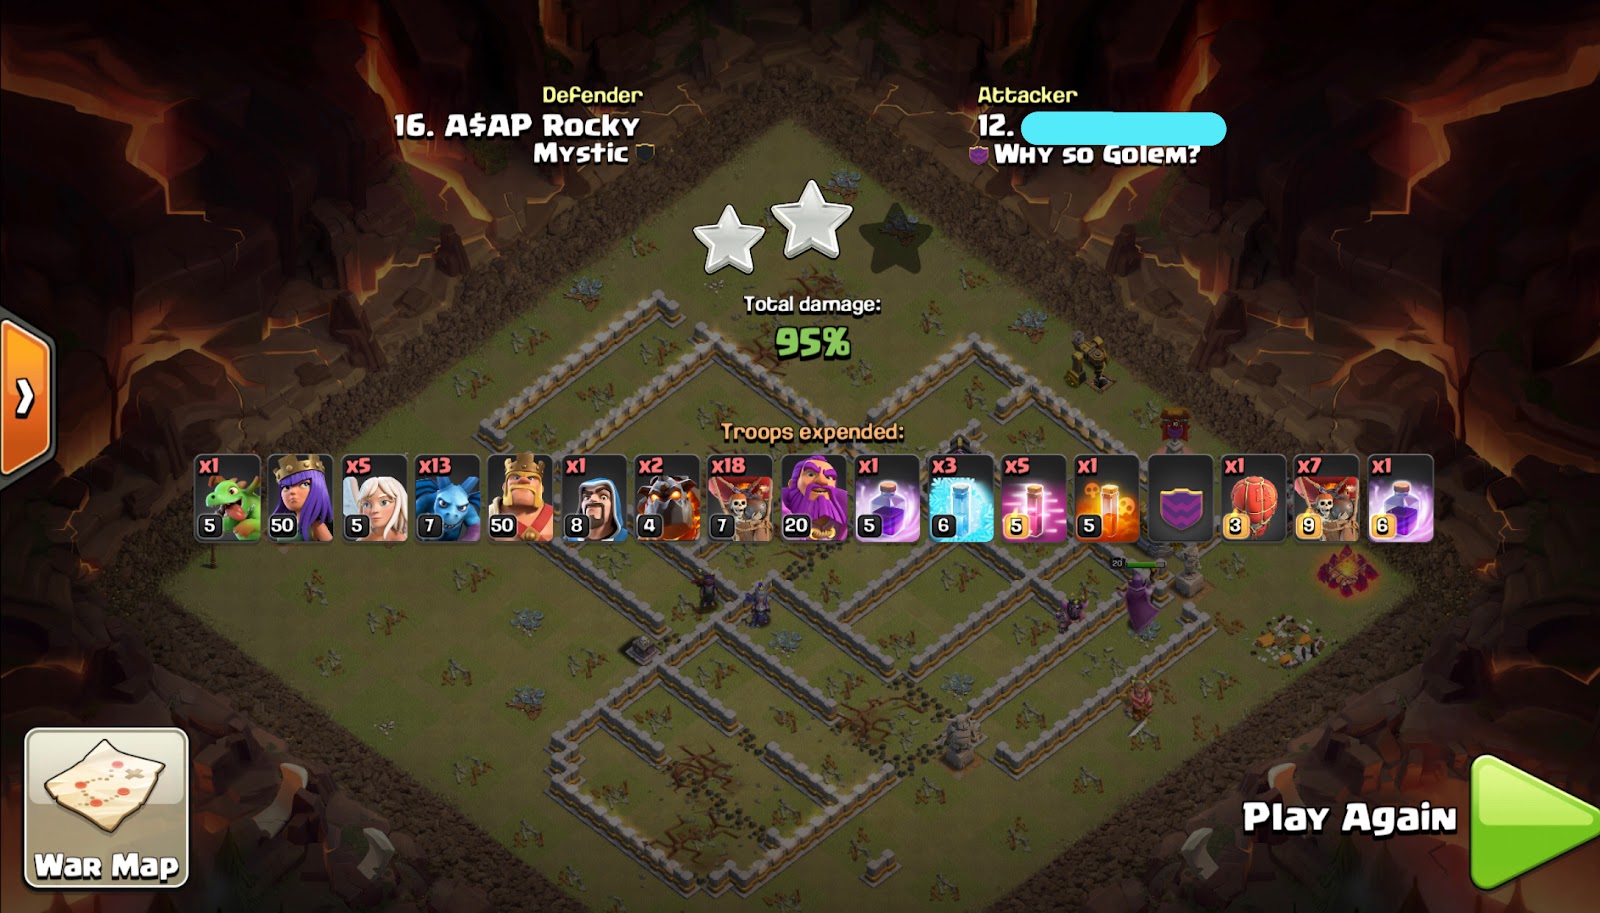
Now during testing, this base was tripled by QC Lalo by Stewie and together we worked on fixing some DPS issues, but one thing to note is that a base will never go untripled in FCs because people are much more comfortable in that sort of environment and aren’t afraid to go for a risky play, I was initially going to run damage cc on this but after testing, I decided to run hound cc to defend and stall the attacker causing timefails.These were the 2 entries…and using that data I made some changes to the base, the cannon swap at 9:30 is to make loon/hog pathing into the WT+AD setup more difficult, SB to 7 o clock was to defend a double wall break for which from testing we learned was viable from that entry, AD rearrange to make it a little more difficult for a QW to grab 3 ADs is a short period of time, I also made slight RAB/SAM adjustments depending on hound drop points.
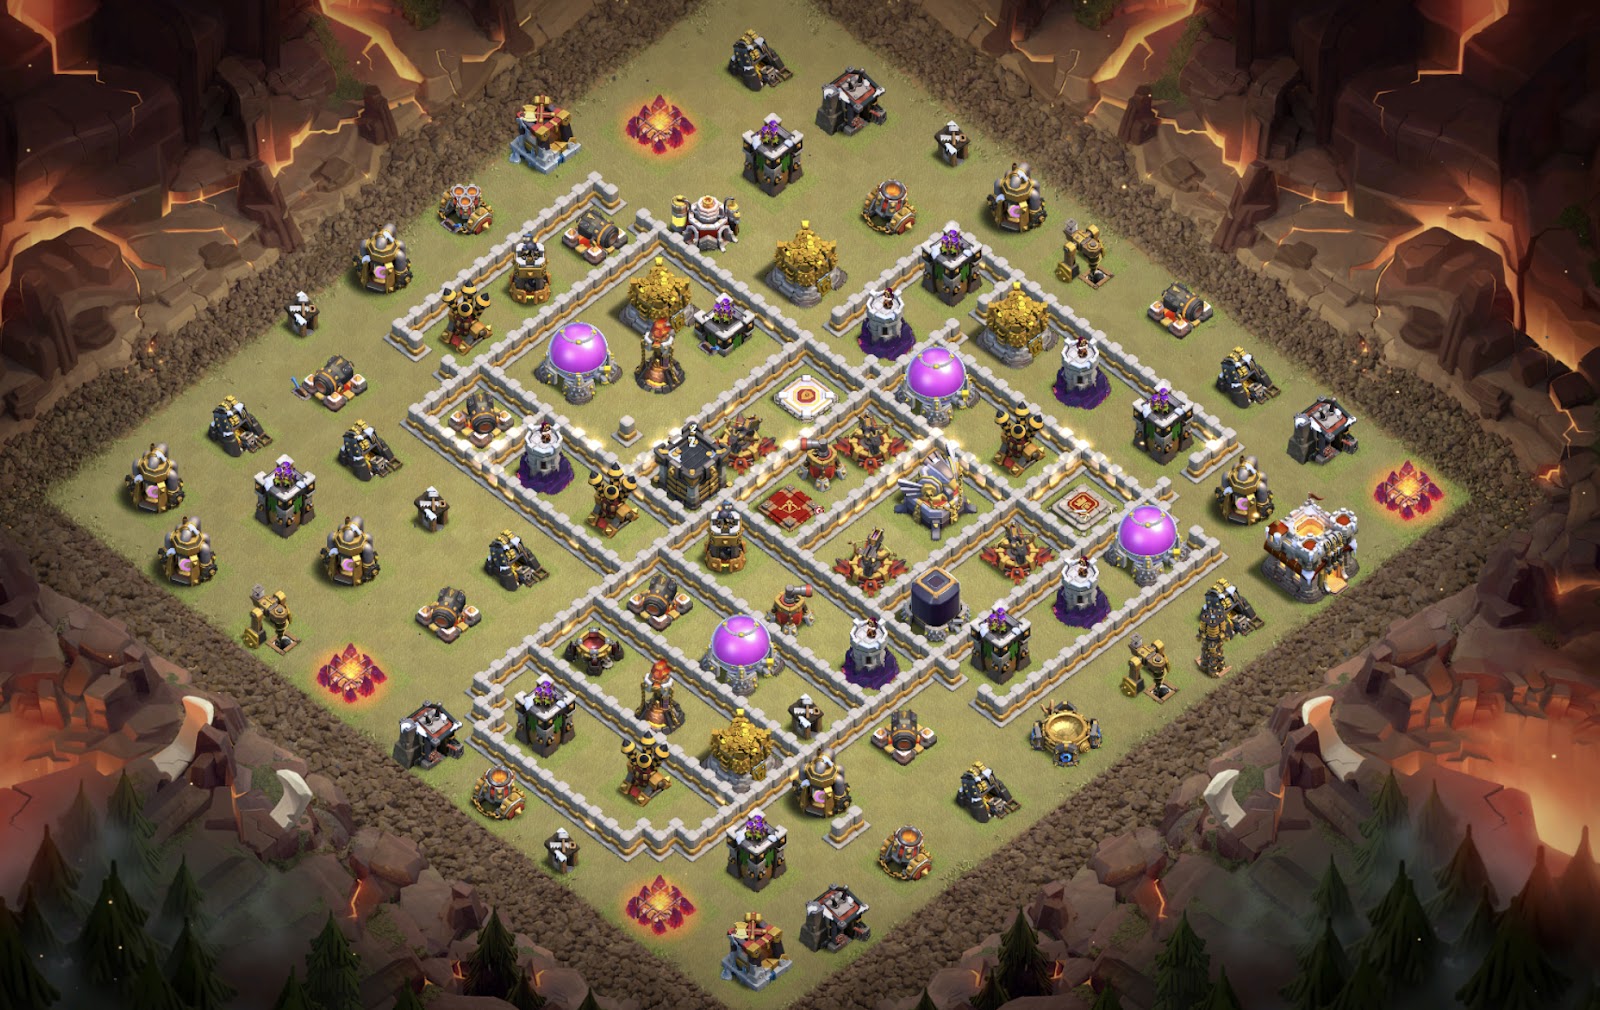
Now this base is ready for competition, some bases need less testing than others whilst some need more so as a builder, it’s your job to make sure that the base gets the amount of work needed to defend well.
Results
Arranged War vs WSG


Thank you to everyone who read this guide, I hope you learned something and If you have any questions feel free to DM me – Lethal#7436
I am always open to any questions or feedback regarding this guide or just base building in general.


