
Contents
General Information
Ships and Their Abbreviations
Let us begin with each ship’s abbreviations and their general characteristics/roles:

Heavy Cruisers (CA):
Heavy Cruisers or CA are generally more durable than their counterparts such as light cruisers or destroyers. They trade speed/evasion/reload for more health/armor/firepower and thus can be seen as tanks for the fleet. Notice that this is not entirely true for every heavy cruiser as some are squishy and have weak armor (Kent and Wichita are two examples of this) or have low damage (Prinz Eugen).

Light Cruisers (CL):
Light cruisers are the in-betweens of both heavy cruisers and destroyers. In general, they have better HP than DDs but less than that of CAs. They have the highest AA potential of any of the classes, again in general, and their reload speeds are faster than CAs but slower than DDs. In conclusion, light cruisers are the jack of all trades class of the frontline ships.

Destroyers (DD):
Destroys are the nimble members of the frontline composition with their light armor, low health, fast reload, and highest evasion stats of any class. What they bring to the table in terms of damage are their torpedoes, in general, and at times even their DPS/barrages. Do not be fooled by their overall appearance as destroyers, at times, are the most lethal of a composition.
General Mechanics and Skills
This section is dedicated in introducing the player in the various important mechanics related to battles and explain what skills could bring to the table.
Speed of the Frontline:
One of the foremost things of a frontline composition is their speed, i.e. how fast they move and react to a player’s control. The more CAs in the fleet, the slower the frontline will move. The more DDs in the fleet, the faster they will move, etc. To determine the speed of the frontline, it is generally the sum of the speed divided by the number of ships, i.e. the average speed of the frontline.
Do I really need to do that? No, just consider this summarization:
- CAs make your frontline slower
- CLs are faster than CAs, but slower than DDs
- DDs are the fastest of your ship.
For the purpose of future frontline compositions, we will give values to each class and we will use those numbers to determine the theoretical “average speed” of the frontline:
- CA = 1
- CL = 2
- DD = 3
The higher the average, the faster the frontline and vice versa.
To note: Some ships have below average speeds despite being part of CL/DD and vice versa in regards to CA. Check this link to determine the speed of a ship. In addition there are equipments such as the Beaver Badge that can allow ships to reach higher speeds than normal. Outside of the Beaver Badge, these equipments are generally not worth the cost of trading an auxiliary slot that could be used for better equipments.
In addition, this guide suggests that one doesn’t stress too much on Speed outside of auto-ing and even then, should be the smallest factor of a composition.
Notice: Evasion is not the same as Speed. Notice there is a mistranslation in the game where it relates Speed = Evasion = Dodging stuff–this is not Speed that is actually considered when determining the frontline’s speed.
Positioning:
Positioning is important for the frontline as it can determine if one of your frontliners will die early or take minimal damage and survive the battle. Below is an example image of a fleet, its only purpose is to serve as a visual guide.

We have 3 points: A (closest to us), B (middle), and C (farthest).
What does this mean in terms of combat? When you push towards the enemy (right) your A ship is in the front and will tank the damage. When you are moving away from the enemy (left) your C ship is in the front (closest to the enemy) who will be tanking any incoming fire. Notice something? B never shows up to tank!
But she still takes damage though? Yes, any stray shells or torpedoes can still inflict damage on her, but the potential damage dealt to her is significantly lower than that of A or C.
What ship should I place on there? In general you want the most squishy of your ships there, i.e. a ship with low health or no skills that mitigate her damage taken. Above, notice that the CAs are on the outside perimeter whilst the DD is in the center.
I noticed that high-level ships seem to dodge more, so shouldn’t I place my highest level ship outside? If the level difference is too great for your high-level ship compared to her cohorts, it is legitimate to switch positions.
I also noted that high level DDs seem to dodge more than their CA counterparts, shouldn’t I put my DDs outside? Well… no, not really. Imagine a torpedo with 500 alpha is steaming towards your ship with a 100% hit chance. Do you want a 1000 HP DD take the hit or a beefy 3000 HP CA? Remember, just because they are dodging often doesn’t make the issue of their low health pools disappear.
But what if the DD is really high leveled? Well if she is more leveled than her slower and tanky cohorts or have an excellent skill in mitigation of damage taken, then yes it is certainly advisable to do that. But once the level differences diminish, consider returning to the conventional frontline setup.
Formation:
Formation, in this sense, isn’t your lineup but rather the fleet’s formation during combat. Whilst it does not affect your ships’ layout, the three difference options offer buffs and debuffs to your ships according to what you pick. Below are the three formations (taken from the Wiki):
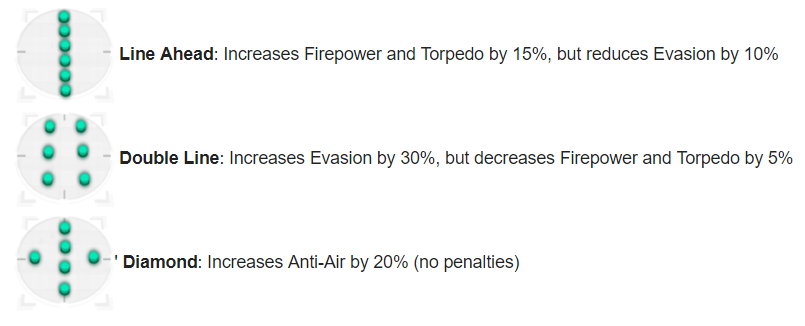
Which one should I choose? Really depends, but here are several suggestions:
- Line Ahead for manual due to increased damage potential.
- Double Line for auto to mitigate AI’s stupidity
- Diamond if you’re having issues with air raids.
- CA-heavy fleets may do Double Line to mitigate damage taken, but Line Ahead for DPS is preferred.
- DD-heavy fleets should do Line Ahead to increase their damage potential.
- Weak fleets with air raid troubles should focus on Diamond.

Anti-Air and Its Role:
Anti-Air is critical for the frontline as it is where the damage against AA plays in. It is only at the frontlines that the fleet’s collective AA firepower is played in and if any surviving planes manage to reach the backlines, your backline ships will not use their AA guns. That means the bulk of the responsibility lies within your frontline to shoot down as many planes as possible.
Whenever enemy planes reach the screen or are coming towards you, a white outlined circle will appear from the center of your frontline ships. Any planes within this area will be affected by your AA guns (it’s not enough for the plane sprites to be in the circle, their shadows must be within the circle for it to count):

(The red ellipse highlights the planes’ shadows.)
Wait, then what are the backline AA guns used for then? The mechanics behind AA and how it works is that it takes the average reload and range with damage being additive. That means the circle that appears is the collective total of your fleet’s AA firepower and the radius of the circle represents the average range. The rate they fire is the average reload time of all of your AA guns (after modifiers related to each individual ship’s stats/skills).
That sounds convoluted. Yes it is.
Is there some general rule of thumbs I can just look at? I’m glad you asked, look at this list:
- Mount high damage AA guns on your CLs due to their high AA values (AA stat is a modifier of AA damage).
- Give DDs long-range AA as those type of guns’ RoF (rate of fire) are generally low and thus a DD’s high reload stat will boost the reload time.
- Backline ships you give them AA guns with high DPS to compensate for their low reload stats.
- CAs can do either three, being highly dependent on the composition. Best to consider what you think your fleet’s AA needs.

Ammunition or Ammo:
Ammunition or Ammo (short-hand) determines whether or not a buff/debuff will be applied to you fleet. This is critical for both your backline and your frontline ships. You can tell how much ammunition your fleet has by a counter seen in Circle B (see image below).
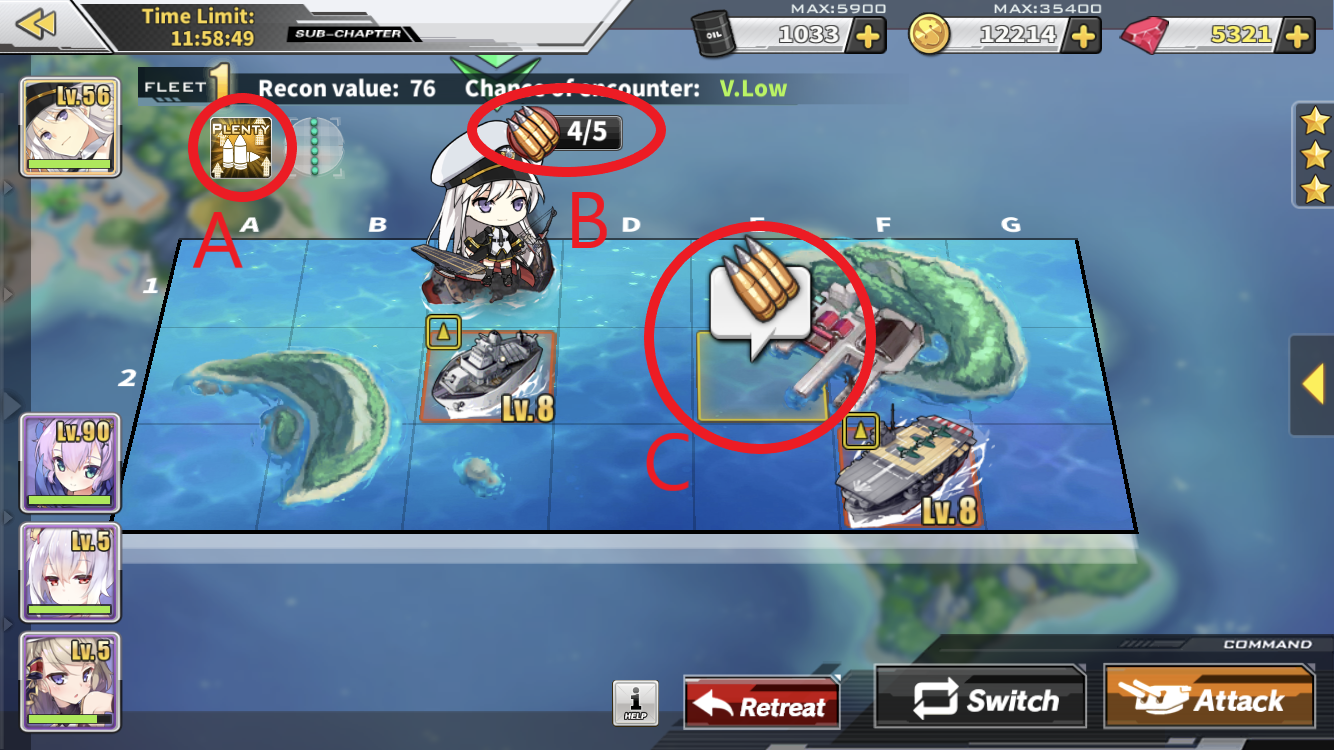
Here is a general breakdown of how ammo works for your fleet:
- If the Ammo counter is from 4-6 (+1 from repair ships), then there is a 10% buff to the fleet’s overall damage (Circle A).
- If the Ammo counter is from 1-3, then there is no buff/debuff present.
- If the Ammo counter is 0/5, you may continue to use that fleet but there is a 50% debuff to your entire fleet.
- Ammo may be regained from docks/areas with the Ammo symbol (Circle C).
- Ammo may also be regained from nodes with a ? symbol. See below for an example.

(Question mark node that may drop ammo/heal/spawn an enemy cargo fleet)

Fuel Cost For A Battle (Trivial):
Whenever you begin a battle, an initial oil fee (like an upfront charge) is deducted from your total oil fuel and from your fleet’s total oil cost. This initial oil fee is determined by the number of girls in your fleet. With each girl, your fee is increased by 1. That is, six girls in a fleet will cost a fee of 6 oil to begin a battle.
To summarize as an equation: Oil Fee = N (where N is the number of girls in a fleet).
So, will I ever get that back? No, if you quit/lose you will not get that back. If you win, you will not get that back either.
Does this mean that my 30-oil fleet of 6 girls actually cost 36? No, the fee (which is 6 oil in this case) is deducted from your fleet’s total oil cost, which is 30. Thus you pay 6 to fight in the battle and you are charged the remaining 24 once you win the battle.
If I quit/lose a battle, what does it charge me? If you fail to complete a battle due to quitting/losing, you are only charged the oil fee. You will not be charged for the fleet’s total oil usage per battle except for the fee that was deducted to begin the battle.
What about Exercises/PvP? Those do not count in depleting your oil, rest assured. Exercises do not affect the morale of your girls either.
Are there any nifty little things about quitting a battle? In quitting a battle, the fleet will return to its original state before the battle. Any damage incurred will be reverted, but as a cost, any progress in the battle is made void. Also, if you quit in PvP, it will not count towards your daily tries. Consider that a gift from this guide.
Skills
Unlike backline ships, frontline ships’ skills are diverse in their purposes and intent. There are generally four types we can focus on: fleet buff, durability buff, firepower buff, and self-focused buff.
Notice: some skills will overlay between types, this guide will assign them to what they are best fit for.
Each will have icons of skills related to that section with the color corresponding to that set(s) for easier identification in the future.


Fleet Buff
To begin, Fleet Buff includes any skill that buffs either the frontline, backline, the entire fleet, or debuffs the enemy. These skills are one of the best if employed correctly and to use them effectively, synergy must be focused on. Skills like Artillery Command works best with a frontline that consists of cruisers (CL and CA). A contrast to this are skills like Radar Sweep which debuffs the enemy team and thus synergy isn’t a necessity.
In general gold-colored skills focus on fleet-styled buffs.
Warning: Command skills such as Raid Order cannot be stacked upon each other. Do not put, say, three Raid Orders on top of each other! Remember to read about these fleet buff skills as some of them have requirements and thus demands synergy.


Durability Buff
Durability Buff skills are any skill that boosts the durability of the fleet/frontline/backline. Such skills typically feature a characteristic found here:
- Heal ships under certain conditions.
- Boost their evasion stats to increase the chance of dodging attacks.
- Temporarily make their fleet/frontline/backline invulnerable.
- Summon shield(s) that will protect against a certain amount of shots during their activate period.
- Increase AA firepower to mitigate damage or destroy planes quicker.
These skills are critical for a fleet if they wish to focus on endurance or to boost a fleet’s poor endurance.


Firepower Buff
Firepower Buff skills are skills that are centered on increasing the damage of a ship. Naturally one might also relate certain Fleet Buff skills to these as some also buff damage and that is to any ship within the envelope of that particular skill.
The range of buffs these skills bring are wide, but here are the general ones:
- Directly increasing damage or increasing their FP (firepower) and thus damage..
- Chance of doubling damage, firing twice, or firing torpedoes twice.
- Boosting their own DPS/damage based on the presence of another ship (ex. Portland buffs from having Indianapolis in the same fleet).
- Boosting various stats that increase their lethality by themselves (Laffey).
- Increasing a shell’s efficiency.
Every ship has a version of a Firepower Buff skill and that is generally related to the barrage/All Out kind of skills. These skills will fire a special pattern of rounds determined by their ship class and by their LB level. Some ships are famed for their barrage skills while others aren’t as much. It is easy to identify if they have a barrage skill if the skill is already MAXED before any skill training.


Self-Focused Buff
These skills focus on either a few things:
- Healing themselves when nearly dead.
- Making themselves invulnerable.
- Increasing their evasion.
Generally these skills aren’t too useful outside of keeping a particular ship alive. They are best used in mob fleets (designed to kill enemy fleets besides bosses), endurance fleets, or farming fleets (Phoenix’s skill heals her when her HP is low)
Frontline Composition and Theory
Now, we get into the actual discussion of the frontline. But! Before we begin, we have a minor thing to discuss regarding cruisers in general. It is related to how their setups have two possibilities.
The Nature of Cruisers (Under Review)
We all know there are CAs and CLs and we explored their roles in the beginning of the guide. What else is there to talk about them aside from fleet composition? There are two types of cruisers, regardless of whether or not they’re a CA or CL, and that is what they can equip in their secondary slot.
What do you mean? On certain cruisers, like Eagle Union cruisers, they trade a torpedo launcher slot for a secondary gun (DD gun). That means certain cruisers have a substantially higher DPS than their peers.
We will call CLs with all-guns as Gun-CL, CLs with torpedoes as Torp-CL, CAs with all-guns as Gun-CA, and CAs with torpedoes as Torp-CA, to summarize:
- Gun-CL – Light cruisers with a secondary gun slot
- Torp-CL – Light cruisers with a torpedo launcher slot
- Gun-CA – Heavy cruisers with a secondary gun slot
- Torp-CA – Heavy cruisers with a torpedo launcher slot
Any other differences?
By their second LB, Torp-CLs and Torp-CAs come with a pre-loaded torpedo set and their limit is increased by one. This means they can immediately launch a set at the onset of the battle
Gun-CLs and Gun-CAs gain a second salvo, that is, they fire their main guns a second time after their first one. This potentially increases their damage and DPS, however, there is generally a salvo delay (around 0.18 – 0.4s per salvo).
Light Cruisers – Torp-CL vs Gun-CL
Torp-CLs and Gun-CLs differ in their role and purpose. Skills also play huge factors, but that is more ship specific rather than the two sub-classes of CLs. To put it simply, Torp-CLs are burst specialists whilst Gun-CLs are DPS specialists.
Can you explain Torp-CLs further? Torp-CLs are designed to unload their damage within a short span of time to get the most out of their damage potential. They use a combination of both their single main gun salvo and torpedoes to deal lethal strikes. Torpedoes are the defining trait of this combination as it potentially provides large bursts of damage for the Torp-CL.
Can you explain Gun-CLs further? Gun-CLs are designed to provide continuous DPS over the battle rather than peaks of burst damage. Their 2nd LB gives them a +1 in their salvos and thus potentially doubles their DPS (delays bring it down). They are best used to speed up the pace in which enemy ships are cleared whereas Torp-CLs are best used to eliminate high-health targets in a short matter.
Which is better? Neither is better than the other. Both types of CLs have their uses and it is up to the player to decide which one fits their gameplay style or composition.
Heavy Cruisers – Torp-CA vs Gun-CA
Torp-CAs and Gun-CAs play similarly to their light cruiser equivalents. Torp-CAs provide burst damage whilst Gun-CAs provide DPS. However, there are important distinctions one should focus on before making any decision. Indeed whereas Torp-CLs and Gun-CLs are roughly equal in viability and potential, Gun-CAs and Torp-CAs are more biased towards one direction.
Can you explain? CAs typically have high firepower and thus their salvos are much more deadlier than that of CLs, this is the largest reason why. Due to their higher salvo damage and that Gun-CAs get a second salvo, their DPS potential jumps drastically higher than that of Torp-CAs.
In addition Torp-CA torpedo stats are significantly worse, on average, compared to CLs or DDs and thus Torp-CA torpedo damage are lower. It doesn’t help when CA guns are high alpha and a second salvo allows a potential doubling of damage on a higher frequency than a Torp-CA torpedo strike’s high burst damage.
Are there some numbers? Yes, I’ve provided four generic averaged ships with their gun/torp damage below (assumption: every other stat is equal and that all shells/torpedoes hit their target and that they are limit breaked twice):
- Torp-CL – 216.48 Gun Damage and 2450 Torp Damage | Total Alpha: 2,666.48
- Gun-CL – 432.96 Gun Damage | Total Alpha: 432.96
- Torp-CA – 846 Gun Damage and 1820 Torp Damage | Total Alpha: 2666
- Gun-CA – 1,692 Gun Damage | Total Alpha: 1,692
If we were to compare Torp-CL and Gun-CL’s burst damages, Gun-CL’s burst deal 16% of a Torp-CL’s burst. This means that on average we can conclude that Gun-CLs have higher DPMs, but not too much that Gun-CLs are strictly better.
If we were to compare Torp-CA and Gun-CA burst damages, Gun-CA’s burst deals 63% of a Torp-CA’s burst. This means that on average, Gun-CAs overall DPM is significantly higher than that of Torp-CAs and thus in the long term, Gun-CAs perform much better.
Anything else? Remember that there is a difference in practice and in theory. In addition auto vs manual. In auto, Torp-CAs lose most of their efficiency as their torpedoes will be wasted whereas Gun-CA salvos will generally hit their targets. Thus in auto, Gun-CAs overall performance will be higher than Torp-CAs.
The unique thing about Gun-CA/Gun-CLs is that their salvos have the potential to correct themselves (read further). When a Torp-CL/Torp-CA fires their salvo, if the target is on low health, their burst potential is wasted as the remaining rounds will miss other targets. Gun-CA/Gun-CLs, on the other hand, their second salvos will target a new target if the old one is destroyed. This means Gun-CA/Gun-CLs can, potentially, retain a higher efficiency rate of using their burst damage than that of Torp-CA/Torp-CLs.
Verdict? In general, Gun-CAs > Torp-CAs.
The Compositions
Is this it? Yes, this is where the guide’s name is actually related to the content.
Below are the various compositions one can take:
A: DD | DD | DD
B: CL | DD | DD
C: CA | DD | DD
D: CL | DD | CL
E: CA | DD | CL
F: CA | DD | CA
G: CA | CL | CL
H: CA | CL | CA
I: CL | CL | CL
K: CA | CA | CA
Each Composition’s Pros and Cons
Before we begin, remember our theoretical speed values:
- CA = 1
- CL = 2
- DD = 3
The higher the average, the faster the frontline and vice versa.
A Composition: DD | DD | DD

(Courtesy of itsfyn from the EN Discord Server)
Characteristics:
- Extremely high alpha strike (torpedoes)
- Low HP
- High evasion
- Fastest speed (score of 3)
- Great for boss killing
- Not recommended for auto
A Comp is one of most well-known setups in the game and the easiest to form. How deadly it is, however, is dependent on the DDs that are used. In general you want to aim for DDs that have high torpedo stats with skills that are related to boosting torpedo damage or increasing their evasion speed.
Can any DD be used? Yes, but the A Comp setup is heavily dependent on the usage of torpedoes to finish off the boss. DPS/barrage DDs can be added into the mix to give the setup more damage, but one should aim for good torpedo DDs.
Can I auto with it? It is only advisable to use auto with this setup if your DDs are significantly leveled and equipped to deal with the World you’re interested in. The main purpose of this setup is to abuse DD’s high torpedo stats and their evasion. Their health is extremely low and with the auto AI’s lack of awareness, you can potentially lose a battle that other setups can clear.
What’s the best use for this fleet? Due to their low health and high damage, the A Comp is best used against boss-killing fleets. Their low health is mitigated as they are only needed for one battle and with their high alpha potential, they can quickly wrap up a battle against a boss.
Should I use the 3 DDs found in the image? You may, but the image’s just showcasing A Comp while using the starters.
B Composition: CL | DD | DD

(CN server. Visual guide only)
Characteristics:
- High alpha strike
- Moderate to low HP
- Moderately high evasion
- Fast speed (2.67)
- Good for boss killing
- Not recommended for auto
B Comp is a relatively unpopular setup to use as you are trading a DD for CL which could affect the overall cohesion of the setup. Compared to A Comp you are trading a DD (which supplies alpha strike) for a CL. The general DPS increase by the CL isn’t worth the lower alpha strikes. In order to make it work, choosing the CL for the role is important as they should be either: a top DPS ship or provide skills that can be used to enhance the composition’s effectiveness.
Despite the various flaws, can it be done? Yes it can certainly be done and with the right CL, it can be extremely deadly. Helena, for an example, is a great choice for this kind of setup as her Radar Sweep causes the enemy to take increased damage and thus increased torpedo damage.
C Composition: CA | DD | DD

(CN server. Visual guide only)
Characteristics:
- High alpha strike
- Moderate to low HP
- Moderate evasion
- Moderate to high speed (2.33)
- Great for boss-killing and poor for mob-clearing
- Not recommended for auto
In general Comp C isn’t too much of a jump compared to Comp B. The important part of this is that one is trading AA, speed, torpedo damage, and reload for high alpha damage, general high DPS (especially if using a Gun-CA), and health.
Compared to Comp B is it more viable? Comp C is much more flexible in the cruisers one may pick due to CAs being more than capable of offsetting the traits one sacrificed when switching out the CL. If the CA is a Gun-CA, the DPS potential will spike significantly. If the CA is a tank, the survivability of the comp spikes significantly. Torp-CAs can be used, even, as they’ll still provide enough benefits to offset a CL loss.
Does that mean Comp C > Comp B? Not necessarily as Comp Bs can still be deadly, possibly even more than Comp Cs.
D Composition: CL | DD | CL

(CN server. Visual guide only)
Characteristics:
- Moderate to high alpha strike
- Moderate HP
- Moderately high evasion
- Moderate to high speed (2.33)
- Acceptable for auto
- Good for boss-killing and mediocre in mob-killing
- Ships with buffs/high DPS/damage are preferred
Comp D is when one begins to trade alpha strike potential for DPS. However, depending on if the cruisers are Torp-CL or Gun-CL, torpedoes still remain a viable way to deal damage. The ships used for this kind of setup remains important, but much more flexible compared to Comp B. In general, for these kind of setups, ships that boost damage/stats are preferred.
Should I focus on Torp-CL or Gun-CL? For light cruisers it doesn’t really matter too much which you choose for this comp. Due to Torp-CLs remaining viable, one can focus on alpha striking while Gun-CLs for DPS. For bosses Torp-CLs are better due to their alpha striking and they can synchronize with the DD to deliver attacks that would delete a boss within the first few seconds of spawning.
E Composition: CA | DD | CL

(CN server. Visual guide only)
Characteristics:
- Moderate to high alpha strike
- Moderate HP
- Moderate evasion
- Average speed (2)
- Jack of all trades
- Auto can be used
- Flexible in composition
- Mediocre in boss/mob fleets
The jack of all trades and the master of none, that is best used to describe Comp E. It is a viable setup and offers many possibilities. While it doesn’t focus on min/maxing like other setups, it is far more than capable of dealing with late game content.
Is it flexible? It is flexible to the degree that one can primarily focus on the individuality of a ship versus synergy. However, like usual, synergy is preferred or that each ship provide a benefit to the frontline comp. A comp like Prinz/Starter DD/Belfast offers tanking, DD alpha strike, and Belfast’s smoke screen along with her specialization in HE. A comp like Chicago/Starter DD/Cleveland offers damage, alpha strike, and Cleveland’s buff and her general superiority compared to other CLs. Many other mashups exist.
How good is it for autoing? Good with the fact you aren’t troubled with low health nor do you have to depend on the AI using torpedoes effectively. Its average speed allows the AI to, unintentionally, dodge enough rounds/torpedoes to minimize damage. Plus it is a jack of all trades comp and thus it’ll minimize issues commonly found in other setups.
F Composition: CA | DD | CA

(CN server. Visual guide only)
Characteristics:
- Moderate alpha strike
- Moderate to high HP
- Moderate to poor evasion
- Poor speed (1.67)
- DPS-focused
- Auto can be used
- Flexible in composition
- Good for boss-killing and can be used for mob-clearing
Comp F itself isn’t efficient outside of certain scenarios in which the inclusion of a DD over a CL is better. The composition focuses on either alpha strike (Torp-CA – poor choice) or DPS (Gun-CA – good choice). Choosing the CAs are also important as efficiency will vary widely. It is best to include CAs that can perform well on their own, i.e. large alpha strike or DPS. The reasoning behind this is if you included Northampton, for an example, she would only buff the other CA and leaves the DD’s performance the same.
How flexible is it? Any CA or DD will work, however, it is advisable to choose ships that perform well on their own or, for an example, Portland+Indianapolis as Portland’s skill only focuses on herself and Indianapolis within the same fleet.
How good is it for auto? It is decently good as your frontline’s health pool is decently large enough to handle any AI mistakes. In addition, if you included two Gun-CAs, the DPS will mitigate any loss in efficiency.
G Composition: CA | CL | CL

(CN server. Visual guide only)
Characteristics:
- Moderate to low alpha
- Moderate HP
- Moderate to high DPS
- Above average speed (2.33)
- Auto can be used
- Heavily focuses on synergy/skills for maximum efficiency
- Mediocre in boss-killing and good in mob-killing
Comp G is a type of composition that can work and will work excellently if it has the ships it needs. Some of the most well-known compositions stems from this such as Wichita/Cleveland/Helena, known for their combined DPS power. If, however, the wrong ships are chosen, then the composition will fail to perform compared to other compositions. Caution is to be advised and a focus on each ship and how they’ll fit into the team is a must.
In general, what should I look for in building this kind of composition? The CA should have absurd DPS or it has good DPS and tanking. CLs should provide some kind of buff to the team and that their alpha/DPS cannot be lacking.
H Composition: CA | CL | CA

(CN server. Visual guide only)
Characteristics:
- Low alpha strike
- High DPS
- High health
- Poor evasion
- Slow speed (1.33)
- Auto can be used
- Low in flexibility of composition
- Recommended to focus on synergy/skills
- Good for mob-clearing and can be used for boss-clearing
Comp H is much more preferred than that of Comp F as fleet buff skills like Artillery Command can be used to their fullest effect. This is indicative of synergy as a recommendation. Preferably one ship has a skill that buffs everyone else in a particular stat, preferably FP. Leander is an example of this where she buffs cruisers. Helena can work as well as she debuffs the enemy.
This kind of fleet composition depends on their DPS rather than torpedoes as CAs have poor torpedo stats. This means that a focus on CAs that have high DPS is recommended.
What about CLs? Either Gun-CL or Torp-CLs work, but if the fleet has high DPS, Gun-CLs should be preferred. If you can focus on the DPS, your strength is your ability to clear enemies on the screen at a rapid pace and thus hopefully lowers damage taken.
How viable is this kind of composition? It is very viable with a mixture of DPS and health. This kind of combination is extremely deadly, for both mob fleets and boss-killing ones. In addition, one of the more well-known CLs used is Leander, a common ship.
There is one thing one should be cautious about: skills. As stated above, buffs are preferred, but another thing to keep track of is: some skills don’t stack. Choose a cruiser that provides the best buffs and the other cruisers should play up to that skill. When you are choosing two cruisers with buff skills, make sure they don’t conflict with each other. It can be tempting to stack (in the attempt to) say two Artillery Command skills on top of each other.
I Composition: CL | CL | CL

(CN server. Visual guide only)
Characteristics:
- Moderate to high alpha (dependent on composition)
- Moderate health
- High DPS
- Average speed (2)
- Auto can be used
- Flexible in composition
- Recommended to focus on synergy/skills
- Good for mob-clearing
Triple CLs, i.e. Comp I, requires some consideration in what CLs to choose. Do you want a mixture of Torp-CLs and Gun-CLs for a balance of DPS vs burst? Torp-CL only for burst? Gun-CL for DPS? Any three are viable and are only min/max versions or the average version of Comp I. It is best to build the frontline based on what you have that will maximize the damage potential, whether its related to burst or DPS.
What should I look out for when building this kind of composition? Preferably you have one CL that provides some form of buff to your frontline. This is to ensure that their potential damage is higher and thus they can clear enemies faster and thus leads to the mitigation of damage taken. The other two can also provide buffs, assuming they can stack/coexist, but they can be switched to CLs that provide either DPS or burst damage.
How does this compare to 3 DDs or 3 CAs? It is, quite literally, in the middle between the two. 3 CLs don’t have as high of alpha burst as 3 DDs and you don’t have as high of a DPS like 3 CAs. CLs are good at doing both, but aren’t the best at them. The one advantage, however, is that CLs generally have high AA and thus 3 CLs triumph in that category.
K Composition: CA | CA | CA

(CN server. Visual guide only)
Characteristics:
- Moderate to high alpha
- High HP
- Extremely high DPS (Gun-CAs, high if using Torp-CAs)
- Abysmal speed (1)
- Auto can be used
- Flexible in composition
- Focus on skills/buffs to maximize their DPS potential
- Synergy is not a necessity
- Can be used for boss/mob fleets
We have already discussed 3 DDs and 3 CLs and here we are with 3 CAs, the natural progression. At this point you may already get the gist of what is in store for Comp K: high health, high DPS, and moderate alpha.
3 CA throws out any idea of dodging or speed for health and DPS. By focusing on CAs that excel in dealing DPS (Gun-CAs) a lethal composition is created that is perfect for clearing mobs. Unlike Comp A which is generally a boss-only fleet, Comp K can do both boss and mob clearing.
Does that mean Comp I is better? No, just because it can do both tasks doesn’t mean it’ll excel at both of them to a degree that Comp A is inferior. 3 DD fleets are still the best in terms of deleting a boss from the moment it spawned whilst Comp K may take longer to finish the task.
How much investment is expected? In order to make 3 CA fleets work to the best of their potential, it is advised to LB them twice so that Torp-CAs gain a preloaded torp and Gun-CAs unlock their second salvo. Thus it requires investment to make it good, but doesn’t require an excessive amount of preparation.
How flexible are my choices? Generally you want CAs that have naturally high DPS or can obtain that from synergy. In general you can focus on two things for Comp K: tanking or damage. Regardless of which one you choose, you shouldn’t abandon the other one completely. One shouldn’t completely choose glass-cannon CAs nor should one choose completely tank-focused CAs. However, if forced to, it is better to focus on DPS due to CAs excelling at that.
Any synergy or skills? CAs are perfectly able to work on their own to achieve high DPS. However, like every composition, it is advised to select CAs that work together with good synergy.
Cohesion of the Frontline, i.e. Synergy
When bringing together a group of girls for the frontline, it is important, regardless of what composition, to consider what a ship girl will bring to the frontline. Of course one may neglect this in favor of a team of “waifus”, which is perfectly fine, but for maximizing efficiency it is critical. A team with great synergy will be much much stronger than that of a team built out of loose connections.
Here are some things to consider:
- Do they have skills that buff each other? Like the skill Artillery Command which buffs cruisers and thus benefits a comp filled with cruisers?
- Do they perform different roles that compliment each other? Like say Wichita/Chicago/Helena where the focus is high DPS with Helena’s debuff skill.
- Do any skill not stack with another skill of a fleet? For an example, two skills with the same name.
- Do the skill of a shipgirl demand another shipgirl to be on the same fleet? Like how Portland gets a buff from having Indianapolis within the same frontline.
Here are some examples of girls who work well together:


CA | CL | CA – | | – Indianapolis | Brooklyn | Portland
(Click on their image to be directed to their Wiki page)
What makes them work?
- Indianapolis brings tanking
- Portland brings tanking/DPS and she gets buffed from having Indianapolis in the same fleet
- Brooklyn is a good DPS CL and her skill buffs the other two.


CL | CL | CL – | | – Belfast | Leander | Helena
(Click on their image to be directed to their Wiki page)
What makes them work?
- Belfast can provide DPS and her smoke screen mitigates damage
- Leander provides a firepower buff to Belfast/Helena
- Helena can debuff the enemy, i.e. increases damage dealt to them
Ranking of Compositions
Any composition will work and they will certainly work with the proper equipment. However, it does not disregard the fact certain compositions are more viable or are more easier to form/make. We will, in this section, split them into several categories:
- How much investment and what’s the maximum oil cost
- High DPS compositions
- High alpha strike compositions
- Mob-clearing fleet
- Boss-clearing fleet
Quick Reference to Compositions:
Before are the letters and what kind of composition corresponds to that letter. Use this as a reference for the rankings below.
A: DD | DD | DD
B: CL | DD | DD
C: CA | DD | DD
D: CL | DD | CL
E: CA | DD | CL
F: CA | DD | CA
G: CA | CL | CL
H: CA | CL | CA
I: CL | CL | CL
K: CA | CA | CA
Miscellaneous (Farming, etc)
This section is dedicated to discussion on the ranking of the compositions, how to save oil in the frontline and the backline, and the like. Anything that is not important that fits in General Information or Frontline Composition and Theory are placed here. Not required for an understanding of how the frontline works, but good if you want to explore more advanced concepts, i.e. saving oil.
How to Save Oil: Farming with Efficiency
In terms of clearing worlds or progressing through ones that are giving you trouble, running a full frontline and backline is great. You maximize the full firepower that your fleets can bring to the table, however, there are drawbacks. As your girls level up and as you LB them, their oil will rise. Eventually you’ll be running 50+ oil per battle. Not too great is it?
How do I save oil then? The answer is simple: you don’t need to be running a max fleet with three girls in the front and three in the back. When farming a world that you can clear, reduce the number of girls in both the back and frontline until you reach the minimum number of ships or a point where you can farm with consistency (i.e. defeating the boss).
Does that mean we can do one girl in front and one in back? Yes we call that 1:1 where one only has one frontliner and one backliner. This is the optimal farming fleet for nearly any world one will encounter now or in the future.
What if I have difficulty with that? Then do a 2:2 (two girls in front and two girls in back) or a 1:2 (two girls in front and one girl in back). The key principal of this entire idea is: less girls = less oil.
What are good frontliners for this? Any frontline ship will work with levels, the proper LB level, and equipment. But there are certainly better girls for such a task. For 1:1 look towards Phoenix for such an example. Cassin and Downes are also examples of being good frontliners. For 1:2 you can mash up these options and 1:3 you can employ all three.
In general, any skill that allows a ship to heal themselves when low on HP can be capable of performing this role.
For farming for a particular ship/equipment blueprints, should I mapwipe? No, just rush the boss, i.e. RUSH B. Higher chance of getting a ship/equipment blueprints to drop and some ships are restricted to boss nodes.
Ranking: Oil/Investment (most expensive to cheapest)
The level of investment per ship differs greatly and it is not advised to follow this ranking to a significant degree. This ranking is best used to determine what would cost the most, in general, in order to make them perform.
In addition this ranking also indicates which are the most expensive in oil and which are the most cheapest in oil.

Comp K Max Oil: 36

Comp H Max Oil: 35
Comp G Max Oil: 34
Comp I Max Oil: 33

Comp F Max Oil: 34
Comp E Max Oil: 33
Comp D Max Oil: 32
Comp C Max Oil: 32
Comp B Max Oil: 31
Comp A Max Oil: 30


