
By sirhempy
This guide is the general outline that a player can use from 1-1 to 13-4
It will mostly focus on :
Gearing
Fleet composition and synergy
Differences between ships
Farming spots
Leveling
It will not focus on :
Research
Events
PvP
I’m open to criticism and feedback. DM me via discord, sirhempy #1769
My main focus is to have people learn how to play the game while using their favorite ships and clear the game with ease. Everything on this guide will be based on my personal experience of clearing the game, months spent helping people in help channel and personal DMs, and most importantly, your feedback. After helping numerous people, I’ve realized that the most difficult thing about this game is building your fleet and preparing for future content and events. Thus, this guide will do its best to help you in that aspect of the game. Other basic mechanics not mentioned in the guide can be easily found on wiki : https://azurlane.koumakan.jp/Azur_Lane_Wiki or can be answered through DMs or #help on AL official discord server.
It will also start on 1-1 as if someone was starting out fresh and be divided into multiple parts of the progress : early game / mid game / late game / end game. If you’re at a specific part of the game and have trouble, don’t go straight into the specific game part. Do try to read through the previous parts or, at least, please skim through it. This guide will also only focus on EN. And this guide will include a lot of hyperlinks, so do please click them.
There is a lot of information in this guide. Take it easy and don’t overwhelm yourself. Enjoy the game.
INDEX
- Early Game
- Starters
- Ship Type
- Enhancing
- Limit Breaking
- Resources
- Daily
- Nevada & Oklahoma
- London
- Leveling
- Shouhou / Arizona / Pennsylvania / Rodney & Nelson
- Mahans
- Beaver Badge
- 3-2 / 3-4 / 4-1 / 4-2
- Difference of IJN Carrier pairs
- Usage of BB/BC in early game
- Fleet Compositions Early Game
- Early Game Checklist
- Mid Game
- Retrofitting
- Cleveland
- Unicorn
- Helena
- Wichita
- Preparation
- World 6
- 7-2
- Fleet Compositions Mid Game
- Mid Game Checklist
- Late Game
- Parallel vs. Converging
- Map Design
- Types of Enemy Fleets
- HE vs. AP
- Triple 406mm vs twin 410mm & twin 381mm
- Magnetic vs. Non-magnetic
- World 8
- Leveling new ships
- World 9
- World 10
- Fleet Compositions Late Game
- Late Game Checklist
- End Game
- World 11
- World 12
- Fleet Compositions End Game
- World 13
- Updates on the guide
- Logs
- Things to Add
- Feedbacks to Add
- Early Game
Welcome to Azur Lane !
You should have finished the tutorial by now and picked your starter.
It does not matter which starter you pick as you will get the others as drops later on. It is NOT recommended to reroll on this game unlike other gacha games.
The resources of “rolling” on this game are easily obtainable. There are also ships that drop from story mode that can easily clear the content.
- Starters
Here’s a quick note on each starter.
(Note: they’re all destroyers ( DD ) and they all have retrofits)
Laffey : Generalized destroyer who shoots fast and shoots out torpedoes fast. Although those torpedoes won’t do that much damage compared to other destroyers who focus on torpedoes, they load quite fast with her skills leveled up.
Z23 : Focused on her guns, she spits out bullets that hurt. Her torpedoes are mediocre and don’t load fast as well. However, she will do A LOT of damage just with her guns.
Javelin : The torpedo focused out of the three. She does well with torpedoes, but there are a lot of destroyers in the game who specialize in that area way better than Javelin. She also has incredibly high evasion stat with her skill that helps with her survivability.
I hope that you picked who you like and not based on what others say. Afterall, it’s your gameplay, not theirs.
- Ship Type
Ships in this game are categorized by different class types and have their own unique features in them that I will discuss very briefly.

DDs are usually small girls that have high evasion, but low HP.
CLs are usually “medium” size girls that have mediocre evasion with mediocre HP.
CAs are also usually “high-medium” size girls that have low evasion, but high HP (some of them have extremely low HP and light armor to top it off)
BBs / BCs are your big girls that shoot out big guns in the backline. They launch salvos, tap them on the bottom right of the screen.
CVs / CVLs are your carriers that can launch planes to either intercept or attack the enemy.
AR is Akashi and Vestal who both have the ability to heal your fleet, but at an extremely slow rate. There are CVLs that do their job better, but can only heal frontline.
(Battlemonitors BMs are not recommended for progress as the exp invested into them should be invested into top tier BB/BCs instead)
Try to memorize these because they will be frequently used throughout the guide.
- Enhancing
At first, your girls are going to have missing stats in their details window
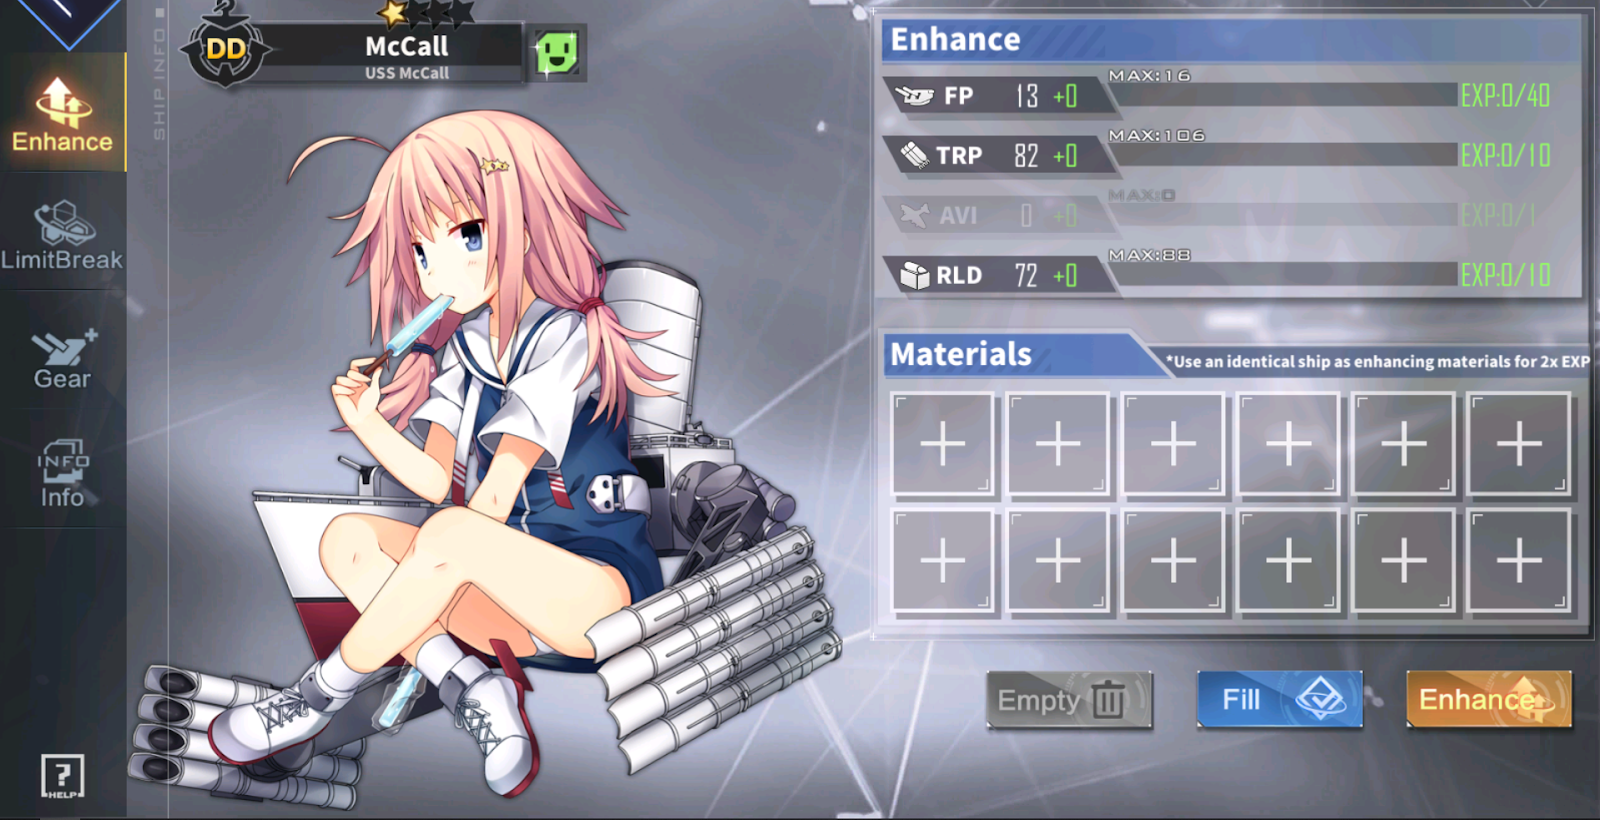
Use other common (grey) ships to enhance your ship to max their stats.
You can click “Fill” option which will automatically fill in the ships for you.
Then, click “Enhance” to see their stats rise up. This should be done for every ship that you frequently use.
- Limit Breaking
Right under Enhance tab, there’s also “Limit Break” tab. This allows your ship to become stronger and be able to increase their level cap. You need either their duplicate copies or “Universal Bulin” (purple) / “Prototype Bulin” (gold). Prototype Bulins (gold) are exclusively used to limit break other gold “Super Rare” ships while Universal Bulins (purple) should and can be used for everyone, but the Super Rare ships. You can limit break a ship three times with the last one requiring two Materials.
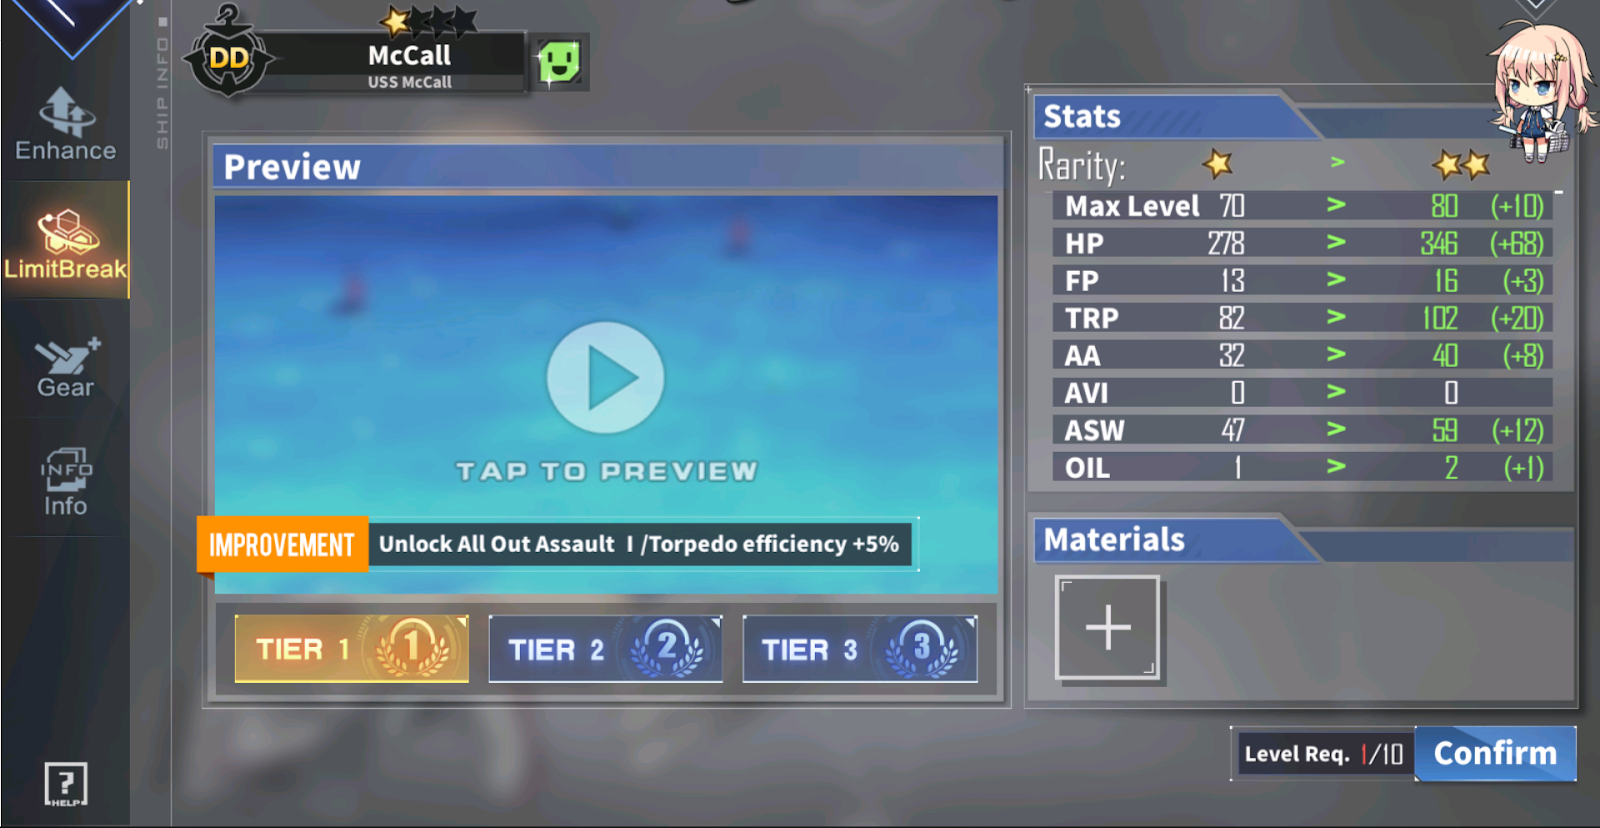
When you click on the “ + “ sign under Materials, this window will pop up and give you the option of either using a bulin or a duplicate
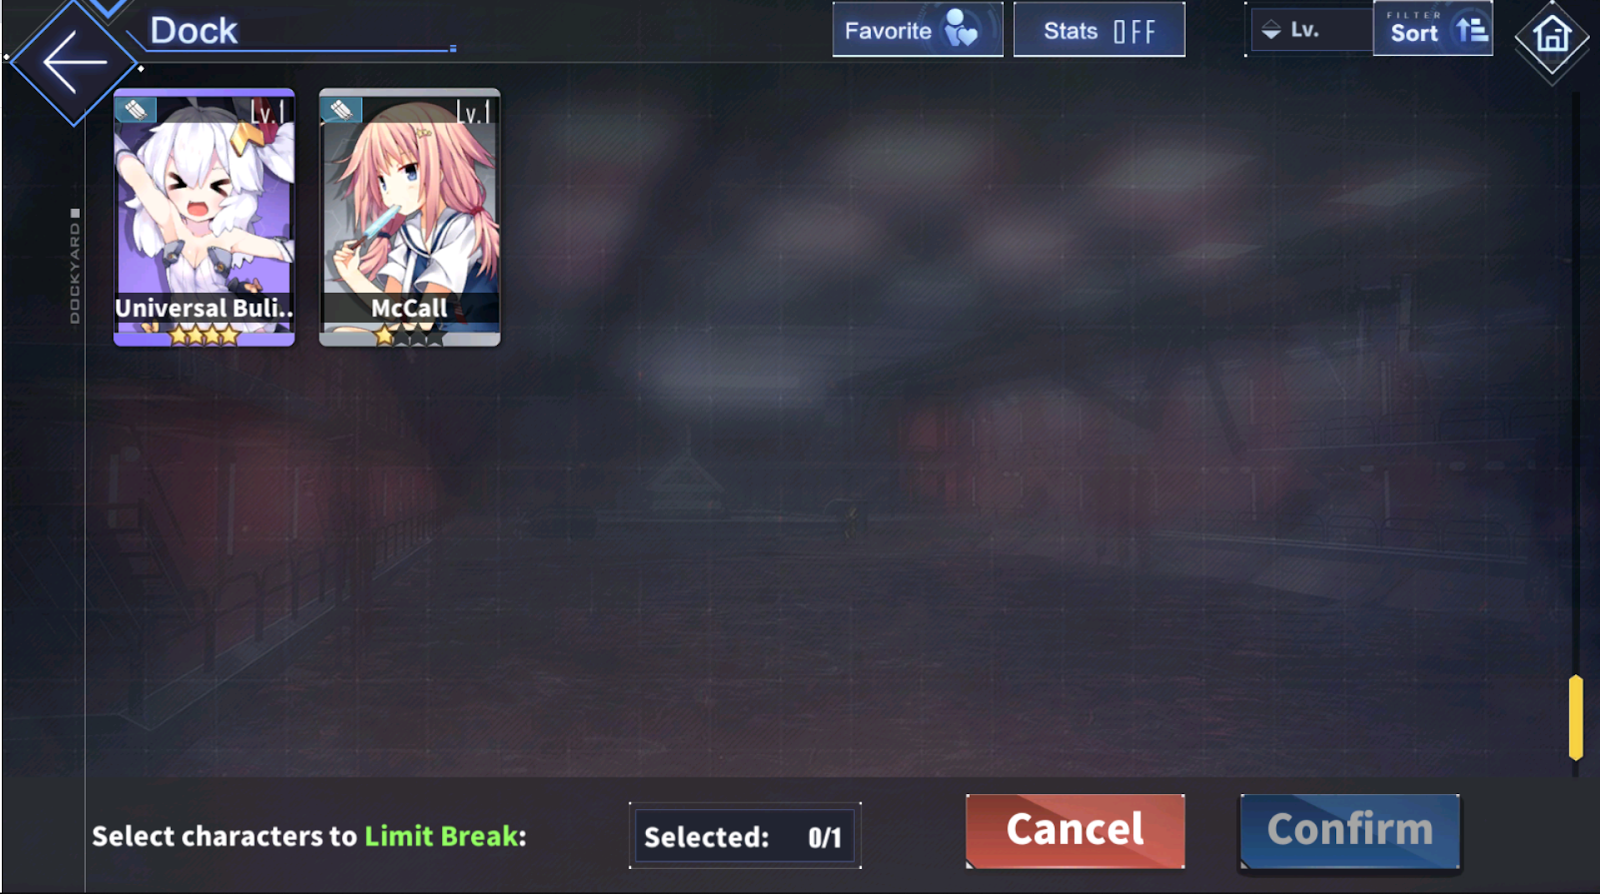
Choose whichever, and click confirm (preferably McCall in this scenario because you may want to save your bulins for someone else specifically).
Their stats may become higher, but they will also cost more oil.
So, when do I limit break?
You limit break when you have trouble clearing content. The only ships that are exceptions to this rule are mahans (Cassin/Downes coming soon in the guide), battlemonitors, and even ARs. Other scenarios are just pretty much memes.
Don’t be scared of using your resources to limit break your ships.
But learn how to cut down your fleet to run only what you need to clear, and cut down the cost.
- Resources
There are a lot of resources in this game and a lot of ways to acquire them throughout the game that you should know before really diving into this game.
Oil : Oil is what determines how much you play in this game. When you sortie your ships into battle, they will use up your oil. This supply can be acquired normally through canteen and commissions. Event shops are also another way of getting more oil. There will also be some oil after a maintenance. You can also buy Trade License for some extra oil.
Oil is also what stops you from playing the game. Be careful.
Coin : Coin is used for a lot of things in this game : limit breaking / retrofitting / Research commissions. They are what dictates how much you can strengthen a ship (basically “gold” in game currency). They can be acquired normally by running battles constantly, coming into contact with “ ? “ nodes, and clearing cargo fleets (very meh). Event shops will almost always have gold in stock as well that you can buy with event points. There’s also a shop by Shiranui where you can spend your coins to buy stuff (heavily recommend buying Tier 3 or Tier 4 gear boxes). You can also buy coins with gems in Akashi shop.
Gem : Another game currency that you can use to buy skins / third academy class slot / dorm slots / 2nd floor of dorm / dock expansion .. the list goes on. This is your pay to win currency in this game. It can be acquired normally and is limited to 3-starring story mode content. Sometimes, the developers will give out “apologems” if there are game breaking glitches after a patch.
Here’s the list of priority that you should do with your gems (excluding your favorite skins for your favorite ship and oath rings) :
- Dorm slots ( 4 ~ 5 slots )
- Third Tactical Class slot
- Dorm second floor (if you are a heavy grinder)
- Dock expansion (as much as you want)
Cube : Wisdom cubes are what you need to roll on gacha in this game.
Light banner will cost 1 cube and 600 coins while other banners will cost 2 cubes and 1,500 coins. These cubes can be acquired normally through missions and commissions. You get about 30 per week if you do the missions, and a lot more if you do a lot of cube commissions. More cubes = more rolls. Some event maps will have a mission to give you cubes upon clearing or 3-starring. You can also buy these with gems in Akashi shop.
Quick Finisher : When you roll on the gacha and build a ship, the ships will have a timer to finish building. You can make this process disappear with a simple click with the help of Quick Finisher. These can be normally obtained through commissions. You can also buy these with gems in Akashi shop.
F. Daily
On story mode, you’ll see a little tab on the bottom called “Daily”, which will direct you to this page :

Depending on the day of the week, you’re able to do different dailies while tactical training can be done everyday and on Sunday, you’ll be able to do all of them. Excluding Tactical Training, the dailies will unlock at commander level 10 / 25 / 35 / 50 / 70. The higher you can do the better rewards you will be getting, so try leveling your commander level as much as possible by sortieing more ships per battle.
Escort Mission : You will enter a map where a bunch of torpedo shooters will spawn. You can either bring a tank here or just stay top left of the screen and go slightly down and up when the torpedo spawns. When you’re at the top left, not all of them will spawn torpedoes to shoot at you. You’ll get different plates for firepower and air. These plates can be used to enhance your gear.
Advance Mission : You will face bunch of suicide bomb boats until the timer runs out. Bring in BBs/BCs with preferably CL auxiliary gun to handle these.
Beheading Operation : You will face bosses that spawn after another. Very easy to do, just bring your usual ships that can do damage.
Tactical Training : This one will unlock at commander level 60. A boss will spawn who will take more damage according to the type you chose : Aviation / Shelling / Torpedo. Aviation is Carrier launches. Shelling is BBs/BCs launch. Torpedo is torpedoes.
At level 70, these missions can give you a good amount of gold coins very quickly, especially on Sunday when you can do all of them, you’ll get about 10,000 gold coins. If you want full detail on daily runs, check here
Hard Mode : Everyday, you will be given 3 available runs for “Hard Mode”.

If you click on that scary icon, the music starts getting spooky and it’s Halloween all of the sudden. For now, I recommend just trying to progress as much as possible, and try to 3* all of them for mission rewards. Try to go as high as possible because the higher the better for data core. I will mention, again, later in this guide about “retrofitting” that can be done by using the blueprints from this mode of the story. Please try your best to do it everyday.
It matters.
G. Nevada & Oklahoma
Common USS Battleships who literally drop everywhere past 2-1. They’re
very mediocre until they retrofitted with those blueprints. They’re usable
until you eventually get better ships. They’re easily replaced, but you can use them for now if you want to fill up your backline with some ships.
Yorokobe shonen, because you will get them very very very frequently.
H. London
Sate sate, it’s time to talk about London.
As one of the best heavy cruisers in the game, London becomes an absolute monster of both dps and buffer who can be and should be used everywhere with her retrofit.
She also becomes hot as hell with a chain going around her and has a sharp ass look that murders anyone that comes close. With the firepower of a heavy cruiser and the ability to equip a DD gun with high efficiency of a destroyer, she is someone who you should not miss in your gameplay.
She drops from 2-1, but can be later found in 4-2.
- Leveling
In early stages of this game, the best way to beat content is overwhelming the enemies with high level. Higher the level, more hp and damage equaling to faster and safer clears. Grind out your starter + long island that you got for free in the beginning and any of the 2 other girls you get along the way at Chapter 1-4. Try to get Leander (very decent ship with retrofit as a plus) in Chapter 1-4 before you leave for Chapter 2. If you want to rush to Chapter 2, leave at around level 20, if you want to take it safe, leave at around level 25 (average of 4 ships).
Try to grind on the highest map that you can grind on, or events.
If you want to check out which ships are worth raising to min/max your time and resources, check out this guide by Kawaii Five-o
J. Shouhou / Arizona / Pennsylvania / Rodney & Nelson
After leveling up your girls, it’s time to pick up a solid backline ship. Although you can still use long island if you like her, I would like to recommend you these five ships instead: Shouhou / Arizona / Pennsylvania / Nelson & Rodney.
A quick summary on these five ships.
(Note: they all drop from Chapter 2-2 with Rodney at 2-4 and Nelson at 2-3)
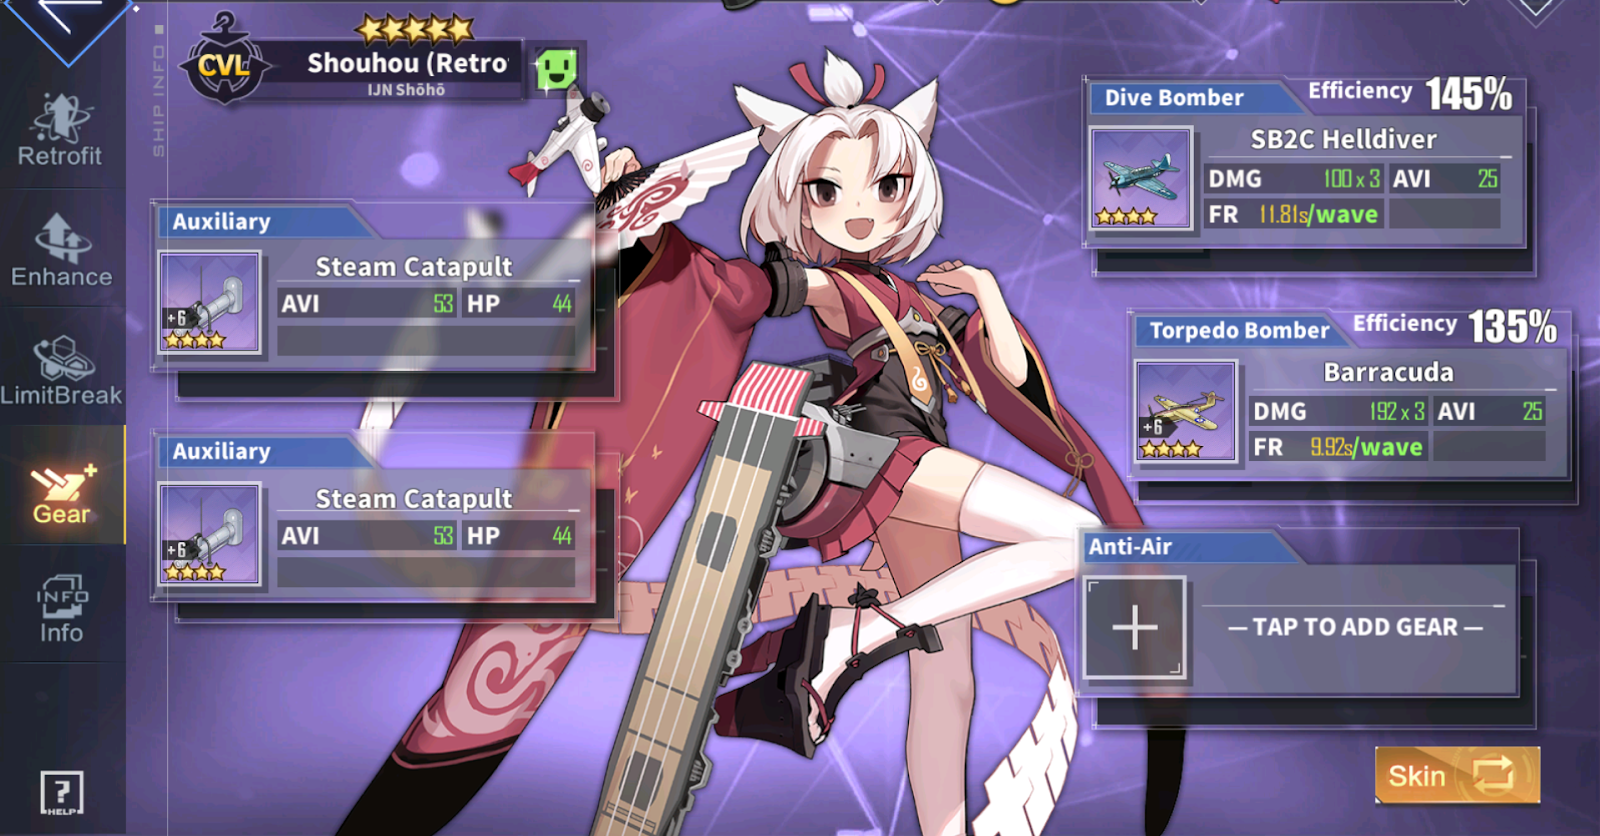
Shouhou : A light aircraft carrier ( CVL ) that can heal your frontlines and do pretty good damage at the same time. She has the potential to become the solo carry in your early game if you grind out the gears that she needs, which are coming up in the next chapter.
Arizona : A battleship ( BB ) that can heal, which has a 50% chance to heal. A simple coin toss. She can somewhat handle suicide bomb ships with her DD auxiliary gun.
Pennsylvania : A battleship ( BB ) that can clear out mobs fast with her barrage. The barrage skill needs to be leveled for her to be able to clear consistently. She has DD auxiliary gun like Arizona to handle suicide bomb ships to an okay extent.
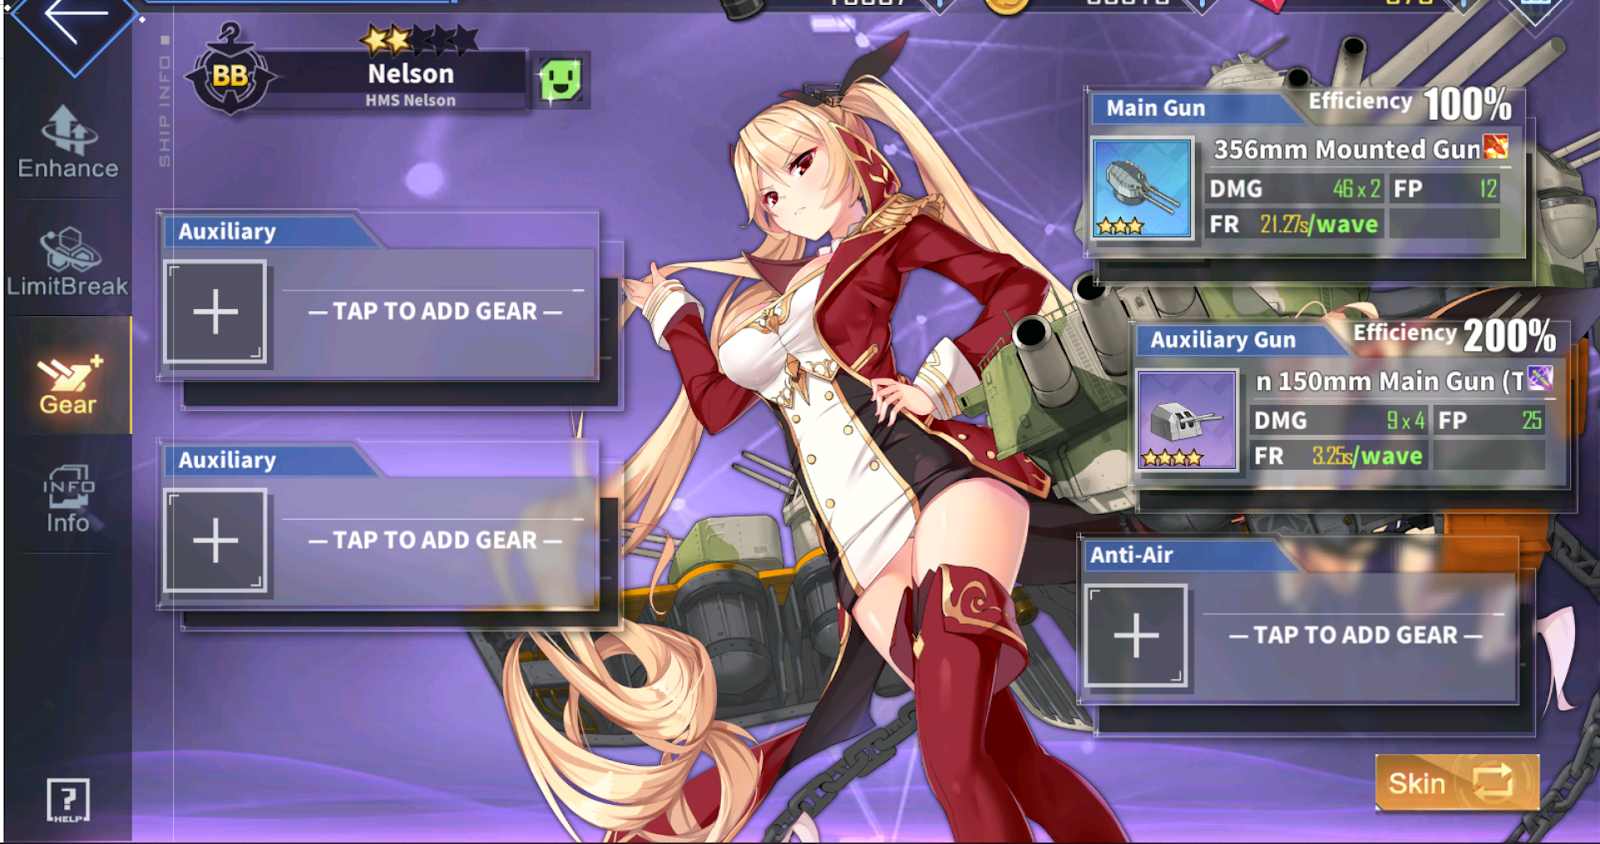
Rodney & Nelson : Battleships ( BB ) that are identical copies of each other. They’re able to equip light cruiser ( CL ) auxiliary gun that can deal with suicide bomb boats better than DD guns. They also have a barrage that can help you clear faster; however, these girls’ barrage damage falls off hard in late game.
I personally recommend Shouhou because she can get her best in slot gear pretty early on (literally the next chapter) while the battleships have their best in slot gear in Chapter 6, which will be a bit later on. Shouhou also has retrofit which gives her more HP / Damage. And she heals.
But you can always use whoever you like.
*Note that a consistent healer like shouhou is necessary for late game / end game content though*
K. Mahans
Along your journey, you will notice that you may have gotten these two ships : Cassin (the cute one) and Downes (the not so cute one). Together, they’re called the Mahans. These two destroyers ( DD ) are special because of their skill : “When Health falls under 20%, heal 15% (25%) of max Health. Can only occur once per battle“. Yes, you read it correctly, these two ships won’t die unless they’re inflicted enough damage to outdo their heal within a single battle. They’re essentially “zombies” and cost only 1 oil thanks to their rarity and class (at 0 limit breaks).
Although they’re extremely good ships, you won’t need to raise them yet since you want to raise other ships first for a “diverse” pool of ships to choose from in the future. Leave them aside for now at 0 limit breaks while leveling them every now and then. However, if you’re someone who grinds very frequently (+5 hours per day), I recommend raising these ships to level 70 with 0 limit breaks to help with your commander experience and oil supply.
L. Beaver Badge
Best in slot for evasion and the ability to increase the speed of movement
The Beaver Badge is an auxiliary item that can be obtained from “collection” tab and very early on.
The ships that you need are :
(Note : They just need to be limit broken twice each)
Thatcher / Aulick / Foote / Spence all drop at Chapter 2-3
While Charles Ausburne drops at Chapter 3-2, which happens to be the next focus of this guide.
M. 3-2 / 3-4 / 4-1 / 4-2
Now, it’s time to grind. Every game has a grinding aspect, but Azur Lane is a grind game in its entirety besides looking at pretty girls. I’ll go one by one and explain why you should grind in each chapter. You may have a hard time grinding if your ships’ levels aren’t up to par. You should have around 4 ships around lvl 40 ~ 50. Also, try to have a couple of Blue Hydraulic Steering Gear and Blue Naval Camouflage from Chapter 2-1 and 2-2 respectively before you leave chapter 2. Now, onto chapter 3.
Chicago does a lot of damage, but she is extremely fragile in exchange. (I would personally pick up Chicago here as she will be your first solid DPS until you retrofit the starters). She drops from 3-1
There’s also Houston that drops from 3-1. She can get some pretty insane evasion with her skills, but she also drops in 3-4, which you’ll be grinding out a lot, so don’t worry about it too much.
So, we look at Chapter 3-2 instead and its notable drops:
Purple Steam Catapult : Best in slot auxiliary gear for carriers until its gold version. This is recommended on all carriers, including Shouhou, for damage.
Purple Single 127mm : A main gun for destroyers (DD). I don’t like its volley too much and prefer another main gun that can be farmed later on. You can use them, but don’t try to farm them after you’ve farmed this upcoming gear.
Purple SB2C Helldiver : This baby right here is the best in slot for dive bomber in the entire game. Yes, a purple gear, not a gold one, is the best in slot. This should sort of be a warning to you that not all gold gears are the best in this game. This dive bomber is what makes using shouhou so amazing early on. Once Shouhou equips this plane, her damage will skyrocket.
Try to farm one helldiver for now, and two catapults, but RNG may not favor you and you may have to be here for a while.
Then, we skip Chapter 3-4 grind for now because that’s where we’ll level the ships we’ll be getting in Chapter 4-1. Just clear Chapter 3-4 so you can go into Chapter 4-1.
Chapter 4-1 and gunbotes
There’s a term called “gunbote” that you may have seen a couple of times somewhere. It refers to ships that can use two guns at the same time, and do not have a torpedo slot. Gunbotes are consistent and do not have torpedoes to do burst damage. So, they whittle down their opponents by simply shooting more at them. And Chapter 4-1 has quite a lot of these ships :
Phoenix : A light cruiser ( CL ), she has the same skill as the Mahans ; the enemies will have a very hard time killing her as she regenerates her health after the threshold after each battle. This girl is the hardest working girl in any dock. She can be obtained early on and can be used even at the end game.
Brooklyn : A light cruiser ( CL ), she has a skill to buff other cruisers in the fleet. This includes both heavy cruisers ( CA ) and light cruisers ( CL ). A pretty good addition to your future boss fleet during mid game, but can be replaced by many other ships.
Portland : A heavy cruiser ( CA ), she is one of the tankiest vanguard ships in game currently with her retrofit. She also does decent damage to top it off. She is what I would call, indestructible. With the power of love for her sister, Portland withstands anything and everything that comes in her way. She is the tank you absolutely do NOT want to miss out on. In the current content of EN, she has the capability to solo frontline Chapter 12 with a healer. If you didn’t get her from clearing Chapter 3-4, get her now.
And besides the gunbotes, there’s also one ship from 4-1 that shines very brightly early game who also has her retrofit.
Saratoga : An aircraft carrier ( CV ), with one of my personal favorite skins in the game; Saratoga will destroy everything once she launches. And even when she’s not launching, she has salvos and burn DoT that make up for the downtime. Her stats are pretty high with 401 Aviation at lvl 100 Retrofitted. She will be the staple of your future boss fleet.
There’s also a purple Torpedo Bulge drop at Chapter 4-1, which is a great auxiliary gear for light cruisers against heavy torpedo based bosses, but for now, you can skip it if you finished farming the previously mentioned ships.
Chapter 4-2 and Gear
Chapter 4-2 is PACKED with great gear. These gears will be used and should be cherished forever. You will spend a lot of time here for a long grind.
Purple Twin 120mm : One of the best guns for destroyers that can compete with even gold guns (extremely hard to farm), as well as the best in slot auxiliary gun for Battleships and Battlecruisers who cannot equip a light cruiser gun, like Arizona and Pennsylvania mentioned previously. Since the ammos are normal compared to other top tier guns that are usually H-Explosive, they travel faster and can make contract with suicide ships faster (damage done to suicide ships are not affected by bullet type). These are also the go-to guns for your gunbotes that you farmed for now.
Purple Twin 203mm 3rd Year Type : Another best in slot gear, but can be replaced in late game. This gun is used on heavy cruisers like Portland and shoots out HE bullets. The only gun that contests this gun early on is the twin 203 (SK C/34), but it shoots out AP bullets which are not ideal as most mobs are light armor, especially early game. Farm a set for Portland and Chicago if you picked her up.
Twin 150mm aka TBTSK : Best in slot gear (excluding Research gear) for light cruisers. This gun will be the gun that you’re going to want the most and farm the most as early / mid / late game mainly focus on the usage of light cruisers. The counterpart is the Triple 155mm which is HE ammo, but its spread is too wide to be used for light cruisers. However, as a special case, Belfast’s skill makes up for the spread and performs pretty well with it.
Chapter 3-4
Now that you’ve farmed the ships and the gears, it’s time to rot, but hold on a second before you rot. You might have noticed that Saratoga requires TWO, not one, but 2? SB2C Helldivers. If you want to use Saratoga to full potential, have a “quick” pause at 3-2 and farm up some more helldivers. With this out of the way, you can finally go back to Chapter 3-4.
The time has finally come for you to rot.
Chapter 3-4 is the early game graveyard for players as it requires a fuck ton of grinding. This is where you’ll level your ships to +lvl 70, and farm a lot of gear and ships. Before I send you off, there are things to note in Chapter 3-4.
Akagi & Kaga : Yes, these girls are visually fantastic, have great oath skins, great dialogues, amazing damage, and fluffy tails. These will be the first Super Rare ships that you can farm. However, these two fluffy girls have to be used in pairs to be maximized, which costs a lot of oil and can be stressful to gear them up in early game. In addition, Saratoga can simply do their job by herself in the boss fleets. You can skip these, but not many can resist their floof.
Purple Toolkits : The most used auxiliary gear in game. Destroyers equip two of these most of the time, light cruisers equip one, and any low level ships that you want to bring to a higher level content gets them as well for survivability. At max enhance, they provide 500 HP along with a passive regeneration. You should grab 3 ~ 6 of these depending on how much you want to suffer. Although they can be obtained from any tier 3 and tier 4 boxes, I wouldn’t try my luck.
Purple F4U Corsair : An extremely good fighter plane that can be used until you get a gold fighter plane ( Hellcat / Seafang / Reppu / and its golden version VF-17 ). There’s not much to say besides the fact that it’s pretty much better than other purple fighter planes in game.
N. Difference of IJN Carrier pairs
There are three pairs of IJN Carriers pairs in this game (relevant ones).
Akagi & Kaga, the girls from 3-4 who are both SR
Zuikaku & Shoukaku, from VDIR who are both in build now
Souryuu & Hiryuu, from 3-1 / 3-2 / 3-3 who recently both just got their retrofits.
Akagi & Kaga are for fast fights since they launch very early on and have the ability to clear mobs before your BB/BC launches (for BB/BC to focus their damage on the boss).
Zuikaku & Shoukaku are for long fights that require you to bring in full fleets. They buff your fleet + get stronger with each launch. They’re also built to handle long fights.
Hiryuu & Souryuu are kind of the middle ground between the other two pairs. They buff frontline while dealing massive amount of damage. And Hiryuu also has a skill to become invincible to handle a lot of damage on her own. However, these two need to be retrofitted to be upto par with other pairs.
Choose who you like, but make sure they’re paired correctly.
O. Usage of BB/BC in Early Game
If you’ve been paying attention to the guide, I mention nothing about farming battleship/battlecruiser gear. Their best in slot is found in world 6, but you can still use a blue gear from 1-4 : Twin 356mm. They cannot reach max potential with this gear and will also be crippled more by their limit breaks in early game.
However, if it’s a BB/BC whose damage is centered around their barrage that scales off skill level like Hood, you won’t be as handicapped as other BB/BC.
If you are having trouble against jihads, there are two options you can do in early game.
- As usual, overlevel your backline to the point where they just tank it
- Bring in BB/BCs who can equip light cruiser guns to defend the backline and put them as flagship.
If you don’t play a lot, the latter is the better choice. Grab any decent BB/BC who can equip a light cruiser gun (preferably twin 150mm tbtsk) on the auxiliary slot and place them as flagship.
P. Fleet Compositions Early Game
The most impactful factor in this game besides gear and level is the composition of your fleet. You can build a fleet using bunch of full top tier ships, but if they’re placed incorrectly or used incorrectly, they’re nothing, but scraps.
As this is the first time that this is mentioned in the guide, it will be explained in full detail on how to build a fleet and what to do with each ship.
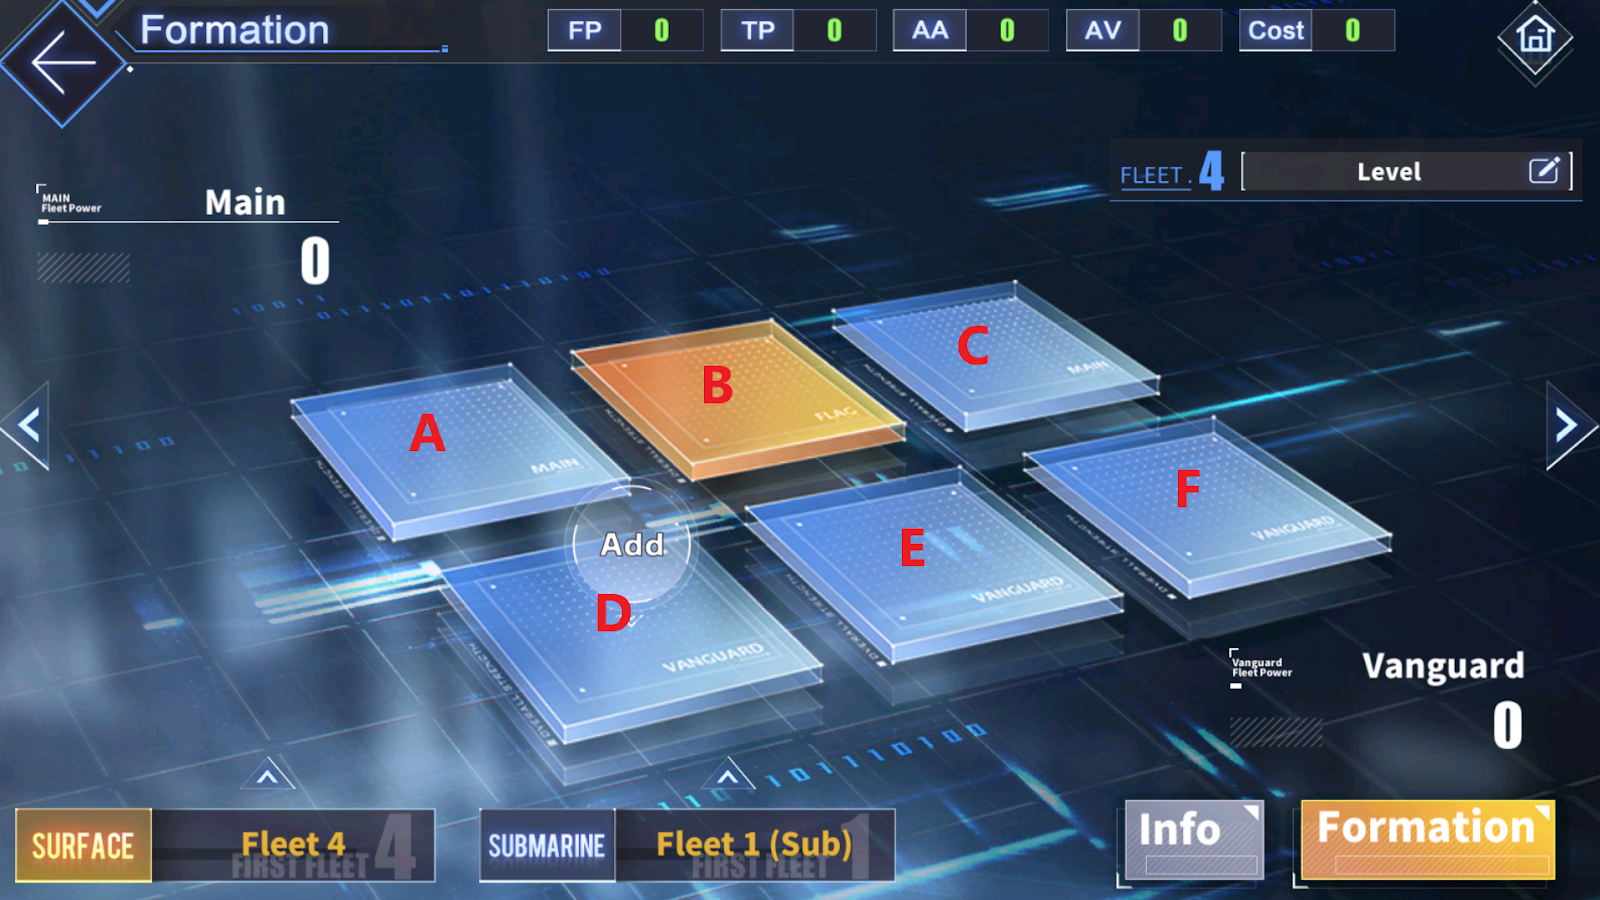
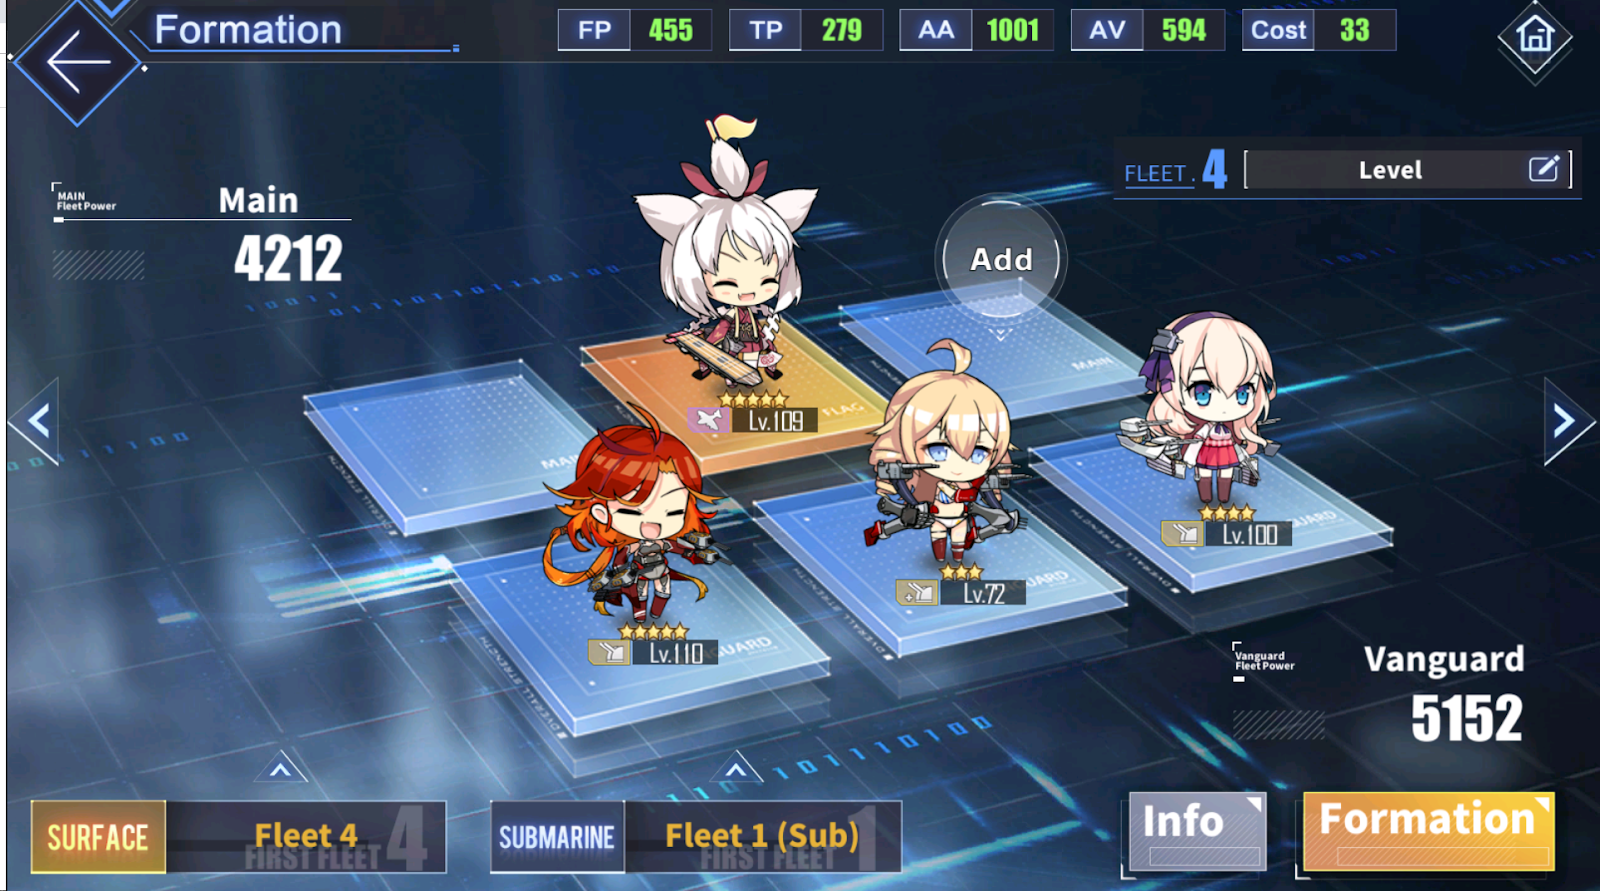
Let’s take a look at this fleet formation together.
There’s ABC which consists of backline, with B in the center as the Flagship.
And DEF which consists of frontline, or vanguards.
The Flagship will take the most damage against suicide bomb boats and the salvos from enemies that travel to the backline will usually target the flagship. This is where you usually want to put a tanky Battleship / Battlecruiser to withstand the incoming damage. When the flagship is eliminated, so is your fleet. The battle will end and will result in the flagship either being replaced by another backline ship, or else the fleet will be gone from the battle.
The Flagship is also the place where you put barrage boats that focus on the center of the map. An example would be this Nagato, a battleship whose barrage that comes out after her salvos launch focused on the center of the map. There are many other ships that focus on the center of the map, such as, Pennsylvania / Washington / Amagi / Nelson & Rodney, Erebus & Terror, and so on. Thus, in most cases, it is not recommended to bring more than one center focused barrage ship as they will just hinder each other’s damage.
And you have A and C who can also help out the flagship against suicide bomb boats if they are able to equip an auxiliary gun.
For the frontline, the line up is based on the tankiness of a ship.
D slot belongs to the tankiest ship of the frontline as it will be hit by the most amount of damage in auto play.
E slot belongs to the squishiest ship of the frontline as it is covered by both ships in D and F slot.
F slot belongs to the ships that are the middle ground between the squishiest ship and the tankiest ship of your frontline.
The tankiness of a ship is determined by a lot of things that all intertwine with each other:
Level : If a ship is at least 10 or 15 levels higher than another ship, it has the potential to be tankier than the lower level ship. As mentioned previously, the best way to beat early game content is to overlevel. This allows your ship to take in less damage due to the level difference between the enemies and your ship.
Gear : For example, you have two very similar ships, but their gear differs in auxiliary slots where one has a toolkit and the other doesn’t, then the ship with the toolkit will obviously be more tanky because of the 500 HP increase.
HP : Self-explanatory : more hp, the more damage that can be taken.
Evasion : Evasion may differ by class of the frontline. Destroyers tend to have high evasion, but low HP while heavy cruisers tend to have low evasion, but high HP, with light cruisers on the middle ground of decent HP and decent evasion at lvl 100. Of course, there are many exceptions to this rule, like Chicago who has very low HP for a heavy cruiser. Heavy cruisers also get a huge increase of evasion after lvl 100 to 120 which makes them a lot tankier in the future.
Skill : A skill can make a ship extremely tanky. A very fine example of a tanky ship mainly due to its skill (and the other factors) would be Yukikaze-sama. Despite having low HP, her skill allows her to scoff at incoming damage as they become literal 1’s, making her literally the best tank on the frontline in game with RNG.
Luck : A stat that determines hit and dodge rate of a ship (indicated by a clover symbol)
Armor : Light / Medium / Heavy armor also determine how much a ship can take from an incoming damage. Heavier armor lets them handle “heavier” damage in a sense for PvE.
All of these factors affect the tankiness of a ship and should be considered when building your fleet. It’s always better to try it out yourself or ask others, rather than just blindly playing this game. Try to see who’s taking more damage and surviving. Then, try to swap them around and see who will survive longer this way and that way. Experiment.
If you have been following the guide to this extent, the fleet comp should roughly look something like this (does not have to be exactly the same) :
Disregarding their levels, Shouhou would take flagship as she’s the only ship for backline, or perhaps if you did pick up one of the battleships, then, Battleships with center focused barrage would be the flagship while Arizona / Shouhou / or even Saratoga can be on the side.
Although, if a ship is able to equip an auxiliary gun, it should take priority of getting flagship spot over other ships who can’t equip an auxiliary gun.
Phoenix would be the tankiest as her skill lets her soak up a lot of damage per battle. Chicago would be in the middle as she has the lowest amount of HP / evasion / light armor / no skill to boost her survivability. Then, leander takes the top position as she is the middle ground between Chicago and Phoenix.
If you have Portland, then it can become something like Portland / Chicago / Leander as well.
Another example that you can do would be this :

This is your typical set up when leveling a vanguard ship.
You sandwich the ship ( like Laffey is atm) with ships that can withstand a lot of damage, ie. Mahans. This way, Laffey will take less damage and survive longer, which means more exp ! It does not have to be Shouhou in the backline and can be other ships instead, but heals are always nice to have for the frontline. With this sandwich “technique”, you can also bring a low level ship to a higher content for higher experience gain.
Now, with your understanding of fleet compositions, you can sort of mix and match two fleets with the current ships you have.
On another fleet (second fleet), Saratoga (any hard hitting carrier or bb/bc) should be your backline with other ships that you may have leveled for the frontline.
If oil is not your problem, then, feel free to fill in two full 3:3 fleets, otherwise try to keep 1:3 fleets for commander experience gain. More ships you deploy, the higher experience gain.
The ratio is Backline : Frontline, ie. 1 backline, 3 frontline for 1:3.
Finally, that’s the end of early game. You have cute girls who can do some damage and survive long. These girls that you want to use frequently for the next content should all be above level 70, and should have at least +3 enhanced gear. They also should be at max limit break with the exception of the Mahans.
Some quick pictures to show you how to build ships mentioned in guide.
You’re not going to have access to a good torpedo bomber planes, yet. So don’t worry too much about what you put in there. For Anti-Air, higher tier means better AA generally, so try to put your highest tier Anti-Air gun there. The two steam catapults and SB2C Helldiver should have been farmed in Chapter 3-2.
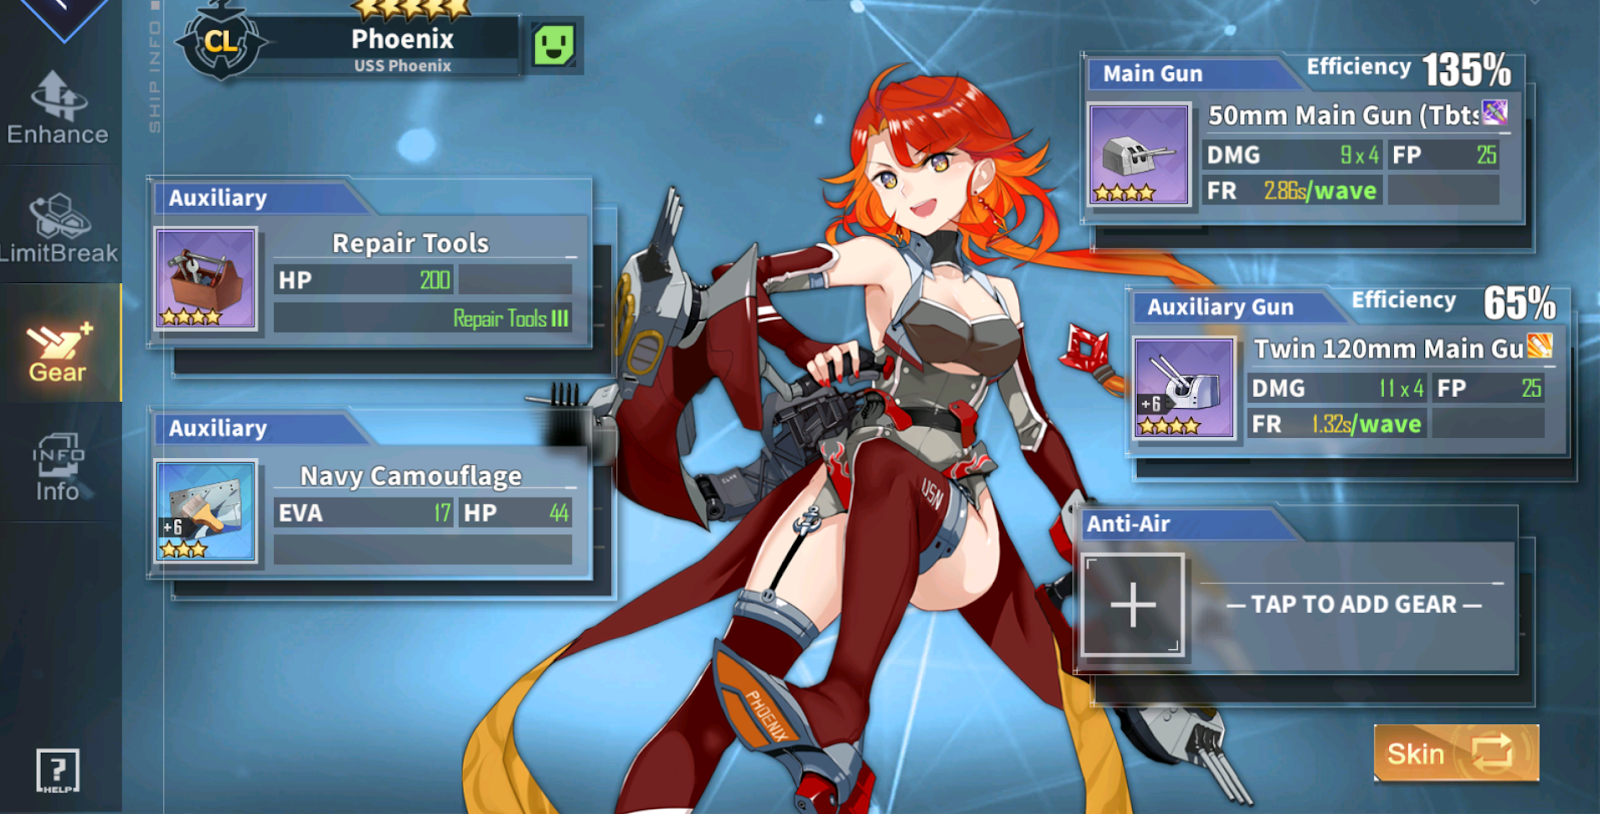
*Note : Specifically, Phoenix benefits more from double toolkits because of her skill to regenerate her health. More healthpool = more health regenerated.
This will be your general light cruiser set up for now. Blue Navy camouflage / Steering wheel are best in slot for evasion except for Beaver Badge and Research gear. You can put another toolkit there, or a torpedo bulge instead of the evasion gear, but remember to always have at least one toolkit. Purple twin 120mm can be swapped out for GOLD twin 127mm if you have them. Anti-air, as always, put the highest tier anti-air gun that you have available.
For destroyers, double toolkits for maximum survivability.
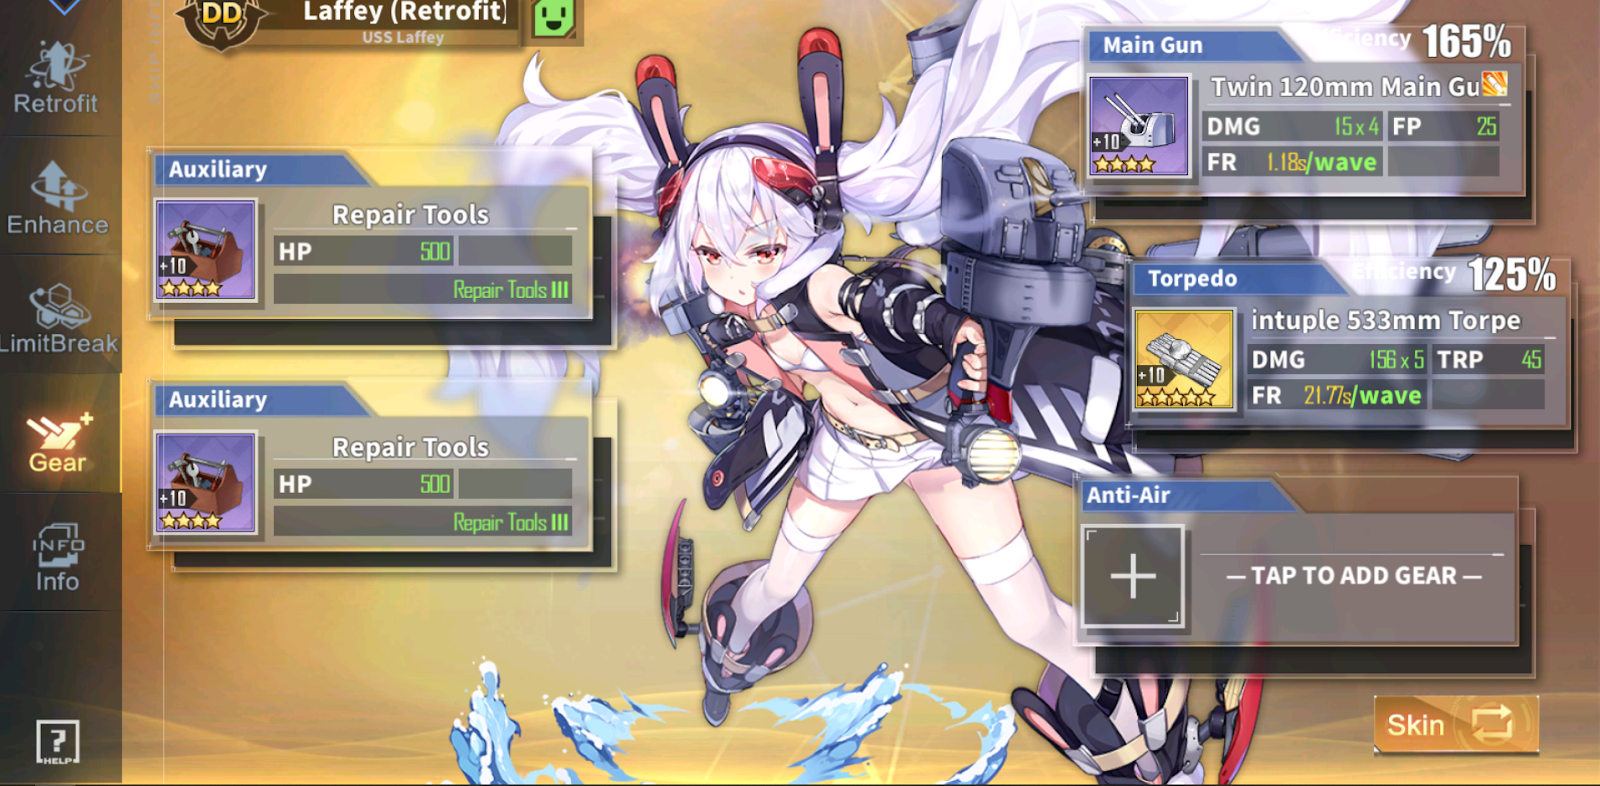
This should be generally how your starters and other destroyers should be geared for now until you can get better guns for them. Z23 and Javelin can get gold twin 100mm if it’s available. Laffey can use Gold Twin 127mm once retrofitted. (Torps and AA can be any gold tier or purple tier as long as it’s not some Triple torpedoes)
For heavy cruisers, most of them will get double evasion auxiliary gear like steering wheel / camouflage.

This is how your CAs should generally look like. There are some special cases where if a CA is solo frontline for mob fleet, you can give her a toolkit instead to keep her HP passively regenerating, or someone like Minneapolis can get one toolkit as well. If you have a Beaver Badge that’s not being used, try to always put it on your CAs as it boosts their effective HP immensely.
For BB/BCs, the best in slot gear is still pretty far away, but you can do something like these for now:
For the Auxiliary, you can use blue rammer and fire extinguisher. There aren’t really good choices to be honest until you reach world 6. But, if you did get lucky with boxes somehow, try to gear them with SG radar / Autoloader or fire control radar.
For Auxiliary gun, some BB/BCs can use CL gun or DD gun. Nelson above can use CL gun while Arizona / Pennsylvania would have to use DD gun. Just slap the purple twin 120mm that you farmed in 4-2 on them as it is their best in slot to deal with suicide bomb boats.
The 356mm mounted can be farmed in 1-4 along with rammer
Q. Early Game Checklist
In this section, we will briefly go over what you should have before you proceed further and cover what may not have been mentioned in the guide. You should also be raising two fleets that can rotate in and out of your dorm.
- Starter at level 70 with max limit break
- At least 2 Backline ships at level 70 with max limit break (Shouhou & Saratoga, or IJN carrier pairs)
- At least 3 ~ 5 Vanguards (including Starter) at level 70 with max limit break
- Beaver Badge
- Light cruisers equipped with purple twin 150mm TBTSK
- Destroyers equipped with purple twin 120mm
- Heavy cruisers equipped with purple Twin 203mm (3rd Year Type) HE
- “Easy” Exam finished
- Dorm ( 4 ~ 5 slots, with the option of 2nd floor)
- Tactical Class 3rd slot
- Hard Mode, as far as you can handle.
II. Mid Game
Before we talk about what’s coming ahead, you should now have two fleets that can rotate in and out of your dorm. Try to increase the happiness as much as possible so that you can grind for longer. If you’re a heavy grinder, invest into a 2nd floor of the dorm, it’ll help you tremendously especially since now you’re going to level more ships. And, also start running hardmode maps everyday to retrofit your starter / Shouhou / Portland / Saratoga / London / Hiryuu & Souryuu if you can.
From this point on, we’re going to build on top of the foundation of information mentioned previously and focus on specific ships that can be added to your fleets. I will explain their role in the fleets as well as what gear to put on them.
Along your journey, you’ll often find that you have missing gear or that you can’t get enough of a specific gear. In that case, take a look at this guide made by Enbayft #2527. If you don’t have a specific gear, just use the gear lower than the ones that I recommend, as simple as that.
- Retrofit
I’ve mentioned retrofitting quite a lot through this guide. It’s a feature in this game where you can make your ships stronger (or in weird cases, weaker). If you go to the details tab of your ship, you’ll notice a “Retrofit” tab above “Enhance” for specific ships as not all ships have retrofit yet.
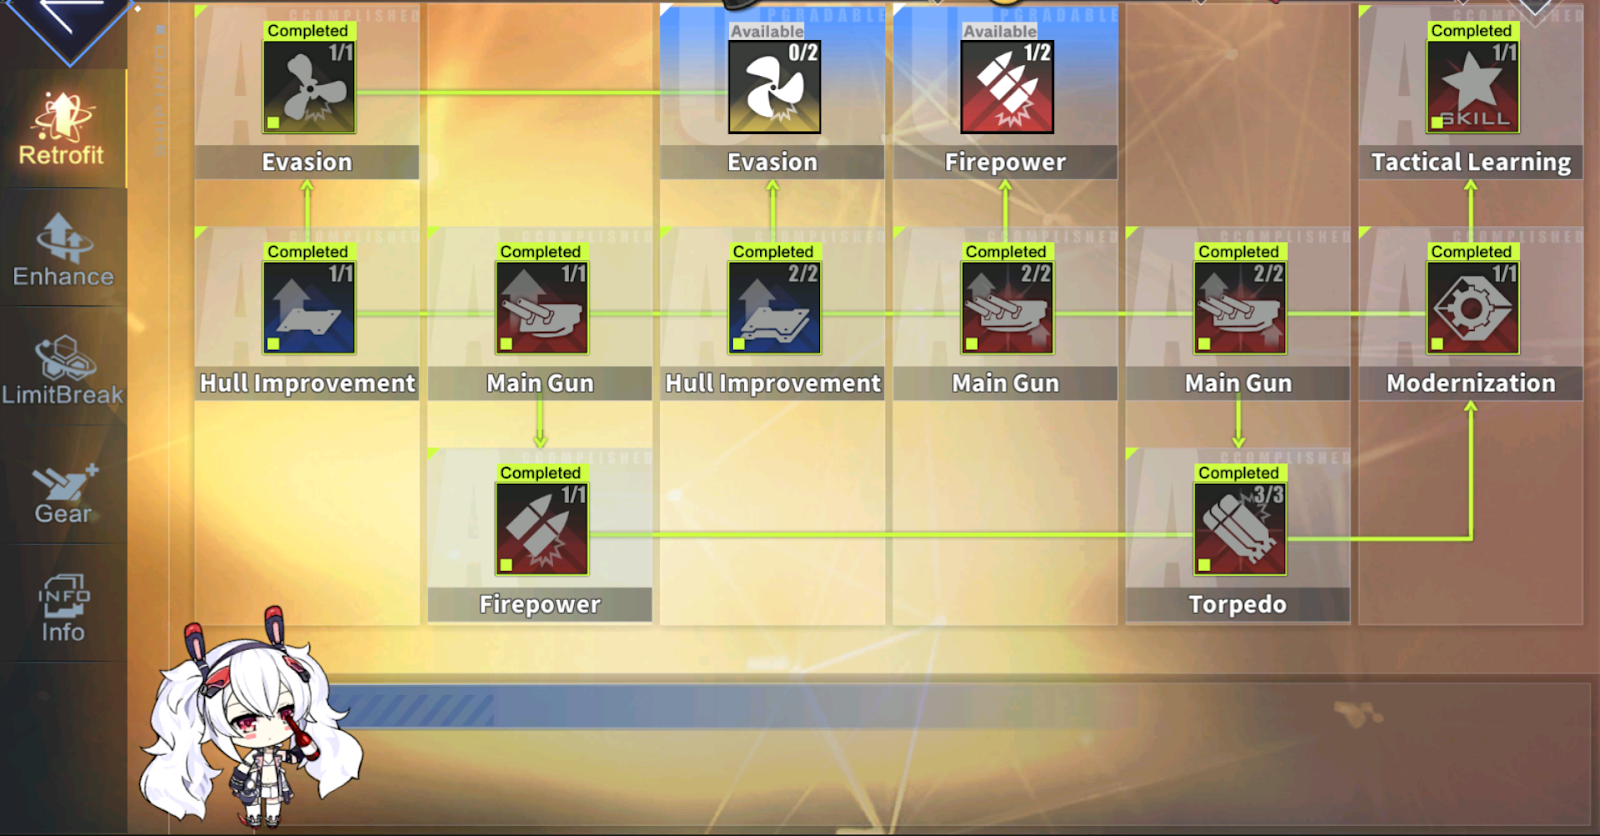
You’ll find something like this. Laffey for this specific case.
It’ll ask you to use “Retrofit Blueprints” to get the specific node for an addition of either stats or skills. There are three tiers overall, ranging from Blue, Purple, and Gold, while there are four different types of blueprints : Destroyer / Cruiser / Battleship / Carrier.
Destroyer blueprints drop from X – 1 (X being any chapter of Hardmode)
Cruiser blueprints drop from X – 2 (Cruiser can be used for both CA/CL)
Battleship blueprints drop from X – 3
Carrier blueprints drop from X – 4
You have three available runs in Hard mode daily (available by clicking on “Hard” at bottom left of story mode, by the way) that can drop you two blueprints per run. More blueprints can be obtained through events or exchange shop through medals.
The Modernization node requires you to have either a duplicate or a Bulin and will raise the rarity of your ship (kind of like limit breaking) while Tactical Learning will allow your ship to learn another skill. Definitely go for both except for Yamashiro and Fusou (coming later in the guide)
- Cleveland
Beyond Chapter 4-2, there lies the prettiest aniki in the world : Cleveland.
She can be obtained from Chapter 4-4, and is your typical gunbote light cruiser just like Phoenix and Brooklyn and should be geared as such. In addition, her excellent statlines allow her to be both a tank and a decent DPS in your fleet. Her first skill is useful, but it does not proc as much as you would want her to. She can also handle incoming planes really well, but that’s not a problem for Mid Game yet.
In my personal experience, she was my tank for my boss fleet from the moment I got her to now. A very consistent tank that can help your boss fleet.
She is extremely good for World 12.
- Unicorn
As one of the two consistent healers in the game (Shouhou), Unicorn has the ability to heal and handle incoming planes at the same time with her fighter plane slot. Although Shouhou does a lot more damage than her, Unicorn can heal a bit faster than Shouhou. In addition, if you don’t like how Shouhou looks and you also happen to be a siscon, this is the girl for you.
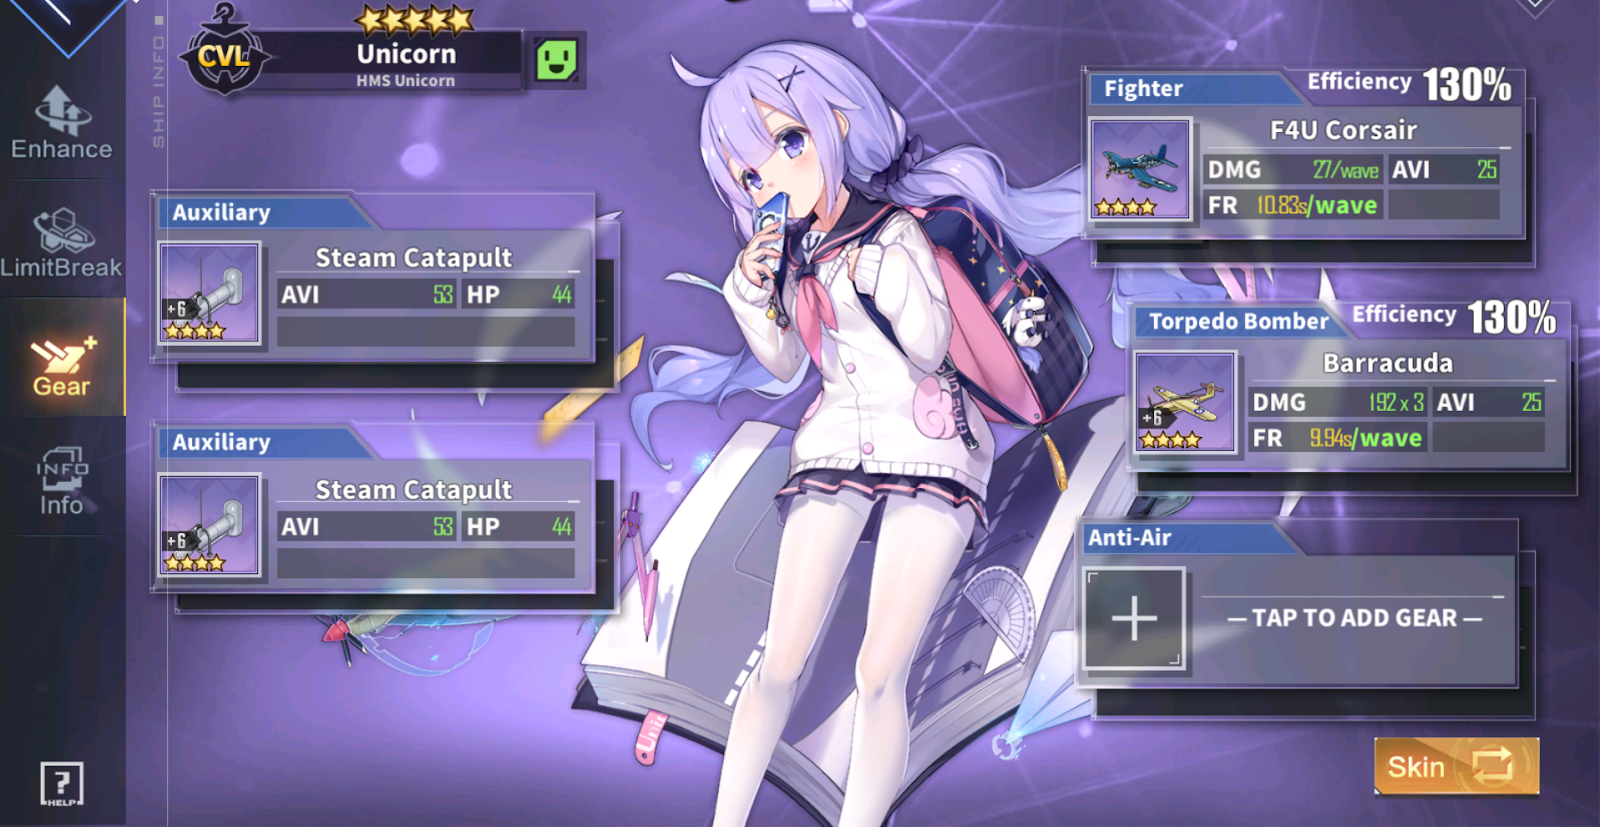
Almost the same as Shouhou above, with the difference being the ability to equip the fighter plane, which you also happened to grind at Chapter 3-4. It’s always better to have more than one healer just in case your boss fleet requires support from the backline (ie. End game 11-3). With the introduction of W12, Unicorn is a lot better than Shouhou for long term.
Unicorn at level 120 in current game content ( World 12 ) makes life easy. You use her way too much to the point where she naturally becomes level 120.
Quick note: You do not build your healers for the speed of the launch ever. The amount of damage lost does not make up for the amount of speed gained. If you kill faster, your frontline will obviously will need less heals overall.
- Helena
The undisputable most cherished smile in the world, Helena (5-1 & 6-1) comes with one of the most broken skills in the game. The ability to make the enemy take incoming damage by +40% is absolutely ridiculous. She is your typical gunbote and should be geared as such, but she is only amazing in boss fleets as her debuff kind of diminishes during mobs since it only affects what is on the screen.
I personally used her in the combination of Enterprise (Saratoga, in your case) as it sort of matches the time of the debuff proc and carrier launch. Whoever is hitting the boss with Helena’s debuff will be dealing devastating damage. However, if your Helena doesn’t proc with 60% rate, then that just means she doesn’t like you. So, earn her favor.
- Wichita
With Helena in your dock, you can finally go for a Collection reward ship named Wichita who is the embodiment of glass cannon in this game by limit breaking Phoenix / Helena / Brooklyn to the point where they add up to 12 stars together.
She has low HP & Evasion on top of her light armor; however, with her high FP and 25% chance to shoot an extra round, she does absolutely crazy amount of DPS. Just make sure she has Beaver Badge and placed in between tanks, so that she doesn’t get one-tapped by a boss. Gear her with the same gear as Portland above. A LOT OF EVASION
- Preparation
You’ll be grinding these ships’ level where you will grind for their gear. If they cannot survive at first, try a lower map. If there is an event, prioritize that at all cost.
You level ships with your mob fleet, and then move them to your boss fleet once they’re high enough. Don’t just stick a level 1 Helena in your boss fleet and complain about how she sucks. Learn to use each ship. Learn how their skills work. And as much as I hate to say it, read.
- World 6
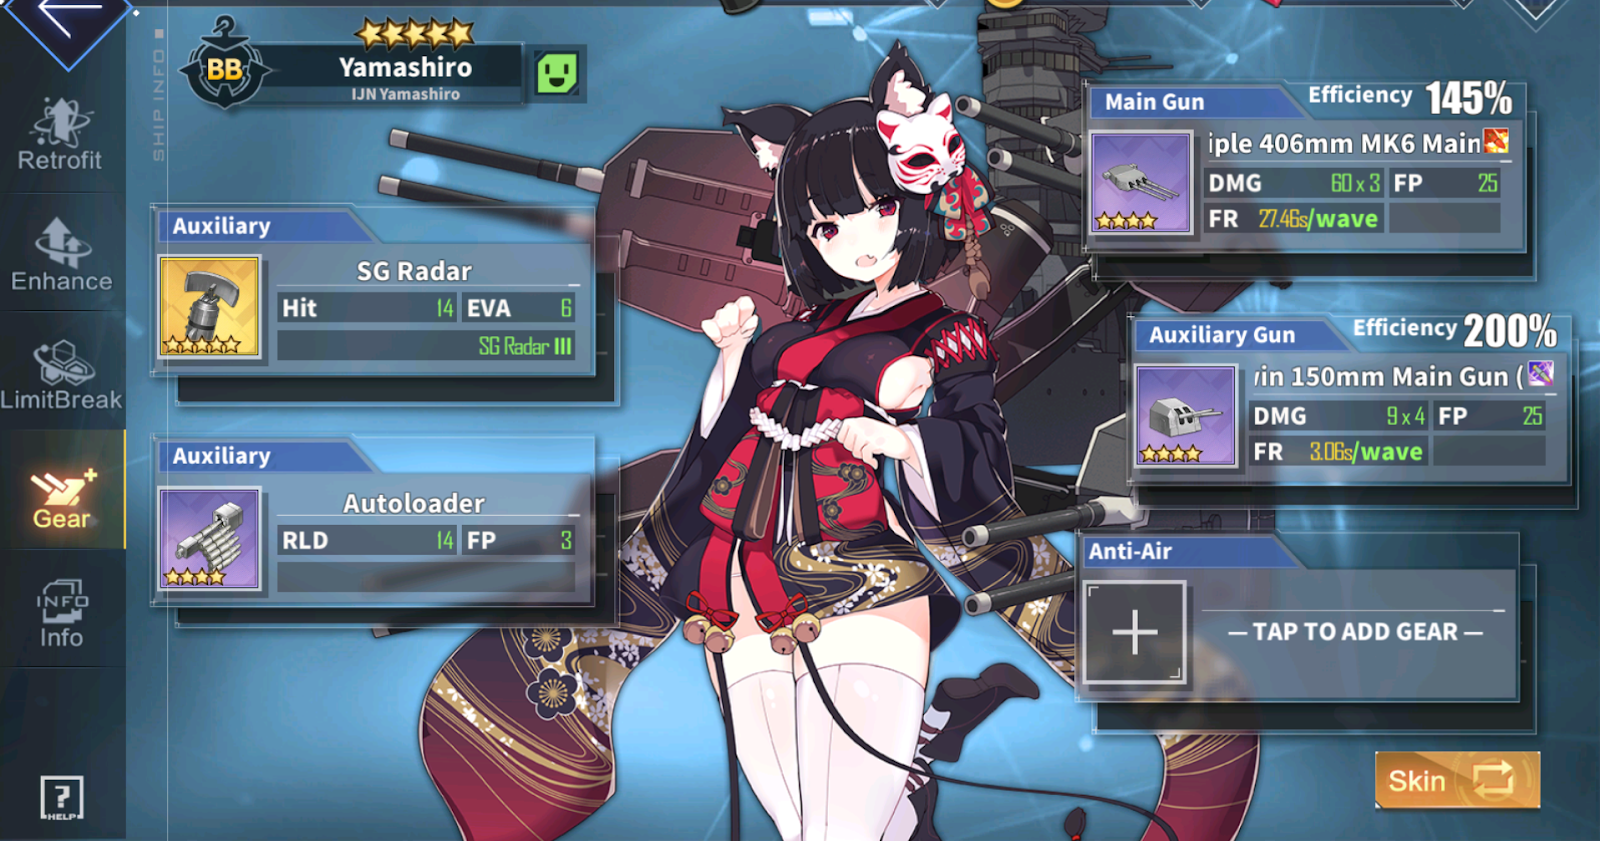
Here is where solo Shouhou backline simply cannot pass due to the amount of damage taken by suicide bomb boats. But, good news, this is where you also get SOLID Battleships for the first time in your gameplay (excluding events) : Yamashiro and Fusou.
Both of these sisters can drop at Chapter 6-2/3/4. They can equip light cruiser auxiliary gun (which should be twin 150mm TBTSK) which can deal with suicide bomb boats A LOT better than destroyer guns. But, wait, there’s more. These two girls deal massive damage when they’re fully limit broken as well as tank a lot of damage due to their heavy armor. But, wait, there’s EVEN more. Their best in slot gear can also be farmed in World 6
Purple/Gold SG Radar (6-1) : The most important auxiliary gear for battleships / battlecruisers. They give a lot of “Hit” (essentially the accuracy of the salvos that launch), evasion that helps a lot with these ships especially for Fusou/Yamashiro who only have around 13 at level 100 (Battleships/Battlecruisers generally have low evasion). And increases the chance to evade an ambush just by having one equipped in the fleet.
Purple Triple 406mm Mark 6 (6-2 / 6-3) : Best in slot main gun for battleships / battlecruisers that do not have barrage focused skills. Due to its HE ammo type, it deals massive damage to the typical light armor enemy ships.
Autoloader (6-3) : If you prefer damage over shooting a couple of seconds faster, then you should use purple fire control radar instead. But this 2nd slot of your BB/BC gets replaced by shells in Core Shop. You can even run double shells if you have a SGR equipped in your fleet. Autoloader is only important until you can grab these shells in the shop.
Purple Twin 410mm (6-3) : Excluding Research gear, this main gun is the best in slot for BB/BCs that depend on their barrage. It launches faster than the triple 406, allowing more chances at proc’ing a barrage. Again, thanks to the HE ammo type, this gun performs well against the typical light armor enemy ships. However, purely on salvos, it is outdamaged by the Triple 406mm mentioned above.
BUT WAIT THERE’S MORE. You may have also noticed that there’s a retrofit tab on Yamashiro and Fusou. This means that their stats can become even higher, but watch out. If you ever take that modernization node in the retrofit tab, they lose their ability to equip light cruiser guns and won’t be able to handle incoming suicide bomb boats. So, here’s a screenshot of what you should do.

Stop right at the modernization node unless you have other solid backlines or want their retrofit skins.
Here’s how they should be geared.
As mentioned previously, autoloader can be fire control radar instead.
Now that you got your solid backlines, take a pause to level them up, farm their gears, and enhance them. After they have their gears enhanced and fully limit broken, you can now tackle Chapter 6-4.
For the first time, the battles that you need to clear to spawn boss node are five. This means that one of your fleets will be out of ammo by the time the boss spawn is up. You will need to prepare two fleets for Chapter 6-4.
THIS DOES NOT MEAN YOU CAN’T FIGHT ENEMIES WITH 0 AMMO. YOU CAN FIGHT ENEMIES WITH 0 AMMO, BUT IT’S PREFERRED TO BRING A FLEET FULLY PACKED FOR DAMAGE AND PREPARED FOR THE BOSS.
The two fleets should look like :
- Yamashiro or Fusou / Shouhou or Unicorn (Healer) / Phoenix / Mahans 0lb or Starter
- Yamashiro or Fusou / Saratoga / Cleveland (Tank) / Helena / Brooklyn or Leander
Or / Cleveland (tank) / Chicago or Wichita (DPS) / Helena or Brooklyn or Leander
BB or BC / Healer / Zombies or tanky ships / DPS for Mobs
BB or BC / DMG (carrier or another BB/BC) / Tank / DPS / Offtank for boss.
The first fleet will be the ones to clear the mobs. The second fleet will be for the boss. Both of these fleets will be centered around a solid battleship with carriers helping them out, either healing or pumping out more damage.
TURN UP YOUR SPEAKERS WHEN YOU FIGHT YUUDACHI
The cutest dog in this game, Yuudachi, will come at you hard. This will be your first hard boss fight, but with enough preparation, it’s a walk in the park. haHAA
She is your third farmable SR in the game. As a destroyer, she performs very well as her skill pretty much boosts everything she needs. The only downside is that the starters with retrofits outperform her. In addition, her FP is horrendously low, but her torpedo stats and efficiency more than make up for it. Try to farm the 610mm Torpedo to equip on her while you farm for her in 6-4. She also has an extremely cute oath skin.

The blue 76mm AA gun is a special gun that can be equipped by destroyers as their main gun. It’s pretty much only used for destroyers who want to proc their skills or barrage as much as possible to make up for their low FP like Yuudachi. It is the best in slot in that regards and also farmable in 3-3. You can use gold twin 100mm if you have one, but gold gears are harder to enhance and farm, and there also won’t be that much of a difference between blue 76mm and gold twin 100mm. There is also 120mm single which is better for auto since it has a longer reach than 76mm.
(Yes, I’m still trying to farm her dupes)
- 7-2
Past 6-4 and 7-1 lies the graveyard for everyone: Chapter 7-2. This is where everyone and their mothers farm their gold. With 4 “?” nodes popping up, there’s a chance to gain a lot of gold in one run. And not just gold, there’s a couple of gears that you may want to farm besides the steam catapult that you already have.
Purple Barracuda : Yes, your very first decent torpedo bomber for your carriers. They’re the best parallel torpedo bombers in game, only out-performed by its gold version. The counterpart torpedo bombers (Ryuusei and Tenzan) are “converging” as in, the bombs try to aim at the target.
Twin 113mm AA : Also known as “roomba”, these AA guns can be farmed while farming for gold. You now have the chance to equip your ships with a decent AA gun, but good luck on farming gold blueprints to craft the gear.
This is also the spot where most of the people grind their ships to level 100. Before you step your foot into late game, I recommend raising at least 5 level 100 ships here in order to clear safely past Mid Game.
- Fleet Compositions Mid Game

I’ve already given you how your fleet should look like when you were at Chapter 6-4. But this section will give you a visual on how you should form them.
This should roughly be how your mob fleet should look like disregarding levels.
On backline, you have one solid BB/BC as flagship with a healer on the side. On frontline, you have one good tank and DPS. DPS being any ship that can shoot hard (Laffey in this case). You should also notice that this is only 2:2 not 3:3 or 1:3. If you want to use more ships and have more oil to spend, you can put in any of the ship of your choice. Just make sure it’s placed correctly on the level of tankiness, so that it doesn’t die fast out of nowhere. On the other hand, if you want to use less ships, then start from DPS.
- Can I clear without extra DPS? Then, take DPS out.
- Can I clear without heals? Then, take heals out.
- Should I clear with just 1:1 ? In this case, the usual answer would be a simple “no” because of commander experience that you’ll be missing out on. Try to fit the Mahans in there and try to run 1:3.

This should roughly be how your boss fleet should look like disregarding levels. As you can see, again, there are empty spots in the fleet. Pick your waifus and place them correctly. If they’re squishier than Helena, then place them in the middle with Helena being top right. If they’re tankier than Helena, then place them top right with Helena in the middle. If they’re tankier than Cleveland, then Helena would stay in the middle while Cleveland goes top right.
I’m waving a giant sign that says, “USE YOUR WAIFUS”.
Both of these fleets do not require any type of special synergy and can have any types of ships just plugged in. The only thing you need to worry about is gear and level of your waifu ship.
Again, this is a rough idea since everyone has a different dock. You don’t have to necessarily use any of these ships, but you should follow the same format: a solid battleship/battlecruiser paired with carriers that can pump a lot of damage with tank / squishy / off-tank set up for the frontline.
Before you head into late game, you should be warned that from this point on, the bosses will actually hurt. Some of them hurt even more than others. There are bosses that require you to bring support from the backline because they melt away your frontline really fast, or a set up where you bring in 3 tanks on the frontline.
But, before you go, congratulations, you can now do events at a good pace to be able to clear out shops and whatnot. OkayChamp +1 You’re now going into late game and have bragging rights about how you farmed this and that blah blah until a veteran comes out and laughs at you.
- Mid Game Checklist
This checklist will serve as a “safe” mark where if you were to follow them, you will not face any trouble in the next part of the guide.
- At least 4 Backline ships at level 100 (half being Battleship/Battlecruiser)
- At least 4 Frontline ships at level 100
- Gears all enhanced to at least +6
- Skills maxed out on frequently used ships
- “Hard” Exam Finished
- Saratoga / Shouhou / Starter should all be retrofitted
- Commander Level 70 for better daily raids
- Some collections done for Wichita / Ayanami / Gems
- Dorm capable of handling one fleet without rotation
III. Late Game
From this point, the guide will focus more on methods of clearing and different fleets that can be formed for the bosses, as well as some mechanics that are not explained well in the game.
There are some mechanics that I need to explain as we go into World 8. This will be a long read, so get comfortable.
- Parallel vs. Converging
I mentioned before that there are two types of torpedo bombers: parallel and converging. The difference is pretty simple. Parallel torpedo bombers are used to sweep through the screen while converging torpedo bombers are used to focus on one target. That one target also needs to be either moving slowly or stationary for the converging torpedo bombers to land well. Also on a side note, most IJN carriers should be equipped with converging torpedo bombers compared to other factions because of their high efficiency in torpedo bombers.
For example, here is Kaga’s efficiency found on wiki:

Notice how she has 150% on torpedo bombers. If she manages to hit something with her converging torpedo bombers, it’ll do a lot of damage, which is exactly what you want her to do.
As a side note, most USS carriers will focus on their dive bombers (SB2C Helldiver) instead, so you can just equip them with Barracudas for stable screen sweep damage. Check their efficiency and the number of planes in each category to see if it’s best to put Parallel vs. Converging torpedo bombers.
It’s worth gambling on converging if the carrier has high efficiency on its torpedo bombs, especially for bossing.
- Map Design
The second mechanic is map design. From world 8 and on, the map designs for the chapters begin to look a little bit confusing and difficult. There are obstacles in your way that hinder your fleet’s movement. There will also be mob spawns that will block your boss fleet from moving to the other side of the map.
Let’s take a look at the map Chapter 8-1 as an example :
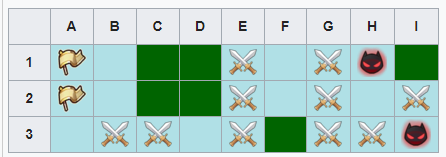
Your fleets spawn on A1 / A2 and the bosses have a chance of spawning at H1 or I3. In this case, there’s only one way for both fleets to move towards the other side of the map. The spawns on column B/C/E are what we call “choke points” where if you don’t clear it or are blocked off, you will have no access to the boss node. And the mob spawns are also randomly generated when you enter the map.
From this screenshot, let’s say I cleared C3 and E3 and went onto clear the other side of the map with my first fleet. There’s a chance that a mob will spawn on B3 or E2 and block the passage for my second fleet. Thus, it is recommended that the second fleet is moved to a better choke point or on top of where a mob can spawn as it will NOT spawn if a fleet is placed on the point, ie. B3 here. Basically, you need to move your second fleet as your first fleet moves through the map so that it doesn’t get stuck in some odd way and you’re forced to kill an extra mob spawn.
(Note : Unlike mob nodes, boss nodes can spawn on top of your fleet)
- Types of Enemy Fleets
The third mechanic is the difference between mob nodes. So far through the game content, the difference didn’t really matter as you’re just bashing your head into the content with the level advantage and preparing your girls with good gear. Now, it’ll matter a bit as you’re going beyond World 8.

Light fleet, also called destroyer or escort fleet, primarily consists of enemies that have light armor like destroyers / light cruisers and also has more suicide bomb boats than other fleets.
The enemies also shoot out more torpedoes. This type of fleet is generally the easiest one as HE ammo burns through everything.
Carrier fleet primarily consists of planes. If these fleets ever cause a problem for you, change your formation to a diamond line-up to increase the anti-air of your fleet. These fleets, especially, 3* will hurt a lot in the future, but they’re not that hard to defeat unless you’re bringing in ships that have extremely poor Anti-Air, like most IJN ships.
Main fleet, also called BB nodes, are your worst nightmare. They spawn heavy armor battleships that can launch salvos into your backline, except now, those salvos will burn and do a lot of damage to your backline. The number of these spawns, especially 3*, will dictate your chance of clearing the map. These nodes hurt a lot, try to avoid them or take them head on if you’re a brave shikikan.
- HE vs. AP
The fourth mechanic that I want to talk about is HE vs AP ammo. This topic comes up almost everyday and a lot of people seem to be confused about when to use HE and AP ammo. In world 6, you were able to farm two battleship main guns that shoot HE ammos. In world 4, you were able to farm both AP and HE guns, TBTSK (on which I explained why it’s better to use TBTSK over other HE guns) for CLs, and twin 203mm (3rd Year Type) for CAs.
HE ammo performs better against light armor, which makes up for the majority of the current content of EN. These enemies consist of destroyers and light cruisers. They take massive damage from HE ammo as well as decent amount of burn damage that comes along with it. However, there are cases where HE ammo might fall off because of the enemies’ armor type. However, this difference can be easily made up by torpedoes. Thus, it is the general consensus to use HE guns most of the times.
For CAs, however, there are exceptions to this general consensus. One of them is when you have a heavy cruiser like Portland solo vanguarding for your mob fleet and your backline ships cannot clear the enemy ships fast enough and they start stacking on top of each other. You’ll watch as Portland just constantly rams herself into enemies and take massive damage. In this case, it’s better for Portland to equip AP main gun to deal with ships that flood the screen, or just not use solo CA vanguard at all.
For HE vs. AP on BB/BCs, the guns will differ by the enemy boss’s armor. When the enemy is CA or heavier, it is better to give one BB (the hardest hitting BB with her salvos in terms of both FP and Efficiency) with HE ammo to ignite the enemy boss and another BB with AP ammo to back up with pure damage (since ignitions do not stack). However, so far in story mode content for EN, this is almost never the case as the majority of the bosses is light armor (making HE ammo generally better). The only exception I’ve experienced was 12-3 and 12-4. These cases seem to happen now mostly in the new events (ie. Bismarck) where the enemy bosses are heavy armor. If you do not have torpedo-focused ships to deal with these enemies, this is another way to deal with them.
And for DDs, their AP guns are just straight up trash in terms of stats. Do not ever gear your DDs with AP guns.
Here’s a quick chart to visualize what I’ve explained :

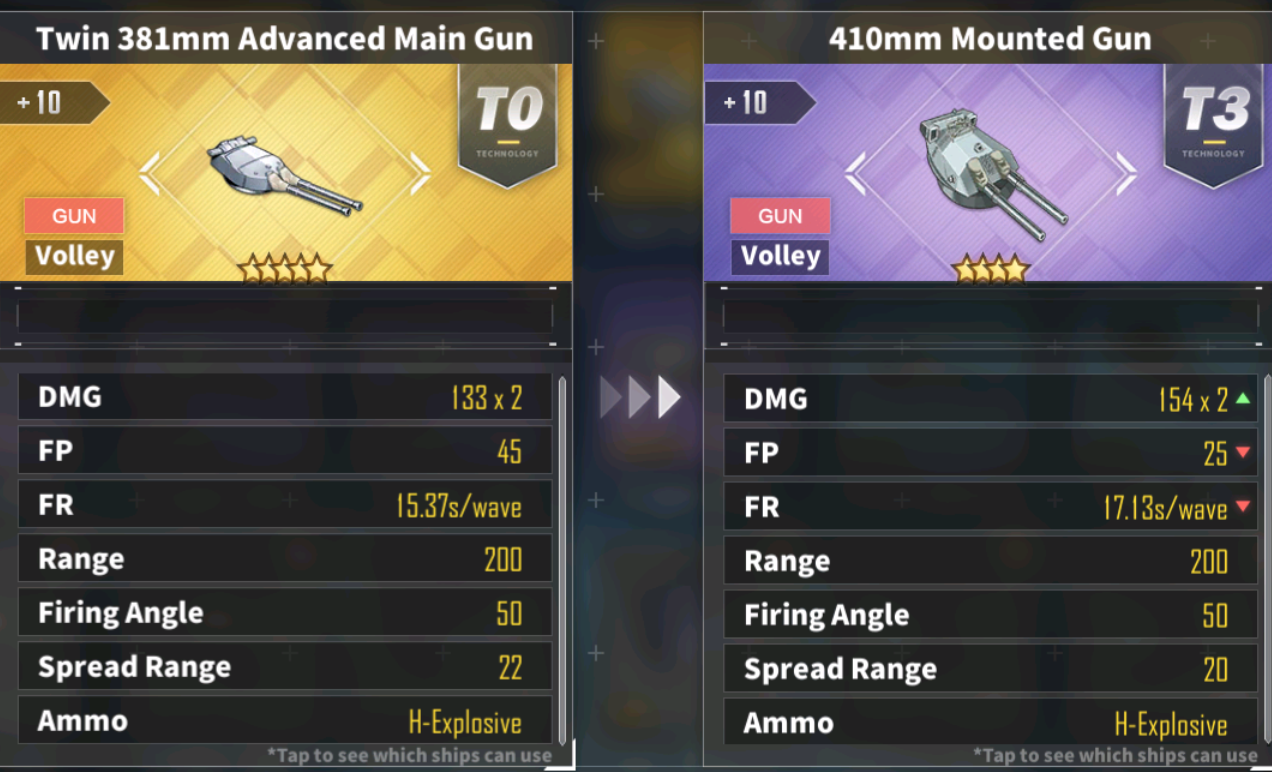
- Triple 406mm vs twin 410mm & twin 381mm
There are two styles of equipping a main gun on your BB/BCs. I previously mentioned that the choice is dependent on the ship’s focus on her barrages. I will go a bit more in depth to explain when to use these guns.
Purple Triple 406mm MK6 main gun is used when your ship has high FP and is not barrage focused. If the ship has a barrage, the barrage’s damage should be very minimal or have low chance to proc for her to equip triple 406, ie. Nagato with 40% chance (Nagato is also special in this case as her barrage is just too powerful for us to not gamble the 40% chance as much as possible). It is primarily used for doing massive damage to bosses with light armor, but can also be used against medium armor thanks to its ability to inflict burn to its target It’s a gun used to maximize on the ship’s salvos.
Purple Twin 410mm Mounted main gun is used when your ship is barrage focused. If the ship’s barrage makes up for most of its damage, then this main gun is preferred for its faster fire rate. More chances of proc’ing the barrage = the more damage potential by the ship. However, this main gun can also be used when your salvo focused BB/BC is overkilling the enemy spawns with triple 406mm equipped. By having faster fire rate, your battleship is allowed to kill quicker and result in faster runs, despite doing less damage with one less salvo launched compared to the Triple 406mm.
This is extremely effective when you’re leveling new BB/BCs as it also grants them more opportunities to get MVP bonus.
(Note: Twin 410mm changes its ammo type at gold tier to “Type 3 Shell”, which is absolutely horrible and should never be used. Stick to its purple version.)
There is also a gun that I have not mentioned yet in the guide : gold twin 381mm , which can be obtained through Research. Although, on the in-game chart, its “damage” is lower than the purple twin 410mm, it makes up for it with the boost of 20 more FP, as well as having faster “FR” : fire rate. It’s basically a direct upgrade for the purple twin 410mm and should be obtained as soon as possible if you have a lot of barrage ships.
(Note : That giant “T0” and “T3” usually doesn’t mean shit when it comes to comparing which gear is better than the other)
- Magnetic vs. Non-magnetic
This is a pretty hard topic to grasp as it usually ends up being your personal choice. While Magnetic torpedoes will load slower and do less damage, they have more potential to hit targets. However, the non-magnetic torpedoes load faster and do more damage, but they can completely miss on auto play.
If you play manually, then definitely go for the non-magnetic torpedoes like Quadruple 610mm or Quintuple 533mm. Quadruple 610mm will definitely do more damage than Quintuple 533mm.
If you play auto, then you can either go for Quintuple 533m magnetic, Quadruple 533m magnetic, or even the non-magnetic Quintuple 533mm. The quintuple will allow your damage to spread out more evenly while quadruple will be focused on each torpedo more. Sometimes, the magnetic torpedoes will completely miss the target because of their weird homing system. You will see this quite often, so watch how your ships play and decide for yourself which one is the right one for you.
An exception to this rule is the rainbow magnetic torpedoes from Divergent Chessboard event. This should always take priority over other torpedoes except for Quadruple 610mm when you play manually.
- World 8
Depending on the enhancements on your gears, World 8 is still doable with cheap fleets. World 8 requires less fights to spawn boss nodes compared to World 7 and also does less damage to your backline. If you lack the DPS to clear mobs, then you’ll often see your frontline just ramming themselves and taking in a lot of damages that add up pretty fast.
The bosses in world 8 are generally all very easy. However, they deal a decent amount of damage to your frontline, so make sure your frontline is packed. There’s no special gimmick that you can try for World 8 bosses except for Maya, 8-4 boss and your fourth farmable SR in the game.
Maya doesn’t move. She stands still in front of her friends who shoot out lines and lines of torpedoes. Remember what I said about using converging torpedo bombers at a stationary target? You can get some funny results like this when you run Akaga & Kaga with converging torpedo bombers against Maya. That’s a lot of damage from Kaga.
(Note : I recommend putting your boss fleet around E5 for 8-4)
- Leveling new ships
Before you go over to World 9, take a pause in your progress and level up some new ships. Hopefully, you have been doing the exam tab and have been rolling in gacha everyday for the mission and got some decent ships. From the exam, you should get either Hood or Enterprise if you do not have them yet unless you just want a waifu ship.
There are a couple of ways to level a ship.
- You can put her in the dorm and have her naturally hit level 70, then fully limit break her and go to Chapter 7-2 for gold or 8-4 for extra exp right away. If the ship is in frontline, sandwich her in between ships that do no damage, but survive long (like Mahans). This can also be done with other ships if you just take off their guns. And, then you grind your life away.
- Instead of dorm to level 70, you bring the ship to Chapter 3-4 (to farm more toolkits because why not, but any other low maps that you need gear for works as well) or an easy event map if there is one currently. Then, you do the same thing where you bring that specific ship to Chapter 7-2 or 8-4, or perhaps a harder event map.
- Just bring them to 12-4 with vestal carry 4Head
Try your best to give her the “MVP” bonus (you can take some gear off your other ships to make one ship guaranteed to get MVP) and keep her morale up by keeping her in the dorm to gain more experience, and place her in the flagship slot if the ship can be placed in the backline.
You should focus on leveling more backline ships, but you should also try to get a diverse pool of ships that can fit in different compositions.
Here are some niche pick ships that you can level :
Ark Royal : An aircraft carrier ( CV ) that has the ability to slow down all enemies on screen when she launches. She’s helpful for bosses that move fast. (Centaur exists and should replace ark royal at any time)
Vestal : A repair ship ( AR ) that grants zombie skill to any ship in the fleet. She’s helpful for keeping your backline alive, especially the flagship who will be targeted a lot in the upcoming worlds. She’s extremely good for people who are undergeared and want to play auto in world 10 and above.
Illustrious : An aircraft carrier ( CV ) who can put a shield on your frontline. She’s helpful for keeping your vanguards up against bosses that melt away your frontline.
However, all three of these ships should never be prioritized over other solid backline ships. These other ships can be found here, a guide by Kawaii Five-O who also explains each individual ship’s roles. Every ship in this guide is worth raising and can be used to clear content.
If you want to clear World 9 and World 10 safely, try to make a boss fleet full 3:3 with ships at +lvl 95 and gears enhanced to at least +6. Also a mob fleet of at least 2:2 full lvl 100 or above. Their gears should be best in slot, at least for auxiliary and main guns.
- World 9
Fire Extinguisher : An auxiliary gear that can help your ship control inflicted fire damages. The enemy BB’s will now launch salvos that will burn a decent amount of damage to mostly your flagship. For now, you can equip it just on your flagship, but if you want to play a bit safer, you can put it on every backline ships. This gear can be farmed in Chapter 2-3, but can be obtained through any tier 2 and tier 3 box.
World 9 maps are by far the most frustrating map designs in the game. There are multiple choke points and boss spawns that are completely on different sides of the screen. So, don’t forget to bring SG radar and some destroyers for extra ambush rate because your fleets are going to be moving a lot. There’s going to be a lot to absorb here, so read it thoroughly.
I’m going to break down each map and explain how you can tackle the enemy fleets as well as the bosses.
Chapter 9-1

The very first choke point would be B3, then the nodes that have to be cleared would be D3, E3 then E4, the entire column of F, and ending with G5 with the option to go either G4 and H5. You may have noticed something here. All mob spawns are choke points. Yikes.
With the potential of the bosses spawning in either passages, you should try to bring in your boss fleet to E3 first, then clear the ways with your mob fleet.
The boss is Tanikaze with two other destroyer friends going up and down in front of her. Bring in your typical BB and destroy them with HE ammo. Simple enough.
Chapter 9-2
Another big yikes map design. There’s a chance for your fleets to spawn together (F4/F5) or separately (D5/F4 or F5). If your fleets spawn together, it’s very easy. You clear out column H while moving your boss fleet towards column E. However, if your fleets spawned separately, you’re in trouble. The entire columns of both C and H are choke points.
Let’s say D5 for your boss fleet and F5 for your mob fleet.
First, move your boss fleet as high as possible on column C.
Then, your mob fleet will clear out of column H, go past column F (hope that it doesn’t spawn at F1) and E , then clear down column C for your boss fleet to pass.
Let’s say the otherwise, D5 for mob fleet and F5 for boss fleet.
First, move your boss fleet as high as possible on column H.
Then, your mob fleet will clear out of column C, and clear column F.
Finally, move down column H and escort your boss fleet to the boss spawn.
The boss is Hamakaze stacked with another destroyer and heavy cruiser. They move kind of like how our frontline does. Very easy boss, just make sure your BB/BC is equipped with some “Hit” (SG radars / Fire Control Radar)
Chapter 9-3

The pinnacle of stressful map designs. The absolute peak.
I’ve cried for days to get Nicholas from this map.
There are five possible boss spawns that are all scattered at the ends of the maps : A1 / D5 / E2 / H1 / H6.
Your fleets will spawn on D3 and E4, completely blocked off from each other with four possible ways to connect through.
So first, let’s look at the choke points : A2 & A3 / C1 & E1 / F2 & F3 / H4 / C5 & the entire row of six.
There are multiple ways to do this, I’ll try to break it down so that every passage is clear for every boss spawn in two simple ways.
Top and Bottom.
Top method is clearing out A2 & A3 with row 1 ,and have F column free with H4 cleared. This way, your boss fleet can move to the boss in A1 / E2 / H1 / H6, but not D5. Your boss fleet will be able to move freely on the top half of the map using row 1. If the boss happens to spawn on D5, then you just have to clear out C5 or row 6 for your boss fleet.
Bottom method is clearing out A2 & A3 / C5 / row 6 / H5 / and column F or row 1 if the boss happens to spawn on E2. Your boss fleet will be able to move freely on the bottom half of the map using row 6.
The boss is Oyashio with two destroyers who just chill out in front of her. They do not move, but they spew out a lot of torpedoes, so try to bring in torpedo bulges for your frontline. They’re stationary, so, you know what to do already to destroy these girls.
Chapter 9-4
We finally get a break. Pretty decent map design and self explanatory. Try to put your boss fleet in E3, and have your mob fleet clear C1 / G2 & G3 / G4 & H5 or I4.
Since we got an easier map design, there must be a balance of difficulty. The boss is Niizuki with two of her destroyer friends that spin like a fidget spinner. If the enemies are not slowed down, your backline will have a very hard time dealing damage as they’ll miss their salvos. The carrier launches also might be off and hit her friends instead. This is where Ark Royal can come in and slow down the bosses, so that your backline can pump in as much damage as possible. You don’t have to necessarily use Ark Royal if you have two solid BB/BCs with high “Hit” that can destroy her friends. These girls also throw a decent amount of torpedoes at you, so grab your torpedo bulges, again.
- World 10
For world 10, your boss fleets may change depending on the boss. The map designs are also very easy as long as you keep your boss fleets moving. However, the difficulty of mob spawns are on another level in world 10 compared to world 9.
3* BB / Carrier mob spawns will decimate your flagship. They do a fuck ton of burn tick damage and they launch their salvos quite often. Fire extinguishers are now necessary items for your flagship and squishy frontlines. This is where Vestal comes in. She has the ability to keep your flagship up if your fleets are not geared enough to one tap the BB spawns.
If you manual, however, you can do a trick so that the BB salvos do not reach the backline. You wait and watch for the first set of BB salvos to fire, then as soon as the second set comes out, you use your carrier launch to clear out the salvos, and the third set will not launch at all.
Here’s an example of clearing salvos. With this method, your flagship will take a lot less damage and survive longer. If you auto, then, Vestal will be your best friend.
Chapter 10-1
There are two bosses, Yuugure and Matsukaze. They slide left and right while Yuugure stays on top with Matsukaze on bottom. Although they deal some damage to your frontline, they’re very easy to kill. However, the real problem of Chapter 10-1 is the row of suicide bomb boats that come often. Bring in a couple of BB/BCs that can equip AP light cruiser auxiliary guns to deal with the suicide bomb boats.
Chapter 10-2
The boss is Hamakaze with Atago and Takao who are in front of her. Hamakaze will move in a “ < “ pattern and will throw a decent amount of torpedoes at you. Hamakaze can be swiftly killed with HE ammo main gun as usual, but the problem will be suicide bomb boats, again. Remember how in 10-1 the suicide bomb boats came in a nice tight row like a train? Now, they’re coming as a column like a wall. Bring in some frontlines that won’t die easily from ramming those suicide bomb boats and backlines who can deal with them easily with CL guns.
Chapter 10-3
Your first true hard boss in the game, Yukikaze, comes with two of her friends that are both BBs pump salvos into your backline. She also does a lot of damage with her bullets and waves of torpedoes. Bring in torpedo bulges, along with fire extinguisher on the backline. The best way to beat this stage is to focus on her, rather than her friends. Kill her before her friends kill you. This also may be the first time for you to bring in a support like a Healer or Illustrious to help with the survivability of the frontline. Hit her strong and hard with HE ammo.
Chapter 10-4
Jintsuu ! You may have heard of her a couple of times. She is the boss and the farmable ship that only drops from the boss node in Chapter 10-4. Jintsuu is the embodiment of peak performance of torpedoes in this game, so try to farm her if you like torpedoes or fluffy tails. As a boss, she moves up and down a lot and will be hard to hit with torpedoes and salvos. She also shoots out a flower-kind of bullets that follow your frontline movements, which can be dodged easily if you manual and move your vanguard up and down, or placing them top left and following the pattern.
However, the real danger is her wave of torpedoes that focus into wherever your frontline is. These torpedoes do A LOT of damage, so make sure you have torpedo bulges on your frontline. If your ships’ auxiliary gears are not enhanced enough, you may need to bring in a support from the backline like a healer or Illustrious for her shield.
- Fleet Compositions Late Game
Fleet compositions change frequently in late game. It all depends on what you’re dealing with, whether it be bosses that focus on your frontline, bomb boats that come in viciously, or bosses that focus on your backline with their friends. I will try to break it down as simple as possible, so that you can fill in what fits into each role with your dock.
In order to deal with suicide bomb boats that threaten your backline, you should bring in at least two BB/BCs that can equip CL auxiliary guns. So, the backline for late game would generally be : BB / BB / CV or BB / BB / BB. For the people who missed out on events, it’ll be quite hard to pull off BB / BB / BB backline as there are not that many decent BB’s that can be obtained through story mode. And if you were to run a carrier, the carrier has to be a tanky to survive any suicide bomb boats that may slip through. You can run CV / BB / CV if both of these carriers are tanky enough and able to deal a huge amount of damage, ie. Enterprise / Sarakai / Akaga, but I wouldn’t recommend it unless the boss is an easy target for converging torpedo bombers.
So, BB / BB / CV for the backline.
The frontline for bosses should always be built to survive. If you manual, however, you can build for damage, ie. Torpedoes. Torpedo memes WORK, they just require you to play manually and ram them into the boss with torpedoes to maximize their damage. A typical torpedo meme consists of Buffer / Main torpedo focus / Debuffer or another Main torpedo ie. Jintsuu / Ayanami / Kagerou or even something like Fubuki / Ayanami / Yuudachi.
It heavily focuses on the fact that you’re going to be dodging the bullets manually. If you can’t do that, torpedo meme may not be the composition that you want to use. However, do note that torpedo memes can make any boss extremely easy in any content. It’s worth trying it out.
- Late Game Checklist
As you’re heading into the End Game part of Azur Lane, this checklist is self-explanatory as you should be experienced enough to prioritize on what you need.
- At least 6 Backline ships at level 100 or above
- At least 6 Frontline ships at level 100 or above
- All ships above with maxed skill levels
- +10 enhanced gears for frequently used ships
- Best in slot gear, ie. some gold tier gear
- Gold twin 127mm for Laffey / twin 100mm for other destroyers
- Gold SG radar
- Gold AA guns
- Gold planes (Hellcat/Seafang/Barracuda)
- Gold torpedoes, both magnetic and non magnetic
- Beginning to farm for PR ships
- Jintsuu (option) if you want to use torpedo based vanguards
- Diverse pool of ships being raised to fill in hard mode requirements
- Hard mode done up to World 7
- At least 1 ~ 2 gold twin 381mm from core data shop
- At least 1 ~ 2 gold proto 203 from core data shop
That’s the end of late game. You’re now one of the big dogs that can bark and show off how many runs it took for Jintsuu and have the ability to help others.
Congratulations ! You’re basically done with this guide. You’re free to do whatever you want when you want. The last part of this guide will cover different compositions that can be formed with investments and require a lot of synergy for the future harder contents like World 12 and World 13.
You can skip it if you do not care about building more synergy compositions.
Disclaimer : From the start of this guide to this point is not mandatory at all and should be followed only if you need some kind of guidance in playing this game. The entire content of EN so far can be done with just “waifu” ships as long as they have good gear and are positioned correctly with a healer. Hopefully, this was helpful to you in any way. If it wasn’t, feel free to shit on it with evidence provided

IV. End Game
There’s nothing left to teach you. Level up more ships, so that when events come out with hard mode requirements, you will be able to fill in the slots with ease and run cheap fleets to save your oil. This part of the guide will focus more on compositions that require investment and the last part of our journey in story content.
- World 11
Basically the same as World 10, but higher levels. There are no special suicide boats gimmick, but these suicide boats hurt the most in our content, so be prepared with CL guns. If your ships are not level 110s, then you might have to run a couple more ships for your frontline. Just bring the same boss fleet that you used for World 10.
The map designs are extremely easy. The only troublesome boss should be at Chapter 11-3 where you can just bring in a support on the backline. Otherwise, just roll through it and 3-star it for free gems.
Chapter 11-1

Clear E5 and move your boss fleet to F3, then clear C1 & E1 on top along with either Column F on the bottom or F4 & G4
Chapter 11-2

A very wide map. Just clear until you can get your boss fleet placed in H4 or H6, then clear enough mob spawns for the boss to spawn.
Chapter 11-3

Clear D6, and place your boss on D5, then clear bottom right and top left for potential boss spawns.
Chapter 11-4
Leave your boss fleet where it spawns and clear choke points : C3 / C5 / C7 or D8 / G6 / H8 or I7 or J6
- World 12
With the addition of World 12, the “meta” of EN content shifts towards planes, and lots of them. Your fleets that you have been building so far will go through a drastic change. Before we dive into each chapter, I will go over some mechanics and ships that you should know for World 12.
WORLD 12 DOES NOT HAVE SUICIDE BOMB BOATS EXCEPT FOR CARGO FLEETS
Anti – Air (AA) : You may have seen a large circle around your vanguards pop up. If enemy planes’ SHADOWS on the water enter the zone, the vanguards will try to shoot them down with their AA guns. The mechanic and the math behind AA is quite annoying and can be confusing for many, so I will try my best to keep it as simple as possible.
It revolves around the usage of Gold AA guns and how they’re calculated altogether to form the circle and determine the rate of fire when a plane approaches the circle
Pom Pom : Pom Poms provide the shortest range, but make up for it with high damage with fast volleys. You should try to have one Pom Pom equipped on your ship with the highest AA stat + efficiency.
Quad Bofors : Bofors are your jack of all trades with the fastest volley and a bit better range than Pom Poms. You can slap these on pretty much anybody and it’ll work amazingly well, but you’re not going to maximize your range this way. So, slap it only on ships who have decent AA stat and decent efficiency.
Twin 113mm : Also known as roombas or ufos, these babies have the highest range out of all four AA guns along with highest damage, but it is hindered by its slow volley. If you’re running multiple AA focused ships (which you definitely should be doing), then give these to your best AA ships in the fleet, excluding the one equipped with Pom Pom.
Twin 105mm : These guys are pretty much just the average out of all four of them, and the worst one. You should only use these if you absolutely need more range, but don’t have twin 113mm.
Basically, the more range you can get will result in vanguards being able to hit more planes. Burst damages are done by ships with actual good AA stats and efficiency while other ships help with volley time and range. With this out of the way, now we can look at ships that are worth raising and bringing over to World 12.
AR : Repair ships, Akashi and Vestal are widely known for their ability to heal both backline and frontline, but Akashi has ridiculously low heals over time while Vestal makes up for it with big burst of heals whenever one of your ships is about to die with her skill. They finally get to see some actual usage thanks to their ability to equip two AA guns. Although their AA stat and efficiencies are both low, they’re still able to provide some AA defense for the backline.
However, I actually do not recommend bringing Akashi for World 12. The only problem of heals that comes up in World 12 is burst fires from 3* BB node salvos that can inflict burn on the backline (If you properly gear your girls and bring in appropriate ships to fight against planes, you won’t have to worry about plane damage). As I mentioned previously, Vestal does her job extremely well against these burst damage with her burst heals. Akashi actually can’t do anything if a burst damage were to come through and dump your backline. And, if you build Akashi for AA, her tiny little heal will become nonexistent and will only rely on those kits for heals. So, I heavily recommend bringing Vestal over Akashi for your World 12 mob fleet (especially for first clears).
Fighter Planes : There is a wide variety of fighter planes that you can choose, however, for World 12, you should use fighters that are equipped with main guns like VF-17 Corsair, Hellcat, and Messerschmitt (MEs). They all have different “travel” time, as in the time it takes them for the planes to reach to the right side of the screen from the left. If they move slower, they can shoot their cannons and main guns more, which allows for more interceptions and less planes doing damage to your backlines.
VF-17 has the edge over other fighter planes mainly due to their slow travel time (49 vs 50 of Hellcat and ME). MEs can also see some usage with air interceptions since it has the same travel time as Hellcat and faster takeoff time, but due to its lack of bombs, the damage as a result would be quite low. If you have VF-17, then equip it, and then equip others with Hellcat. If you’re out of Hellcats, MEs are a good choice, as well.
Speaking of fighters, this is when you kick Shouhou to the side and use Unicorn instead for her fighter slots.
USS Cruisers : There’s a species of vanguards that excel in shooting down planes more than anyone else in the game. USS Cruisers usually have both high AA stat and high AA efficiency. Cleveland sisters even have a skill that focus on shooting down planes. On top of my head, there are Montpelier, Portland, Cleveland, Columbia, Denver, and the ultimate beast out of all of them : San Diego
HELLO Sandy with a stupid amount of AA stat of 406 at level 100 packed with 170% efficiency, she is no longer the stupid girl of the dock. Whatever comes in her circle, they will fall in the water. Planes will cower when they hear her HELLO. And with the retrofit, she turns into an absolute unit of a ship with no other ship in-game that can even come close to her in terms of AA.
Before her retrofit, however, keep in mind that she only specializes in AA and has very low dps.
Since san diego retrofit came to EN, she should be the most used ship in your frontline ever. She deals a lot of damage, and can clear screens effectively in lower worlds.
No contest.
She is number one.
Langley : A sensei that shows how it’s done in World 12. Equipped with six fighter planes with 145% efficiency, she keeps your backlines clear from enemy planes. Best of all, she only costs 9 oil as a common ship. Extremely cheap and extremely efficient sensei that even helps your carriers gain more exp in World 12. Make sure she’s retrofitted for that extra 15% efficiency and a good sum of Aviation stats.
Illustrious : A carrier with very big softlanding who has two fighter slots and pops a shield for vanguards. The shield is based on her total HP (6561 at level 120, so 656 hp shield for each vanguard). Her shields are extremely helpful against burst damages that World 12 bosses tend to do. And her six fighter planes keep your backline safe as well in boss fights. Definitely one of the must take ships for boss fleets if you’re not fully prepared.
Yorktown : Remember some purple girl that dropped from 3-4 or 7-2 ? Well, now she can tank those planes like hell and take revenge on them at the same time. With her skill that heals 25% when she gets to 20%, she’s basically Phoenix, but with planes and more planes. If you put her as flagship, she can tank those 3* BB node salvos and simply brush them off like nothing as she just heals right back up.
Diamond vs. Double line : While the double line formation gives more evasion for the vanguards, diamond formation gives more AA to the entire fleet. In most cases, your vanguards will be underleveled (under 115) and be shredded easily by bosses unless you bring Illustrious or Unicorn. This is also the case for mob fleets if your vanguards are underleveled. So, double line formation will actually be the better choice for most people, but as you level them up more and clear more, try to change your fleets to focus more on damage and less on AA.
So, you’ll be using double line formation at the start, then eventually switch to diamond formation once you feel like your vanguards are comfortably alive unless you’re bringing odd ships that don’t have good AA and your backline gets melted by planes.
Fire Extinguishers : 3* BB nodes rarely spawn in World 12, but when they do spawn, Kongou will come hard for your backline. If you’re not bringing in Vestal, it’s a good idea to bring in a fire extinguisher for each backline for the worst case scenario if you don’t want any of them to die randomly.
Regardless of who you want to bring, I would suggest these general fleets:
BB/BC (Barrage ship) at Flagship for both Boss and Mob (like Hood)
Unicorn / Vestal for Mob
Illustrious (or some kind of support for vanguards) for Boss
Second BB/BC (high AA stat +250) or Carrier that can inflict pure raw damage with good fighter planes for Boss
USS Cruiser Vanguards
One DD if you’re getting fucked by ambushes
One san diego kai
On a side note, carriers like Yorktown, or even Enterprise can be flagship for World 12 as they have a very big health pool, but if you do use someone like Enterprise, try to bring Vestal along for backline heals.
Low AA Barrage ships like Amagi also works well if you pair her with two carriers on the sides (Akagi & Kaga works well) for mob fleets. If you can keep your vanguards up, it should be fine to bring whoever you want for the backline as long as you have carriers with decent fighter slots.
Chapter 12 – 1
A pretty small map with Myoukou as the boss.
She spits out a lot of torpedoes, so make sure to bring some torpedo bulges if you can, or try to clear them with carrier launch if you absolutely have to manual. A very straightforward boss with no gimmick; just torpedoes and planes. You don’t necessarily have to bring in anyone special for Myoukou. If you want to see the actual boss, click here
Chapter 12 – 2
We WIDE now, with two DDs;Tanikaze and Oyashio as the boss. Bring BB/BCs that can fire HE salvos to melt these two. The only things that hurt are those blue balls that fly around. You can’t exactly defend yourself against those unless you bring in support from the backline. If your vanguards are getting melted, bring in Unicorn or Illustrious.
If you want to see the actual bosses, click here
Chapter 12 – 3
We WIDER now, with two Carrier bosses, Hiyou and Junyou who move up and down in a fixed column. These two girls spit out a lot of planes, and these planes actually hurt a lot. They drop a lot of fireballs that focus and rip apart your vanguards if you’re not careful. These little balls focus only on one vanguard pretty hard for some reason. You can gamble here, if you go for diamond formation, you can shoot down the planes before they try to shoot out their fireballs, or go double line formation and try to evade them, but definitely bring in a support from the backline (Illustrious would be the best here) or bring in two carriers.
Click here for double line
Click here for diamond
As you can see from both videos, Unicorn can’t keep up with the amount of burst damage that gets focused onto one ship. I suggest you bring Illustrious if you want to get it S rank on auto for lethal, or just bring level 120 ships 4Hood.
Chapter 12 – 4
Widest map, with Choukai and Maya as bosses. Choukai stays still and spawns blue balls that hurt like a fuck ton while Maya rotates around her in 8 loop and spawn waves of fire balls. It’ll depend on your BB/BC for whoever dies first. It’ll be in your favor if Choukai dies first because those blue balls hurt a lot. And as mentioned throughout the guide, the best way to get rid of bosses that stand still is converging torpedo bombers. There may be cases where Maya rotates in front of her and those bombers end up all whiffing pretty badly, but I think it’s still worth taking converging torpedo bombers over parallel just because of how much those blue balls hurt. You want to kill Choukai ASAP.
If you want to see the actual boss, click here
Well, that’s the end of World 12.
When I experienced it myself, I believe I experienced what most people have experienced as well : underleveled vanguards. When your vanguards are underleveled against end-game content, the damage taken from bosses is quite a lot, especially on lethal first clears. This is where your supports shine the most like Illustrious and Unicorn. However, if you did level up your vanguards in preparation of World 12, then feel free to run whatever works. Or, you can even manual these bosses and they will be a piece of cake. Also, don’t forget torpedo memes still work in World 12, but they need to be +lvl 115 for you to have an easy time with the meme.
With that said, I wish everyone good luck with Choukai hunting as she is one of the best buffers for cruisers and has the most waifu personality ever.
Fuck me
Portland 115 to 119
Monty 115 to 120
Cleveland 115 to 120
In rotation as solo vg or 3:2 (with baltimore or sandy, or helena)
115 to 120 = 1,385,000
1216 per average node
1216 x 7 = 8512 exp
1,385,000 / 8,512 = 162 runs
162 runs cleveland
162 runs montpelier
115 to 119 = 1,066,000
1,066,000 / 8,512 = 125 runs
162 + 162 + 125 = 449 runs.
Damn bitch
- Fleet Compositions End Game
There are a lot of compositions in the game that I have not mentioned in the guide. These compositions generally need a lot of investments (time / skill books / gold / retrofit blueprints ) to perform at its peak. These compositions should ONLY be made when you already have a set of solid frontline ships. I do not recommend any beginners on investing heavily into these compositions, so I decided to put it at the very end of this guide.
“Z-trio” : This vanguard composition focuses on making Z23 into a monster. Z23 retrofit is already top tier Destroyer by herself, but she can be buffed even more by Z1’s skill (40% boost of FP / Evasion). If you were able to get Z46 from Divergent Chessboard, then you have two amazing Z- vanguards buffed to absolute DPS monsters by Z1. Their survivability can be further boosted by Graf Zeppelin who reduces damage taken by all Ironblood ships in the fleet by 15%. And with the past event, Bismarck is another great ship that can boost them EVEN MORE. This synergy is all about damage and damage. It would look something like this:

Basically, a full KMS fleet. Z46 is the tank for the frontline. Bismarck gets flagship to enable her barrage (no one else really needs the flagship slot). If you do not have z46, you can bring in another tank for Z1 and Z23. If you do not have Graf Zeppelin, you can bring in a healer like Shouhou or Unicorn instead. If you do not have Bismarck, Tirpitz (from Divergent Chessboard) can be flagship instead, but you should never put another BB/BC in the same fleet with her, so be careful (Hyuuga Kai works here with Tirpitz). If you have none of these, don’t really bother unless you really love Z23. At that point, just pair her with Z1 or really anyone would be okay since Z23 by herself is amazing.
With the addition of leipzig retrofit, you can use Roon (or Prinz Eugen as tank) / Leipzig retrofit / Deutschland or Graf Spee.
With the addition of z1 retrofit, z-trio is now the most offensive frontline synergy in game besides having ships just boosted by Avrora.
“Chinawall” : Another vanguard composition. But unlike Z-trio that focuses on damage, this composition focuses on tanking. Made up of Ping Hai / Yat Sen (Center) / Ning Hai, these chinese trio are the tankiest ships in game, on paper, together. With Yat Sen as the centerpiece, Ping Hai/Ning Hai’s evasion almost reaches Destroyer tier with reduced damage taken by enemies. On the plus side, they also have increased damage against IJN ships (all story content). Outside of story content, however, they don’t see any use since there are many other ships that can just roll through events with damage.
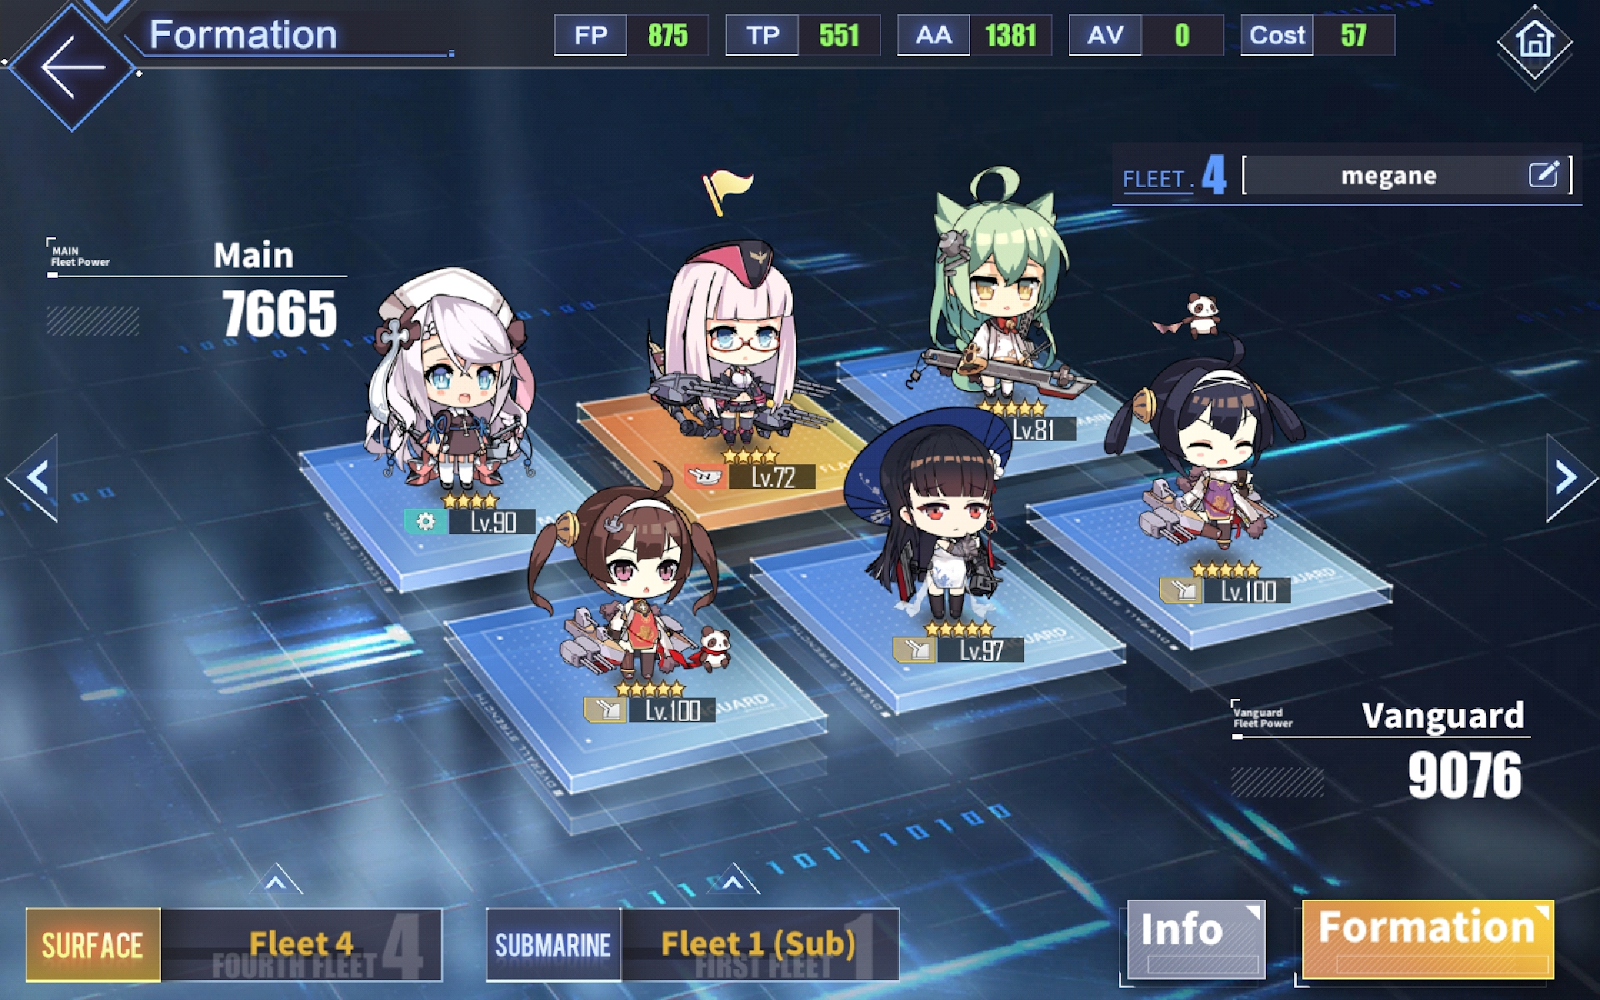
Screenshot provided by pyco since I don’t have chinawall invested
Disregarding the backline, put Yat Sen in the middle as she is the squishiest. The sisters can be placed interchangeably. For the gear, the Hai sisters should get TBTSK with double toolboxes as they will have insanely high evasion. Yat sen should get the Beaver Badge and toolkit, if you don’t have Beaver Badge, blue evasion auxiliary gear works, too.
“Fletchers” : Mainly focused around Fletcher and her ability to buff destroyers and her fellow sisters, this composition focuses on boosting destroyers’ FP / Reload / Torpedo / Evasion to ridiculous stats. This composition would be the best if EN can raise 0 lb girls to level 100 due to how cheap it is, but even with MLB, they’re still worth noting. With Nicholas Kai, this fleet will be able to fill its missing hole in terms of damage and be completed. It will look something like this:
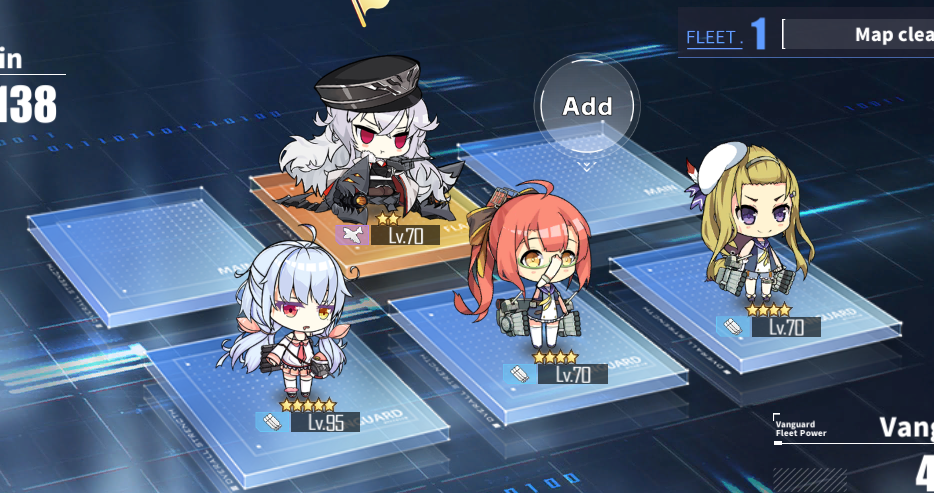
Screenshot provided by Heaty since I scrapped fletchers long time ago
“HMS” : Focused around Queen Elizabeth’s ability to boost every Royal Navy Ship, this is another composition that focuses on the entire fleet. However, the downside to this composition is quite complex. Hopefully, I can explain it in full detail for you to understand how it works and why it still works. Thonk
Queen Elizabeth has a pretty awesome skill, but herself as a ship is very very mediocre to the point where she can easily be kicked to the side by other big HMS ships, Duke of York, Hood, Monarch, Centaur, Formidable, and even King George V. Then, there’s a bunch of HMS frontline who are all pretty much lacking in terms of synergy. Belfast / Edinburgh can both be used as tanks for your frontline. Sheffield has a pretty unique skill that makes lower HP ships on the frontline to become more tanky. Leander is still a pretty decent ship by herself. Same goes with Javelin, a decent ship, but outclassed by many. There is also Suffolk who is pretty much scuffed HMS version of Wichita, ie. Glass cannon. The frontlines for HMS are a bit hazy in terms of who fits where and how. Don’t even get me started on Sirius. But, in order for HMS frontline to do some amazing damage, they need to be all buffed by QE.
This requires every slot to be filled in the fleet for every maid and big girls to benefit the most out of QE’s buff. And when it’s not a full fleet, QE loses easily to the bigger names as I mentioned previously in terms of usefulness.
Personal bias here, Duke of York is the uncontested top tier Battleship in game for EN and should never be replaced by anyone, especially in boss fleets, but if you don’t have more than 3 big HMS backliners and really like maids, HMS is a very solid fleet for bosses.

As you can kind of see, I normally never use QE / Javelin / Belfast, nor do I bother try running HMS. That doesn’t mean it’s bad, but those two girls, Hood and Duke of York can perform like beasts anywhere. That’s just how good they are, especially Duke of York. However, if you don’t have Duke of York, you can put in Unicorn to heal frontline or Illustrious for shield.
With the addition of Centaur, QE is now :litter_in_its_place:
“NAKAGA NANODA !” : With Nagato as the centerpiece, she buffs IJN carriers pair to their maximum potential in the game. As one of my favorite comps to run, this composition is about pumping full damage with planes and planes while Nagato backs them up with pure salvo damage AND the most broken barrage in game despite its low proc rate. Then, you put in Yukikaze, one of the most tanky vanguard ships in game, and just chill out. Here’s a quick example of how they perform : Floofs
You don’t need to worry about the tankiness of the vanguard, nor do you have to worry about backline damage. The only concern would be suicide bomb boats, but Akaga are both tanky enough to handle suicide bomb boats as well as Nagato having CL guns and a good HP pool herself. Waves are cleared fast, thanks to Akaga’s quick launch, so you don’t have to worry about Yukikaze ramming either.
Freedom Fleet
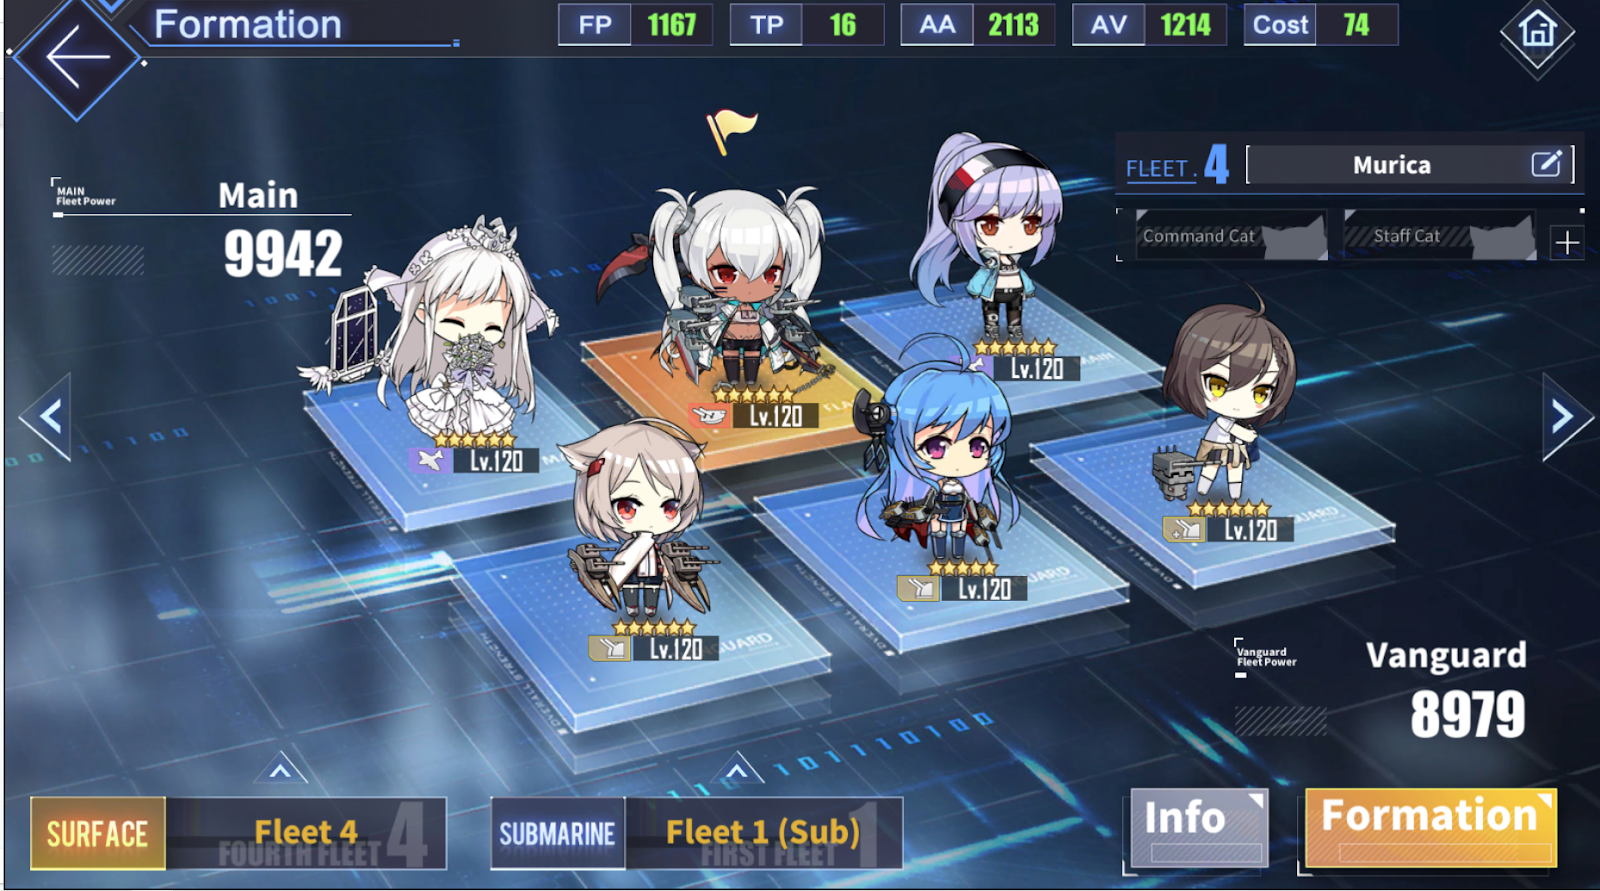
Alabama (or Bataan, or Centaur, or any hard hitting BB/BC) with Essex & Enterprise who are buffed by Baltimore with Helena’s debuff on the boss.
This composition is murderous and works extremely well in w12. If you want more tankiness, you can swap montpelier for portland retrofit. If you want more anti-air, you can use sandy retrofit instead.
This composition deals excessive damage for no reason and fucks whoever is standing on the other side of the map.
- World 13
With the introduction of World 13, the developers brought us another plane infested map with new enemies and tougher bosses. There will be a lot to talk about in this section of the guide, so get comfortable and grab your snackies because this is gonna be one hell of a ride.
For your first clears of World 13, you will be either playing auto or manual.
This will entirely depend on who you have in your dock and how prepared you are.
World 13 becomes A LOT easier if you have submarines raised to 120 with their gold torpedoes + skill levels raised. You will see the difference a bit later on, but if you want to have an easier time, I HEAVILY recommend that you raise your subs.
Before you continue reading, I will be assuming that every ship is 120, fully maxed with best in slot for every slot and that you have all the background knowledge mentioned in this guide.
COMPOSITIONS
MOBS
Flagship : Top Tier Barragers with High AA (Monarch is saved)
Washington, Hood, Alabama, KGV, Littorio
OR Top Tier Carriers with Good Fighters / Damage / HP
Enterprise, Essex, Illustrious, Centaur
Heals/AA : Combinations to cover heals and AA for both frontline and backline.
Akashi : Provides extremely mediocre fleet-wide heals, but the fights are long enough to make her heals matter somewhat. She’s there for her Anti-Air.
Vestal : Focused heal of 20% which will most likely be for your vanguard tank or flagship. She’s there for her Anti-Air as well.
Unicorn : Decent fighters with very good vanguard heal
Ryuuhou : Decent fighters with focused heal on both backline and frontline
Akashi & Ryuuhou : Akashi focuses on keeping everyone up to a decent health while Ryuuhou focuses on keeping your vanguard tank and flagship up. This combination has worked the best for me especially since enemy tends to focus their torps A LOT on the vanguard tank.
Vestal & Unicorn : Vestal focuses on keeping your vanguard tank / flagship up while Unicorn keeps your vanguard fully stacked. This works well if you want to bring a squishy vanguard to provide some extra dank dps. However, the problem with this combination is that if your fleet cannot handle AA, unicorn will most likely die eventually.
Unicorn & Ryuuhou should both get Ryuuseis to focus down on these new enemy ships that fucks up your entire flow of mob fleet.
Nagato with Akagi & kaga also work for backline if your frontline doesn’t need heals, and if your frontline does need heals, run akaga + unicorn.
Frontline
Left slot : An extremely high HP tank with decent AA
Portkai / Roon / Zara / Neptune / Minneapolis/ Prinz Eugen (last option)
Middle : A torp user or A vanguard with very good AA (squishy)
For AA: San Juan / Birmingham / Isuzu / Sandy (save)
For Torp : Jintsuu / Javelin / Shirakami / Z46
You want a torp user that can not only bring torps, but bring something else as well. Jintsuu has torp buff/debuffs. Javelin has evasion to survive longer than other regular torp users. Shirakami allows screen clear. Z46 brings a nice barrage. But you don’t want your torp user to be too squishy, or else they’ll die.
Right Slot : Same as middle, but defense oriented and less squishy
For AA: Montpelier / Cleveland / Columbia / Sirius (If you bring in carrier as flagship) / Sheffield / Leipzig Kai / Baltimore
For Torp : Noshiro / Ibuki / Yukikaze / Belfast / Kinu Kai / Belchan
Or, just chinaball 4Head
For Vanguards, you basically want an extremely tanky frontline due to how those planes focus down on the front. For the other two slots, you want a mix of torpedoes and Anti-Air. Torpedoes are extremely helpful in mob fleets to clear away those enemy AA/AR/elite spawn ships very swiftly before your backline launches, but you want these ships to be tanky enough so they don’t get one tapped out of nowhere, or you need to swap places with other vanguards to spread out their hp-pool. And, since you’re bringing in a full fleet, any buff/debuff that they can bring is well-appreciated.
Backline buff/debuff like Yukikaze / Columbia are one of the best to bring for World 13 mobs since there is a fuck ton of planes coming for your backline.
BOSS
Backline
You want to either run two BB/BCs with one carrier, or two carriers with one BB/BC with barrage.
Monarch / Warspite Retrofit / Illustrious : Monarch has a fat barrage to deal with little enemy spawns that help the boss, then warspite focuses down on the boss while illustrious will bring support for the vanguard and the best fighter-interception you can ever ask for. If you have swordfish, yes, slap those on illustrious.
Monarch / Warspite Retrofit / Centaur : Basically more offense oriented composition than the one above. However, if your BBs end up shooting at useless targets, this composition falls apart very fast due to Centaur being the only one to defend the backline. It definitely kills fast, but that’s only if you kill it before they kill you.
Monarch / Enterprise / Essex : Enterprise / Essex provide both top tier damage and fighter-interception. If you bring Baltimore along, they even do more damage. They clear away everything and will keep your backline safer than one illustrious. Make sure to run Ryuuseis on Enterprise because Essex will launch first with either cuda or swordfish and leave the boss to be dealt by Enterprise’s Owari-DA.
Nagato / Hiryuu / Souryuu : Nagato brings the fattest barrage with Hiryuu & Souryuu keeping themselves up and clearing away planes. It’s a bit more RNG-oriented and Souryuu’s relatively low HP poop might give you A rank for the boss.
Frontline
Left slot : Agane, the tankiest vanguard of all : Roon / Zara / Portkai / Neptune
Middle slot : San diego Kai (if you auto) / Helena (if you manual)
Right slot : Baltimore / San diego kai (if you used helena for middle) / Montpelier / Columbia / Belfast / Literally anyone who can do good dps, and have really good AA at the same time.
If you run portkai, you need support from the backline or manual.
Otherwise, Roon / Zara / Neptune are better.
If you have sandy kai, you must include her since she will be your carry.
If you run helena, you have to manual or else she ded
If you run baltimore, you should run enterprise / essex in the back
You want tanky vanguards with good AA. It mostly matters on who you run in the back. If you run two BB/BCs with one carrier, focus more on AA. Otherwise, focus more on damage if you run two carriers.
Also, torpedo memes still work if you want to manual.
Tanikaze kai / Jintsuu kai / Noshiro / Ibuki / Ayanami kai / Kagerou Kai
Run whoever you have, and see them pop off !
FOR AS
If you run two BB/BCs with one carrier for boss, run carrier flagship on your mob fleet.
If you run one BB/BC with two carriers for boss, you can run BB for flagship on your mob fleet.
Monarch gets twin 381mm from PR if you run two carriers, or triple 406mm mk6 or triple 381mm if you run one carrier while your other BB gets triple 410mm AP gun for maximum salvo damage.
Twin 381mm will allow the barrage to slow everything on the screen for your carriers to destroy.
Triple 406mm will allow her to ignite + salvo damage for the enemy AR / CV / AA ships. If you skimp out on her main gun damage, AR may stay alive and keep healing the enemies.
Best compositions that I found after one day of spending 30k oil :
Mob : Centaur / Ryuuhou / Akashi / Neptune / Columbia / Noshiro
Boss : Monarch / Enterprise / Essex / Roon / Sandy Kai / Baltimore
Gears matter a lot, so put BIS on them with one HPAAR on sandy.
Akashi or Vestal gets triple HPAAR with bofors or roombas depending on manual / auto / whatever your frontline is holding.
Fighter planes MUST be Hellcats with one VF-17 for boss.
For Mob, if you want it to be even safer, but slower, use illustrious as flagship instead of Centaur.
Enemy Anti-Air ships : They shoot down your planes that launch. I’ve seen akaga early launch right into them and do absolutely nothing PepeLaugh :right_point_finger: :akagifluff:
Enemy AR ships : They have a little tool in the front and heals the enemy ships on screen. Kill this mother fucker first. Actually, in most cases, your Unicorn or Ryuuhou’s Ryuuseis will try to target this thing, but fail due to the enemy spawns. This is where your frontline torps come in and help them out.
Enemy CV ships : These just spit out planes until they’re dead. If you don’t have good AA in your fleets, this ship will shit on you before you can even progress. And kick you when you’re on the ground with a sprinkle of plane PTSD. This is also where your torps come in and shit on them before it starts shitting on your backline.
13-1
Some benched CA named Mogami shows up with a fuck ton of planes.
Nothing really surprising. If you can’t kill her easily, oh boy, it’s time to go back and re-do your fleets.
13-2
Shoukaku comes out by herself, asking to get spanked. This is basically a sample of what’s to come in 13-3. The game literally tests you out saying, “are you ready for TWO of them?”
13-3
Well, now there’s feckin two of them, Shoukaku and Zuikaku. More planes, more fun, six flags. I heavily recommend DIAMOND formation for this boss no matter who you have on your backline.
Again, if you want to see how the boss is before you go in.
13-4
The hardest boss of all time in Azur Lane is some yandere thot with heavy armor who brings a fuck ton of planes with her. Along with her, enemy AR/AA/CV ships will continuously spawn. Fuck her up and show what kind of a chad shikikan you are by bringing the comps above.
JP/CN Players told me it couldn’t be done, so I went ahead and fucking did it.
Overall, my experience with World 13 revolved around who I had in my dock and who I knew would work beforehand. I was prepared for this content and steamrolled it without subs. If you do not have the ships that I mentioned, it’s still okay. Hit me up on DM with your dock on imgur and I can help you manual, at least. OR OR OR..
LITERALLY JUST RAISE YOUR SUBS AND STOMP IT 4Head
*Disclaimer : If you manual, you can literally run anything you want with subs.*
And for the rest of the gear, I believe in the chad shikikans that were raised reading this guide to properly gear their ships for World 13. Ganbare
That’s the end of the guide for now until there’s new content or something that I missed out specifically. Thanks for reading.

Good bye
V. Updates on the guide
- Logs
6/2/2019 – Guide Published
6/6/2019 – Feedback added / Torpedoes / Wichita / Basic mechanics
6/18/2019 – Addition of World 12 (AA)
9/9/2019 – Edited wording and updated some old stuffs while jamming out to paramore from 2009
11/11/2019 – Edited some early game stuff with addition of hiryuu/souryuu/london/nevada/oklahoma AND added in Freedom Fleet.
1/17/2020 – Added World 13.
- Things to Add
Research gear
PR Ships
Submarines ( N omegalul )
- Feedbacks to Add
You found the hidden section !
But too bad, this is just my flex section.


I hope you enjoy this game as much as I do.
And I hope that this guide was useful to you in any way.


