
Guide to Starting FFRK
Before we actually start, here’s a FAQ:
Q: Is rerolling necessary?
A: No. This game is very new player friendly and you can get by with pretty much anything all the way until cutting edge content. There is no need to reroll unless you’re targeting a favorite character to start with, but rerolling is also a massive pain so it’s still not recommended.
Contents
Getting Started
When you first reach the home page, you’ll see something like this:

It’s a lot of things on the screen at once so let’s break things down one at a time. In the top left, you’ll see two resources:

The blue crystal on top is mythril, which is used to pull for relics that make certain characters stronger. Relics will be covered a little later. Mythril is very valuable, particularly if you’re a F2P player, so do not use this for anything other than relic draws when you are starting out. The yellow coin on the bottom is gil, which is used to upgrade abilities and equipment, among other things. In the top middle, you’ll see a yellow bar:

This represents your stamina, or how much you get to play the game before taking a break. The first number is how much stamina you have currently and the second number is how much stamina you can have at max. You recover stamina at a rate of 1 every 3 minutes (or 20 stamina per hour), up to the max. Different content will have different stamina costs so keep an eye on it as you’re progressing through the early stages of the game.
The hexagons along the bottom of the stamina bar represent stamina shards. You can obtain shards as rewards for clearing realm dungeons, and obtaining 5 shards will increase your max stamina by 1 and fill up your current stamina by that same amount (so it is possible to go over the stamina limit, but you will not recover any stamina while it is capped). In the top right, you have two icons:

Ignore the shop for now. In the Menu, you can access your friend/follower lists, change your name, change your settings, and a few other things. Next section down:

To the left you have Announcements and Item Chest. Announcements are self-explanatory, and Item Chest is where your daily login rewards, quest rewards, and a few other things automatically go into. Items will last for 30 days in the chest before being deleted so be sure to collect everything in there frequently!
In the middle, you have what are basically announcements in banner image format. You can ignore them.
To the right, you have the Item Exchange and Missions. We’ll visit these later.
Along the bottom are the 4 buttons you’ll use the most throughout your time here:

Home takes you to the screen we’re looking at. Party takes you to a screen where you can change your roster and their equips, abilities, etc. Upgrades & Inventory is self-explanatory, and Relic Draw is where you go to spend mythril on rare and exclusive gear for your characters. We’ll also visit some of these later. For now, the important thing you want to focus on is in the middle.
As you swipe to the left or right, you’ll see a bunch of structures. These represent all the types of content the game has to offer. Most of them will be grayed out until you unlock them so for now, focus on Realm Dungeons to the far left:

Tapping on that takes you to one of two screens:

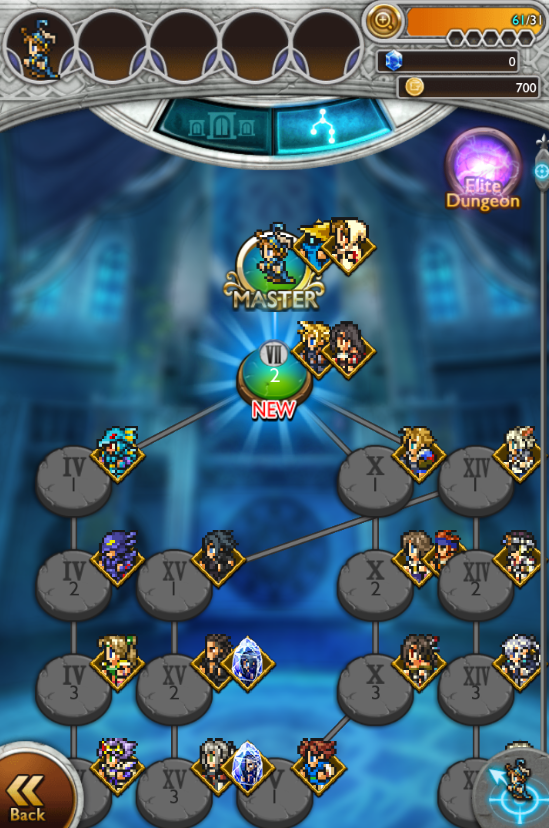
You can toggle the view by tapping on the blue icons near the top middle. Tree diagram view shows you who you can obtain from what dungeon at a glance while door view shows you your progress in each realm. I personally recommend the tree view to start with so you can see your progress at a glance but you can go with whichever you prefer.
When you select a dungeon, you can see its difficulty, stamina cost, rewards, and mastery requirements.
Difficulty, for the most part, is arbitrary. Just treat them as relative values (e.g. 14 is more difficult than 7, but not necessarily twice as difficult) and do dungeons from easiest to hardest. The basics of the party interface and combat should have been covered in the tutorial, so it will not be repeated here. Elite Dungeons in the top right is another set of realm dungeons that are just the normal ones at a higher difficulty. Don’t be intimidated by them, and also don’t forget to do them when you can.
You performance in dungeons is scored by how many turns you take, how much damage you take, how many characters survive, and how many special requirements you meet. These grades are represented by the medals you see at the end of a battle.

If you fail to obtain enough medals, you may not receive all the rewards for the dungeon. Special requirements can be found on the boss or enemies tab of the dungeon preview, and these often make up a big chunk of medals.

Special requirements can range from hitting a boss with a specific elemental attack, debuffs, or simply not dying. Be sure to check these every time so you don’t have to waste time redoing a dungeon for full rewards!
Now let’s go back to Home and visit Relic Draws.

When you first visit this page, you’ll see lots of tabs and banners. Ignore all of these for now. Do not pull on banners blindly. What you want to pay attention to is the one at the very bottom that says, “1 Free Relic Draw per Day!” Make sure to draw on this one every single day.
With that, you have the basic of the basics down. Where do you go from here? Read on to find out!
Early Progression
As you noticed earlier, pretty much all content is locked to you right now. To unlock other pieces of content, you have to complete certain quests. Go back to Home, then tap on Missions. This will take you to the Acolyte Archives:

The Acolyte Archives (AA for short) is where you can view various missions and challenges, their rewards, and how to complete them. To summarize what each book offers,
Book of Dates: Daily missions, includes 1 mythril. Be sure to get this done every day!
Book of Time: Missions with expiration dates, ex. monthly missions.
Book of Challenges: Miscellaneous one-time missions.
Book of Transcendence: Missions for superbosses that return every 3 months.
Book of Trials: One-time missions to help you learn the game.
The one you want to focus on for now is Book of Trials. These books will teach you all the basics of playing the game, and completing each Book of Trial unlocks additional pieces of content as well as give you certain relics. For example, completing Book of Trials I unlocks Record Dungeons, Event Dungeons, Equipment Upgrading, and Ability Creation and Honing. Complete all the volumes to unlock everything!
Other Content

Record Dungeons (not to be confused with Realm Dungeons) act as another extended tutorial. Realm Dungeons and the Books of Trials will force you to go through all the basic aspects of the game on your own but Record Dungeons give you prebuilt parties and abilities to give you an idea of what does what, what works and what doesn’t. Because everything is prebuilt for you, the fights themselves will feel more like puzzles than realm dungeons. Besides that, there are a few other differences. The table below summarizes them:
| Realm Dungeons | Record Dungeons |
| Form your own parties. | Prebuilt parties. |
| Follows each realm’s storyline. | Has its own storyline.* |
| No map or cutscenes. | Has custom maps and cutscenes. |
| Allows Roaming Warriors (limited). | Doesn’t allow Roaming Warriors. |
Event dungeons are essentially a short series of realm dungeons but time-limited (most events stay for 2 weeks). The biggest difference is the Roaming Warrior (RW for short) list is opened up to other players, so you can use a friend’s RW or any particular one you like instead of being limited to a preset list. Events are the main source of mythril after completing realm dungeons and also provide accessories, which are very important for end game content. Typically, two realm events are added each week, one with stages ranging in difficulty from 5 to 260 in the middle of the week, and a short one with just harder stages.

Power Up Dungeons are where you can farm materials to create and hone abilities, farm materials to upgrade weapons or armor, farm gil, or gain exp for your characters. The stamina costs are high but these are the best way to burn excess stamina if you’re short on time or if you have nothing else to spend stamina on. You will visit these very often. The dungeons rotate on a set schedule, which you can view in-game in the Power Up Dungeon menu at the bottom right:

The other structures you see on the home screen are more intermediate/advanced, so we’ll visit those later.
Ability Creation
Abilities can be created with orbs and gil. Orbs can be obtained by clearing realm dungeons or events, power up dungeons, and uncommonly dropped by various enemies. Orbs come in different grades (e.g. minor, lesser, standard, greater, major) and are used for different levels of abilities (ex. minor orbs are used for 1☆ abilities).
When you first tap on Ability Creation, you’ll notice there are a *ton* of abilities you can create. What should you make? Which ones are good? It may seem overwhelming, so here’s a quick list of abilities you should make while you’re starting off:


4☆:
- Curaja (White Magic)
- Protectga (White Magic)
- Shellga (White Magic)
- Lifesiphon (Physical Combat)
- Wrath (Physical Support)
- Power Breakdown (Physical Support)
- Magic Breakdown (Physical Support)


5☆:
- Any “Chain” Spell, ex. Chain Firaga (Black Magic)
- Full Break (Physical Support)
- Hastega (White Magic)
Depending on which events are running when you start the game, you may or may not be able to make everything on this list. If you can’t, that’s fine; just work towards it. This is not an exhaustive list of abilities you want to make, nor do you necessarily want more than one copy of these. This is simply a list of economical abilities that will get you through early content while also remaining useful for the rest of the game. Once you learn and understand the game better, you will want to branch out your abilities but you do not want to do that now when you are running on limited resources.
Priority Order of Content
Once you’ve unlocked more things, you’ll probably wonder what you should focus on completing. Here is your priority list:
- Event stages with mythril.
- Book of Trials requirements.
- Realm dungeons (overlaps with #2)
- Event stages without mythril (if you can clear them).
- Power Up Dungeons
Similar disclaimer as abilities. This is not a fixed priority list for the rest of the game. Following this list will ensure you get the most mythril you can while also progressing through the early stages of the game.
Mid Game Progression
You’ve probably been wondering why people like this game. You’ve probably been grinding through all these dungeons, mashing buttons with little to no thought (or just tapping Auto) and stomping everything.
Until now.
Whether it’s D50, D99, or D220, you’ve probably hit a wall and suddenly, you’re the one getting stomped. Nothing you’ve been doing until now is working. That’s a signal that you’ve hit “mid game,” or the point where you have to transition from tutorial tactics to something more structured. The following sections will explain how to strengthen your parties and get over this wall.
Relics and Soul Breaks
First and foremost, these are the fastest ways to make characters stronger. Remember how I said ignore everything except the daily draw? We’re going to revisit that now.
You should see a banner called Acolyte Relic Draw:

Tap on that to see a list of more banners. Each banner lets you draw, for free, from a limited, preset pool of relics and also lets you select a relic from a different preset list of relics. To select a relic, tap on the Available Relics button at the bottom after making the draw.
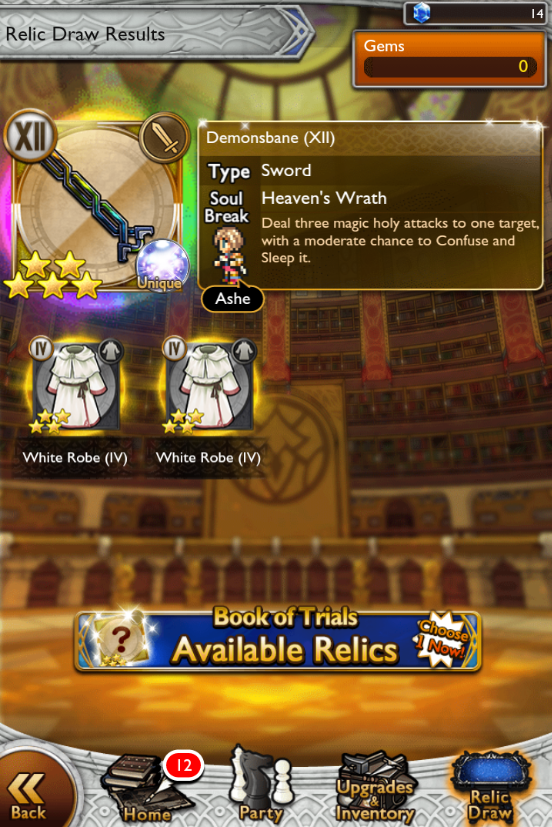
Pull on each banner you see and pull on each additional one as you complete Books of Trials, but do not select your relics yet; you can come back and select them later. Since these are once per account decisions, you want to make sure you absolutely won’t regret a selection, which typically means saving them for a difficult fight.
You’ll notice some relics have a character shown on them along with a Soul Break (SB for short). These provide stronger alternatives to the default SBs you’ve probably been using. Only the character shown can use the SB, and they have to be equipped with the relic to use it to start with. While it’s equipped, the character will gain exp towards mastering the SB – you’ll see this exp bar at the end of battles and when you tap and hold on the relic. Once you’ve mastered a SB, you no longer need that particular relic equipped to use the SB, so you’re free to change gear around as needed again.
There are several tiers of SBs (pay attention to the symbols in the corner):
| Sample Icon | Type | Abbreviation | Brief Description |
| Unique | SB | Very basic, weak damage or effects. | |
| Super | SSB | Stronger damage or effects | |
| Burst | BSB | Provides “burst mode,” which replaces your attack and defend actions with two abilities. | |
| Glint | FSBGSB | Provides two, simple effects instantly for free or at half the cost of a normal SB. | |
| Ultra | USB | High damage and/or powerful effects. | |
| Overstrike | OSB | Single, powerful attack that can break the damage cap of 9999, up to 99999. | |
| Arcane Overstrike | AOSB | 3 powerful attacks that can break the damage cap; or 20 hits and a single, powerful attack that can break the damage cap. | |
| Chain | CSB | Massively boosts all damage of a certain type. | |
| Awakening | AASB | Boosts damage, allows all damage to break damage cap temporarily, up to 19999 or 29999, and/or provides follow-up effects. | |
| Synchro | SASBSync | Allows all damage to break damage cap temporarily, up to 19999 or 29999, and provides follow-up effects to abilities. |
In general, SB < SSB < BSB < FSB < USB < AASB = SASB <= CSB and OSB < AOSB. There are many exceptions to this (ex. some SSBs are better than some USBs) so treat this as a vague ranking. OSBs and AOSBs have a different function than the other SBs so they’re listed separately. If you have a question about how good a particular SB is (compared to another), feel free to ask in discord.
Go back to the Relic Draw page and look for Realm Relic Draw.

Like the Acolyte Relic Draw, this will take you to another list of banners. These are the best value you will get for your mythril, but only for the first pull on each one since it’s a one-time discount. You will want to pull on all of these but try to keep at least 100 mythril on hand in case there is a hyped, full-price banner coming up. If you’re not sure if there is one, just ask in discord.
If you’re starting sometime around March, June, September, November, or December, you may see a few more banners. One is called Luck of the Realms.

These are one-time 3-relic pulls that are guaranteed to give you a 5☆ relic or better for just 5 mythril and are also top tier value. Second is Lucky Relic Draw, a one-time 11-relic pull from a curated pool of relics at half off.

These are usually good but can be hit or miss depending on the pool, so ask if you’re not sure. Finally, there is the megadraw, a one-time free pull of a bunch of relics.

It’s free. Pull.
The table below is a summary of the above:
| Draw Type | Mythril Cost | Rates |
| Single | 5 | 14% to obtain a 5☆ relic or better. |
| 3-Relic Pull | 15 | 3 chances at 14% each to obtain a 5☆ relic or better. |
| 11-Relic Pull | 50 | 1 guaranteed 5☆ relic or better plus 10 chances at 14% each. |
| Lucky Relic Draw | 25 | 1 guaranteed 5☆ relic or better plus 10 chances at 14% each. |
| Realm Relic Draw | 15 | 1 guaranteed 5☆ relic or better plus 10 chances at 14% each. |
| Luck of the Realms | 5 | 1 guaranteed 5☆ relic or better plus 2 chances at 14% each. |
As you can see, Luck of the Realms is the best value you can get for your mythril, followed by Realm Relic Draws, Lucky Relic Draws, and then standard 11 pulls. Single pulls and 3 pulls are never worth doing unless you’re a desperate or high stakes gambler.
Once you’ve done this, you should have a solid assortment of relics and SBs to gear up your party.
Hall of Rites
What if you get a relic for a character you don’t own? There’s a really simple solution for that! On the Home screen, tap on the Item Exchange, then Hall of Rites. That will take you to a screen where you can trade Hero Souls for characters. You can obtain Hero Souls from events.


You can also trade Memory Crystal Lodes for Memory Crystals (MC for short).
Leveling
This is the most obvious way to become stronger. Besides farming the exp power up dungeon, you can use Growth Eggs you’ve probably been getting from realm dungeons or events. Growth eggs are just items that give a lot of exp so you can level characters quickly without spending a ton of stamina. You can feed characters eggs from the Growth Egg menu under Upgrades & Inventory.

Growth eggs award exp only towards character levels; they will not help you learn SBs.
Right next to it, you can see Break Level Cap. That’s where you go to use your MCs. Character levels cap out at 50, 65, 80, and 99. MCI, II, and III are used to break each cap at 50, 65, and 80 respectively. Level 99 is the highest any character can go.
Record Materia
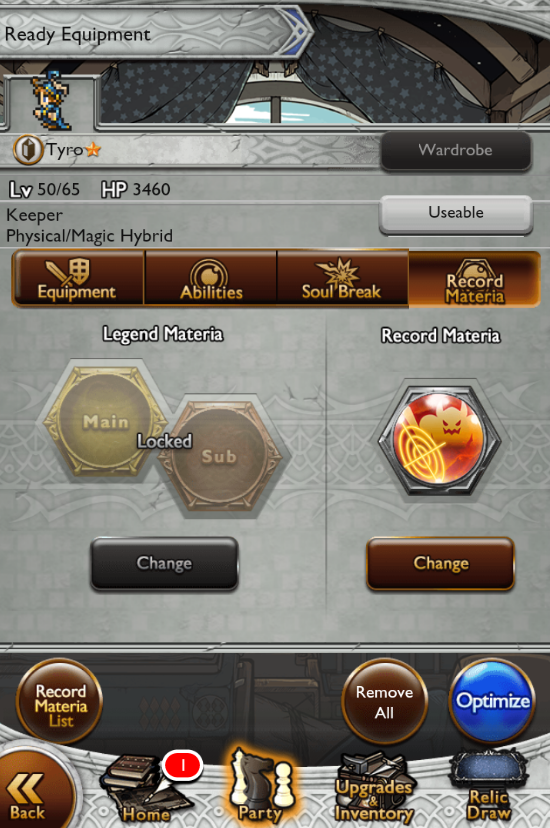
Breaking the level cap does more than just let you level them up more. It unlocks Record Materia (abbreviated RM) for you to use and unlocks that character’s RM slot.

RMs can be obtained by breaking a character’s level 50 cap, as a random drop by having a character in the party after breaking the level 65 or 80 caps, or leveling a character all the way to 99. RM effects are varied, from boosting stats or damage to letting you start with statuses like haste to letting you even start with free gauge for SBs! To see the entire list of RMs and how to obtain them, tap on the RM slot from the Party Menu, then tap on Record Materia List in the bottom left.
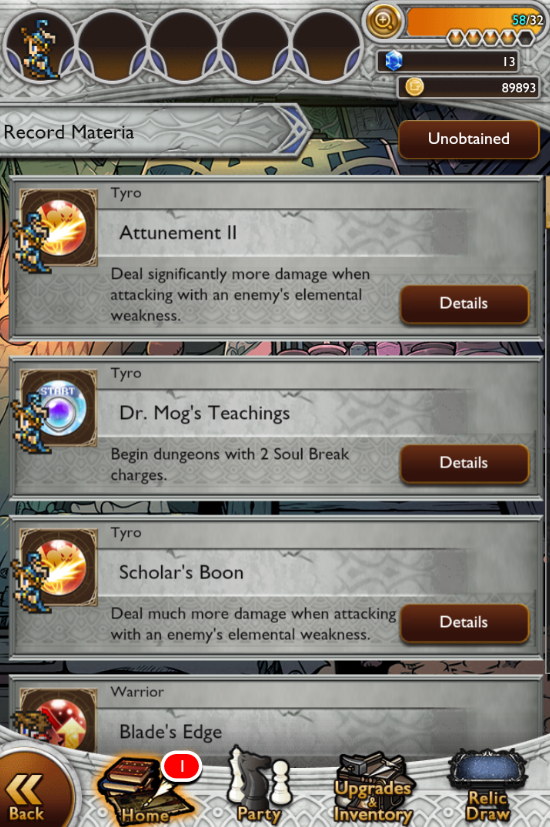
RMs give your party added flexibility, allowing it to adapt to various situations, and they can even be the difference between winning or losing a battle. But how do you know which RMs are good when there are so many? Here’s a list of most of the useful ones in the game. The list is slightly dated but includes all the core RMs you’ll want and use for 99% of battles.
Out of those, there are two in particular you want to get as soon as possible: Cloud and Tyro. Mako Might and Dr. Mog’s Teachings both let a character start with enough gauge to use a SB at the start of a fight – perfect for getting a hastega/party buff off early or making sure the healer has enough gauge to use a party heal when it’s needed.
Party Composition
You’ve probably been rolling with whatever characters you had. Maybe they were your favorites. Maybe they were your highest leveled. Or maybe they just had the highest stats out of all your other choices. Unless you were insanely lucky with your choices or you’re a RPG veteran, you likely have to change some things.
A typical party will consist of 1 healer, 1 buffer and/or support, and 2-3 damage dealers (DPS for short). When I say “healer,” I don’t mean anyone who can equip a heal spell but someone who specializes in healing. What is the difference? Tap and hold on a character in the party menu, then tap on Usable in the top right.
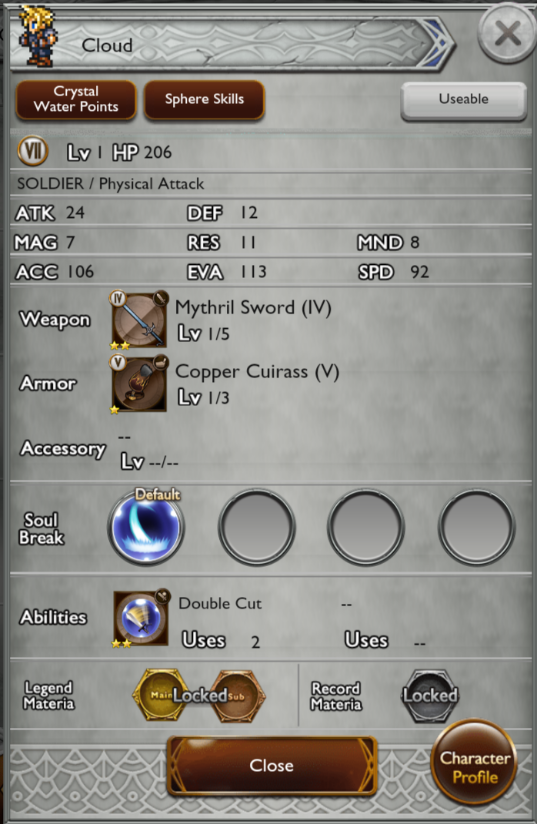
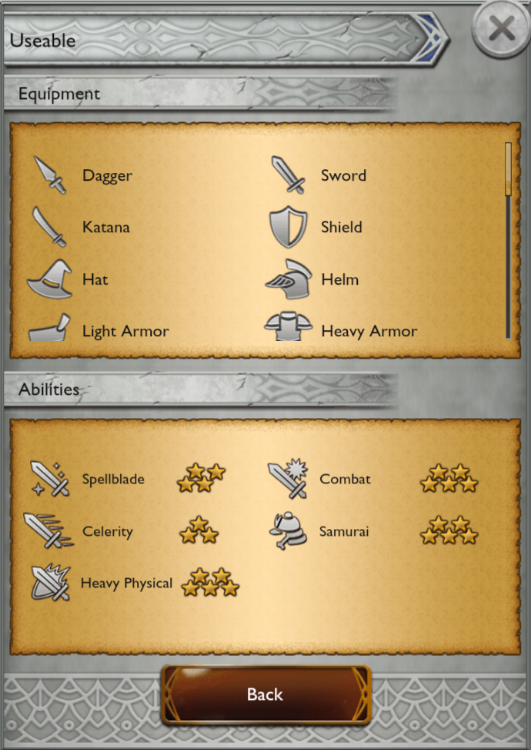
The Usable page shows you all kind of gear and abilities a character can equip. For example, Cloud can equip anything from 1☆ to 4☆ spellblades, but he can’t equip a 5☆ spellblade because he has only 4☆. Similarly, he can equip 1☆-3☆ celerity abilities, but he can’t equip 4☆-5☆ celerity. But he can equip any kind of combat ability because he has 5☆.
These skillsets show you what the character is specialized in. In the above example, Cloud is clearly meant for DPS, but not healing. Here is another example:

This character can heal because he can equip Curaja, but he’s not a healer because his specialty lies in combat and knight. But wait! Look at Tyro.
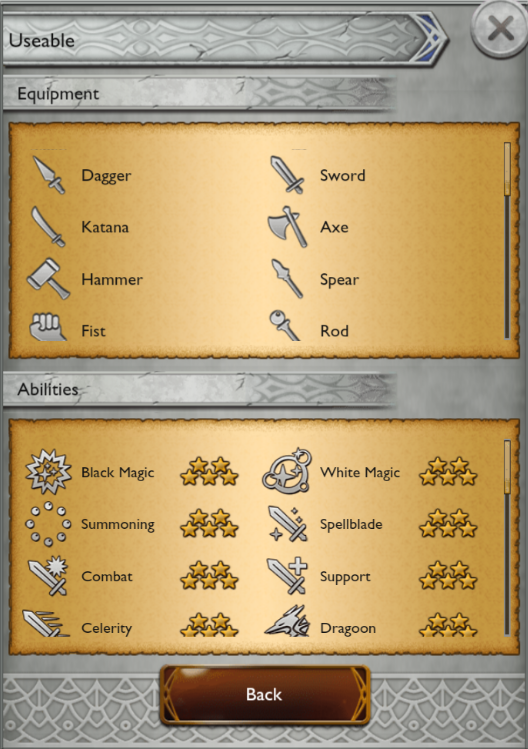
Tyro has 5☆ in literally everything. Does this mean he is God?
… no, and this is where you have to look at SBs as well to see what a character specializes in. To see what SBs characters own, you can browse the Soul Break tab of the Community Database (warning: overwhelming data dump). For example, both Beatrix and Eiko have 5☆ white magic, but if you looked up Beatrix’s SBs, you’d see they all do damage while all of Eiko’s heal. This means Beatrix is a DPS while Eiko is a healer. In Tyro’s case, most of his provide buffs, which makes him a support. You can put every character in the game into at least one of those role groups, with many characters overlapping into a second, or even a third – for example, Onion Knight can DPS, support, *and* off-heal depending on the fight and what you have for him.
Now that you know how to put a good party composition together, you still need to identify who your best characters are for each role, and the rule is simple: SB > no SB. If your Yuna has a heal SB and your Penelo doesn’t, you’re going to use Yuna over Penelo, period. Do the same for buff/support. For DPS, your best choices will vary from fight to fight. Much of this game is about abusing elemental weaknesses, and all DPS specialize in some element (or two). For example, Cloud deals primarily wind or dark damage, depending on what SBs you have for him, and Tidus deals only water damage. If a boss is weak to wind, you’re going to pick Cloud over Tidus. If a boss absorbs water, you’re not going to bring Tidus at all. If a boss is neutral to everything, pick whoever does the most damage in general.
Buffs and Debuffs
(De)Buff foundation is very important once you get into higher difficulties. For starters, rule #1 is
Always Have Hastega Up.
Hastega reduces your ATB (the yellow bar that you have to wait on to fill before taking an action) in half, which means you take more turns to heal and do damage. High level bosses are designed around the assumption that you have Hastega at all times. It doesn’t matter if it’s from a SB or the white magic ability, just have Hastega somewhere.
Bring a Party Stat Buff.
If you have an all physical team, bring an attack buff. If you have an all magical team, bring a magic buff. If you have mixed damage, bring a hybrid atk+mag buff. Many of the good party stat buffs come with Hastega so you can kill two birds with one stone. This is the quickest way to boost your damage, but you don’t want to stack a bunch of stat buffs all at once because of soft caps (limits on how high your stats/buffs can go).
Bring Defensive Buffs.
Get into the habit of fitting protectga or shellga (depending on whether a boss deals more physical or magical damage) in your teams to reduce damage taken. If you need more mitigation, pick Tyro’s Sentinel Grimoire as a RW in realm dungeons, or his Divine Veil Grimoire as a RW in events.
Use Stat Debuffs.
Simply bringing defensive buffs may not be enough mitigation. Some bosses may also use piercing attacks that completely ignore your defense or resistance stats. This is when you bring stat debuffs like Full Break or Power or Magic Breakdown.
Important Rule of Thumb About (De)Buff Stacking
- If two things affect the same package of stats, they don’t stack.
- If two things affect different packages of stats, they do stack.
You can think of it like magnets. Like doesn’t stack on like. For example, if you have a +50% atk buff and a +30% atk buff, they will not stack because they both affect only atk, and the newest buff will overwrite the oldest one. If you have power breakdown (-atk) and full break (-atk/mag/def/res), they will stack because they are different packages of stats.
Roaming Warriors
With all the things listed above that you want to bring to fights, how do you fit them all into your party? RWs, whether they’re the ones in realm dungeons or the random ones you find in events, are great slot savers. You can use them to fill one or more of those roles listed while you bring everything else. For example, I mentioned Tyro’s Divine Veil Grimoire in the defensive buffs section. That SB provides Hastega, Protectga, Shellga, and a +200% def/res buff. Wow! That fills out half that list, so you just need to bring an offensive stat buff and debuffs.
You’re not just limited to buffs either. You can pick a RW to fill in any weakness you have, be it buffs, healing, or even damage. Here are a few good ones to follow as a new player:
| Character | SB Name | When To Use |
| Tyro | Divine Veil Grimoire | Provides Hastega, Protectga, Shellga, and Def/Res buff. Use when you’re taking too much damage from bosses. |
| Rikku | Hyper Mighty G | Provides Hastega, Protectga, Shellga, and Atk/Mag buff. Use when you want a mix of defense and offense. |
| Eiko | Guardian Mog | Provides Hastega, Healing, and Last Stand (lets you survive lethal damage one time by restoring you to 1% HP). Use when you already have defensive buffs and/or debuffs on the boss but your healer still can’t keep up. |
| Cloud | Ultra Cross Slash | Provides a physical damage buff to the user and allows their physical attacks to break the damage cap. Use when you’re bringing all the necessary buffs yourself and you want extra damage but have only one strong character. Only use with physical DPS. |
| Shadow | Shuriken Storm | Provides Haste to the user and deals damage to all enemies. Use as a quick way to clear Power Up Dungeon stages. |
Honorary mention goes to the entire class of AOSBs. These SBs are one-time use but will let you one-shot most bosses up to D99. This are a great way to pick up mythril from event stages. The main thing you want to look for when choosing an AOSB is what element it is and what element the boss is weak to.
Again, this is not an exhaustive list. As you gain more experience playing the game and learn what all the various SBs do, you’ll figure out what’s useful to you and what’s not so useful.
Finding and Adding RWs
You know what to look for, but how do you find them? Refresh your list until one finally shows up? Thankfully, there’s a quicker way. You can visit this website: https://friends-ffrk.com/
to find a list of codes for a particular RW. For example, let’s say you’re looking for Divine Veil Grimoire. You would enter in Tyro for character and Divine Veil Grimoire to bring up the list of codes, then pick the first code you see.
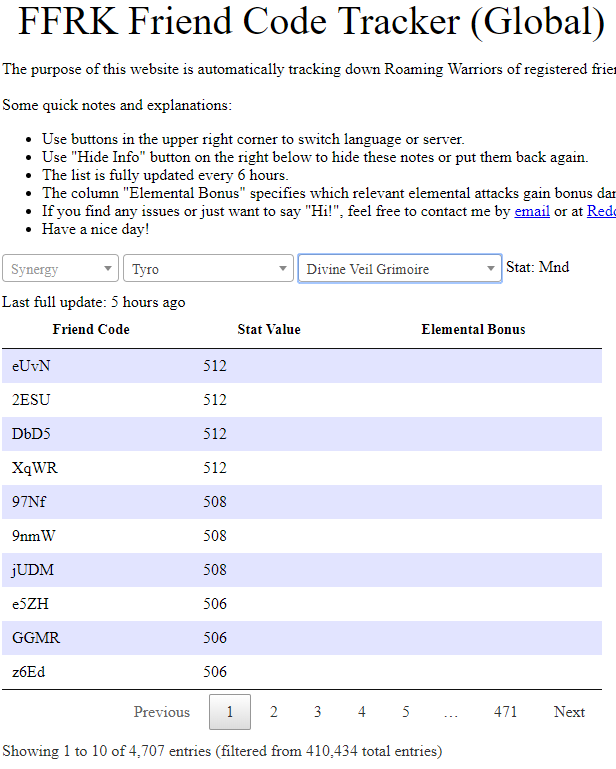
In this example, it’s eUvN (at the time of this writing). In-game, from the Home screen, go to Menu -> Friend & Block List -> Find Friends, then enter the code into that field and you should have the option to follow that player.


Once you have followed the player, you can go back to the event, refresh until you see their RW (shouldn’t take more than a couple of refreshes if you keep your follower list small), and select it! Just be aware that you can use their RW only once a day so if you need to use that same SB for another stage, you’ll need to repeat this process to find another player with the same SB.
Accessories
Accessories can be obtained from some dungeons and events and are a major source of element and status debuff resistances that help prevent a lot of damage or headache. While you won’t have many of these to start with, you’ll eventually use them all the time. You can buy a starter set from the Gysahl Exchange. From Home, go to the Item Exchange, and then Gysahl Exchange.
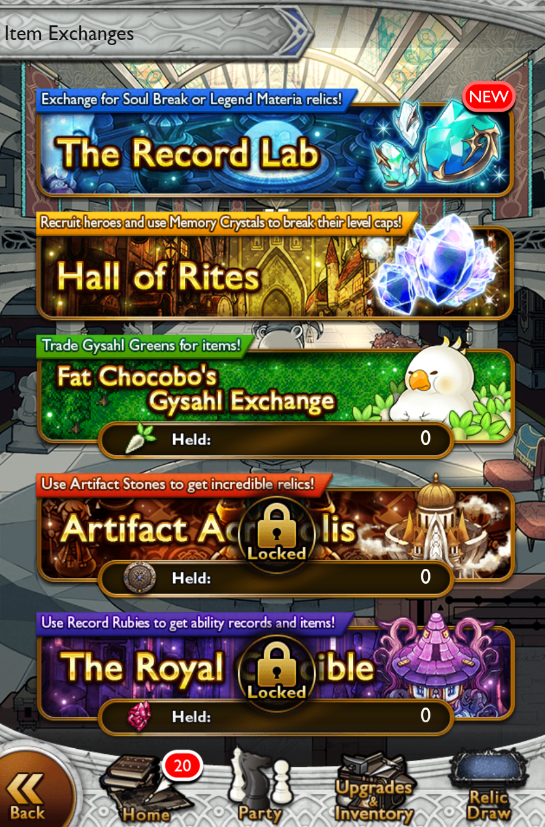
In the Gysahl Exchange, you can trade Gysahl Greens for a variety of things. Gysahl Greens can be obtained from power up dungeons or multiplayer events. In the Other tab, you will find a bunch of accessories; buy as many of the elemental or status resist accessories as you can but ignore all the ones that give only stats.


Also important is the Special tab, where you’ll find 1 mythril and 2 cheap stamina potions. These restock once every week on Wednesdays and any unbought ones will be lost forever, so be sure to get these at the very least.
Speed
Change combat speed to 1. You can change it by pausing in battle or in the settings outside of battle. The reason you want to do this is because there is a delay between when you tap on something and when the game actually registers it; we call this input delay. The faster the battle is moving, the more input delay you have, which means you actually get fewer actions for each boss action over the course of the fight. Don’t put yourself at a disadvantage!
Dives
Depending on where you are in content, you may have seen Motes as rewards from events or realm dungeons.

Motes are used to increase a character’s stats, damage, or ability access permanently. The community refers to this as diving, based on the JP name for the system. You can access this system by tapping on Record Spheres from the Upgrades & Inventory screen.

From there, you’ll find a list of all characters you own. Tap on a character to see all their record spheres, bonuses they offer, and how many motes they cost.


Spheres at the top level use 3☆ motes and are quite common, so use as you see fit. Spheres in the middle level and below use 4☆ or 5☆ motes that are uncommon, so it’s strongly recommended not to spend those frivolously.
Abilities and Hones
Remember how I said earlier that you’ll want to branch out on abilities eventually? This is that time. The list before was of generic abilities you could use on most characters. If you want to strengthen your characters even further, you’ll want to create abilities for jobs they specialize in. For example, Refia is a fire monk. She can use combat, monk, and sharpshooter. Out of those, monk and sharpshooter have fire options. If you look at her dive boosts, you’ll see she’s geared for monk rather than sharpshooter, so you’ll want to create a fire monk ability to get the most out of her. Most characters have only 1-2 abilities worth using within their primary school so it shouldn’t be hard to figure out what to make for you, but feel free to ask in discord if you ever have any doubts.
The other important aspect to abilities is their Hones. If you run out of uses on that ability you created just for one character and have to resort to using something else instead, that defeats the purpose of making the ability in the first place. Hones will directly increase your staying power in battles, so if you find yourself running out of uses, you either need to rank up your abilities or you need to changing something in your party setup to make it more efficient. Either way, since orb costs on abilities increase at each rank, it’s recommended you hone only when you need to (i.e. don’t make something rank 4 just because you can if you’re using only 6 uses, or rank 3 worth of hones).
Other References
If you somehow had the patience to make it this far, you know enough to reach endgame, where you’ll have to shift gears again. There are a ton of other details not covered in this guide that can be helpful but I covered only the main ones. If you want to read up on them, there is a huge library (pun not intended) of resources you can read up on if you want. Two of the big ones are,
FFRK Community Database: An always up-to-date database of all abilities, SBs, materia, and
many others and all their associated potencies, costs, status IDs,
and other technical details.
Mr. P’s PDF: An outdated derivative of the database in PDF form but covers technical details of
things like combat damage and statuses that the community database doesn’t
explicitly include.
Other Useful Links:
Abbreviation Glossary: If a conversation sounds like it’s in another language, it’s because it is.
This helps you translate.
RW Tracker: A database of all player-owned RWs in the game. If you’re looking for a specific
SB to follow, this is where you want to go.
Useful RMs: List of most of the important RMs in the game.
There are also many resources for specific fights or types of content, which you’ll find in the GL or JP info channels on discord, or if you don’t see it there, you can ask in the Q&A channel.
Good luck Keeper!


