
CT Planning
A comprehensive guide to Charge Time (CT) in
The Alchemist Code
Contents:
- Cast Time Fundamentals
- Cast Time Modifiers
- Cast Cancelling
- Overclock Synchronisation Tables
- Alpha Strike – First Attacks
- Continuing and CT
- Overclock with 80 CT
4) Advanced Charge Time Tactics
- (Important) Calculating the next turn
- Hit-and-Run tactics.
- Forever my turn – CT reduction.
- Quicken/Delay
As translated and expanded on by VicariousExp (Reddit)

Foreword/Preamble
This content of this guide is not entirely my own work, although I have expanded on it.
The majority (around 70 percent) of this guide has been translated from the wonderful resources which the Japanese have contributed on their wiki for The Alchemist Code at seesaawiki.jp
I write and translate these guides mainly because I have a vested personal interest in seeing The Alchemist Code do well.
It is, as far as I know, the game most mechanically similar to Tactics Ogre and Final Fantasy Tactics, game franchises which I loved long before the game industry I grew up with devolved into hundreds of sterile remakes of the exact same franchise and bandwagoning on to the next big thing (Survival games/MOBAs/Battle Royales). Therefore, thank you very much for prolonging the life of this game.
As a lifelong gamer, I wish to share this heartfelt love of turn-based strategy games with you. If you have any questions, opinions, or corrections, please feel free to send me a private message on reddit at /u/VicariousExp.
Charge Time – the Basics
Charge Time is a factor that determines how often and when a unit gets an action in The Alchemist Code (TAC). Although an intricate understanding of the mechanics isn’t necessary to play the game, learning about Charge Time can greatly strengthen your ability to lead your units to victory. This guide has been written with the intent that even a beginner with no prior knowledge of the mechanic can gain a comprehensive understanding of how it affects gameplay – no complicated calculations are needed at all as it is actually a very simple and elegant mechanic.
Although I will attempt to make this easy to understand, new players may be confused at some terms and concepts introduced early in the guide – namely the five basic terms of CT, AGI, Cast Time, Cast Speed, and Time Units. As the guide is a little long, it is recommended that you read through it once first.
Contents
Charge Time Fundamentals
The official website has a description of Charge Time. Before we get into the nitty-gritty, it is a good idea to go over it. From the website, we get this description:

A few things to note here:
- A unit’s job does not affect CT replenishment speed directly – rather, for each unit, its different jobs usually have different AGI values, which leads to the gauge filling at different rates.
In-Depth Explanation
During Battle, the unit turn order is displayed in the upper-left corner of the screen. Charge Time (CT) determines this order in which units will take their turns. You can view each unit’s CT by the number next to the hourglass gauge.

Example: Logi’s CT is 72 in this picture.
CT increases as the game timer (Time Units – we will discuss this later) increments, and when the CT gauge is full, a unit gets to act.
CT Charge rate is equal to 1/10 of a unit’s Agility (AGI) stat. If a unit has 132 AGI, every time the map timer increments, it will gain 13.2 CT. (The decimal value is not displayed in the bar.)
The consumption of CT after a unit’s turn depends on the actions a unit takes.
- Passing a turn (No movement/Action taken) – 60 CT.
- Moving OR taking an action only – 80 CT.
- Moving AND taking an action – 100 CT.
- Although the CT bar displays 100 during a unit’s turn, the unit’s actual CT may exceed this displayed value. Any surplus CT is carried over and added to the CT bar after the unit has taken its turn.
- Example: A unit has 105.7 CT. As its CT is above 100, it gets a turn. It moves and attacks another unit, decreasing its CT by 100. It now has 5.7 CT.
Some skills can directly manipulate CT values:
- Overclock (Chronomancer) and Magical Momentum (Chronomancer +, Rahu) add 100 CT to the CT gauge.
- Jewel Investment (Merchant) adds 50 CT to the CT gauge.
Cast Speed and Casting Time
Some skills have a casting time instead of activating immediately. These skills can be identified by the Cast Speed number displayed under the skill.
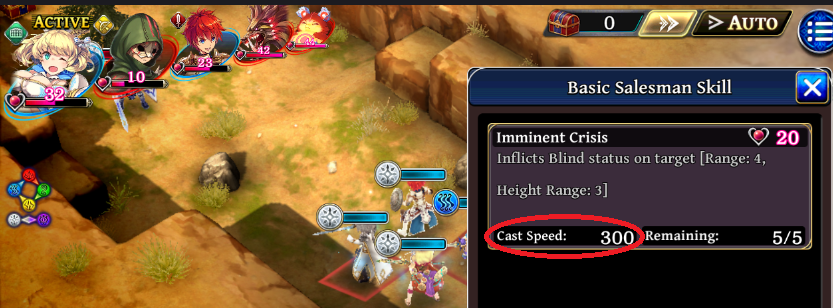
Example: The skill “Imminent Crisis” has a Cast Speed of 300.
Upon using the skill, “Charge” will appear above the unit and an invisible timer for the skill is created.

Cast Speed uses the same concepts as CT, but is treated separately:
- The time of the skill’s activation is displayed on the turn order list with the word “Charge” overlaid on the unit’s portrait.
AGI is to Charge Time as Cast Speed is to Cast Time.
- There is no way to view Cast Time values in the game. Although Margaret has 9 Charge Time in the above picture, the skill activation itself has a separate Cast Time.
- With every increment of Time Units, Cast Time will increase by ⅒ of Cast Speed. “Imminent Crisis” has a Cast Speed of 300, this means the gauge fills by 30.
- When Cast Time reaches 100, the skill will activate.
Due to Cast Time and Charge Time having the same abbreviation (CT), they are both frequently confused, even by the game’s translators. For the purposes of this guide, CT refers exclusively to Charge Time and “Cast Time” is never abbreviated.
Time Units and Action Sequence
In the Alchemist Code, whenever a battle begins, an invisible timer (Time Units) is created. Whenever this timer increments by one (we will call this 1 tick of Time Units), CT for all units and Cast Time for all skills is incremented by ⅒ of their AGI or Cast Speed values.
Each step of the following sequence happens in order:
As Time Units increase by one,
- Time-based triggers resolve (e.g.: Reinforcements spawn)
- CT is added to every unit and Cast Time is added to each charging skill.
- Resolve the action for every unit or skill with 100 or above CT/Cast Time until there are no units nor skill with CT/Cast Time above 100.
- Advance the Time Units by 1 again.
As there is no in-game display or reference for Time Units, it may seem that Time Units frequently skips ahead by large values (for example: at the start of a battle when everyone has no CT).
If there are multiple units or skills exceeding 100 CT/Cast Time, Time Units does not advance until all their turns have ended – in other words, the game clock is frozen and no “real time” is passing. The turns will resolve from the highest to the lowest CT or Cast Time. If two turns happen simultaneously, they should resolve in the order of the unit list.
As there is no official term for Time Units, they have many names, such as “Game Clock Cycles” and “Map Time”. However, it shouldn’t be too difficult to guess what people mean from the context.
CT per Time Units
The amount of CT a unit gets for each increment of Time Units is affected by buffs to the AGI stat and by the statuses “Delay” and “Quicken”. Both mechanics are multiplicative and the CT value can be calculated as follows:
CT increase per Time Unit = {AGI ✖ (100% + AGI buff%)} ✖ (Quicken/Delay coefficient) ÷ 10
*Note: The value for AGI after buff/debuffs is rounded to the nearest integer.
*CT increment values are rounded down to 2 decimal places
For Casting Time and Cast Speed, there is no equivalent of a buff to AGI, however it follows similar calculations and is affected by Quicken/Delay.
It can be convenient to think of factors which affect Casting Time such as “Swift Charge” as a speed multiplier, however the actual way the game processes these mechanics is slightly different. (discussed later)
Action Sequence per Turn
Unit turns resolve in the following steps:
- Duration decrement of Buffs and Status Ailments.
- Assuming a buff has a 3 turn duration, its timer decrements to 2 turns at the beginning of a round. When the timer reaches zero, the buff or status ailment expires. This is why charge-up skills have a duration of 2 as a duration of 1 would mean they would expire immediately at the start of the unit’s next turn.
- HP/Jewel regeneration and paralysis probability resolve (chance of losing the turn)
- Unit’s turn (Controllable)
- Additional resolution of Status Ailment effects (e.g. Poison), terrain/panel effects (picking up treasures, gems, etc).
- End of the unit’s turn.
AGI and CT Tiers (Turns to Action)
Due to CT calculations being performed every increment of Time Units, there is frequently a large benefit to acting 1 Time Unit earlier. We can calculate the time needed for each unit to reach certain amounts of CT simply by dividing the goal by a tenth of their agility. This gives us the following tables:
Agility breakpoints for Time Units (until first/next turn)
CT 100 AgilityTime Units2504200516761437125811291001091118412771372146715 | CT 80 AgilityTime Units267320041605134611571008899801073116712 | CT 60 AgilityTime Units30022003150412051006867758679 |
(Note that for values near breakpoints, due to surplus CT carried over, units may act 1 Time Unit earlier.)
I have a full breakdown of Agility values to Unit Turns in this Google sheet showing the number of unit turns required until a given value drops a tier and how many turns it will stay in the lower unit time bracket. Generally, additional AGI has significantly less of an effect the further it is away from the breakpoints listed above. (e.g. 138-140 AGI are barely different)
- For example: A unit with 99 AGI will take 11 Time Units to get a turn. However this becomes 10 Time Units after 1 turn due to a surplus of 8.9 CT, and it stays there for 8 turns before dropping back down to 11 Time Units.
- Further calculations are not extrapolated, but I have created a column called “Effective Tier” which rounds off the average Time Units needed to get a practical estimate for prolonged battles. (e.g. 99 AGI functions equivalent to the 10 Time Units tier most of the time)
Time Unit based duration effects
Although most buffs and debuffs have a duration based on unit turns, there are some notably important exceptions; the following list of special effects have a set duration based on Time Units:
- Quicken (usually 35 Time Units from a Chronomancer)
- Delay (35 Time Units)
- Stop (35 Time Units)
As you can see, this means that these skills have a larger effect on units with a high AGI stat. For a unit in the 11 Time Unit category, Stop will prevent 3 of its turns while it would prevent 2 turns for units in the 12 Time Unit category.
Another example: A unit has 100 Agility. Quicken gives it an effective 150 Agility (15 CT per Time Unit), placing it in the 7 Time Unit tier. This means it will last for approximately 35 ÷ 7 = 5 of the unit’s turns.

Charge and Cast time reduction.
Certain skills and passives can shorten Charge or Cast Time, reducing the time until the next unit action or the time for a skill to activate.
These skills work mechanically different from a straight multiplier to the Cast or Charge speed.
Charge Time Reduction
This effect is mainly found in Leader skills, such as Othima and Mielikki’s Leader skill. Othima reduces Charge Time for Water Units by 10% and Mielikki reduces Charge Time for Light Units by 5%. Under this effect, the CT gauge next to the hourglass icon will have the maximum value decreased by the sum of all such effects – e.g.:
1 Othima Leader will reduce the CT gauge maximum to 90
1 Othima Leader and one Othima Ally will stack additively and reduce it to 80.
In effect, this means that units affected will get their action once their CT value increases above the new threshold (i.e. units will effectively use the CT80 Time Unit table to determine their next turn).
Note that CT consumption remains unchanged at -60 for no action, -80 for moving or taking an action, and -100 for both moving and taking an action.
However, negative CT does not exist. This means that for a water unit under double Othima effects with 80 CT, both moving and acting will reduce the character to 0 CT, not -20 CT. This effectively gives the unit a free “movement” or “action”.
I have created tables in the CT spreadsheet for 95 and 90 CT to show how Time Unit tiers change when using a single Othima or Mielikki. Although 5% and 10% do not seem like very much, note that this has a significant impact on higher values of Agility.
For example: Using one Mielikki, a Light unit needs to have 159 Agility to soundly have a Time Unit interval of 6. Without Mielikki, this threshold would be 167, which is 8 Agility higher. This isn’t quite as significant for these values as another 10% agility, however, Mielikki also comes with a PATK buff of 20%.
Using one Othima, 160 Agility is required to have a Time Unit interval of 5. This is roughly equivalent to 200 Agility under normal conditions – a gain of 40 Agility! (In practice, this is actually superior to 40 Agility if you are moving as well as taking an action)
Important: Note that this is commonly confused with Casting Time reduction (e.g.: Lofia’s Leader Skill affects Casting time, not Charge Time, unlike what the in-game text says). However, it has no effect on Casting time whatsoever as they are completely separate things.
The following units in Japan are known to have this Charge Time Reduction effect:
Othima (10%, Water Units)
Chiruru (5%, Water Units)
Mielikki (5%, Light Units)
Tomas (10%, Light Units)
Izayoi (10%, Wind Units)
Succubus Rosa (10%, Dark Units)
- Note that this effect is also sometimes called “Charge Time Ratio” by data miners and on Alchemist Code db due to the in-game variable names.
Cast Time Reduction
As you may have guessed, Cast Time reduction works in a similar fashion as Charge Time reduction.
Cast Time reduction comes from many more sources such as Master Abilities, Leader Skills, Buffs, Passives and so on. Note that mistranslation issues exist in the game – for example, Mielikki’s Master Ability says it reduces her Charge Time by 33% when it actually refers to her Casting Time.
Although it is impossible to view the Cast Time gauge in-game, it is easy to think of this effect as a reduction to the maximum number of the gauge. Multiple modifiers to Cast Time stack with each other, however, applying them as multipliers will result in incorrect calculation of the actual Cast Time. As a result, it is easier to think of it as a reduction to the maximum value of the Cast Time gauge with the assumption of a default value of 100.
Some examples of skills which shorten Casting time are:
- Swift Charge (Support Passive, Enchanter): Reduction of 33.
- Shell Charge (Support Passive, Battle Mage): Reduction of 20.
- Quincunx (Buff, Basic Astrologer): Reduction of 50
- Mielikki / Deneb’s Master Abilities: Reduction of 33
A worked example: Swift Charge + Quincunx
33+ 50 = Reduction of 83. Skill will activate in 100-83 = 17 Cast Time.
For any skill with a Casting Speed of 170 and above e.g. Freeze (Cast Speed 200), Sage Mega Nukes, they will activate on the next Time Unit.
Cast speed reduction is especially effective for skills which can be shortened to go off in 1 Time Unit, skills which have little to no surplus casting time on activation, and skills which have an activation which can be shortened by 2 Time Units or more.
As an example of a rarely used skill:
Sky Crush has a Casting Speed of 250, therefore it activates in 4 Time Units. However, due to having a surplus of 0 Cast Time upon activation, it usually activates right at the tail end of that Time Unit, hence practically speaking, it can be thought of activating right at the start of the 5th Time Unit.
With the addition of Swift Charge, the Cast Time becomes 33 + 25×3 = 108. This makes it not only activate in 3 Time Units , it also takes priority over any unit or skill with a surplus CT/Cast Time of less than 8.
An additional example:
Cross/Bolt Nukes (Sage/Mage) have a Cast Time of 600, activating in 2 Time Units with a surplus of 20 – they can be considered to go off at the end of 1 Time Unit. Swift Charge has less of an effect on these as (100 – 33)/60= 1.12, which just gives them an additional priority surplus of 53. This is seldom practical nor useful! (Hence why Othima should not take Swift Charge when on main J1 sub J3)
Applied CT Tactics
Cast Cancelling
It may happen that a unit gets a turn while it is still in the middle of casting a skill. When this happens, selecting the same skill it was casting once again will make that skill activate instantly. For the purposes of this guide, this mechanic is called Cast Cancelling as it cancels the Casting Time, bypassing that mechanic.
This has the added benefit of being able to move the unit and retarget the skill, hence it is very useful for slow casting skills. On the other hand, since the unit uses up two actions to cast one skill, its damage output per turn (DPT) falls.
Selecting another skill to use will cancel the charged skill entirely and start a new Casting Time timer if the new skill has a Cast Speed too. Moving or passing the turn without taking an action will result in the continuation of the old Cast Timer and the skill will be launched towards its original location upon resolution.
The main method of triggering this is to cast Overclock/Magical Momentum or Jewel Investment on a charging unit. Casting Overlock gives a casting unit over 100 CT, forcing it to have a Unit Turn. Jewel Investment adds 50 CT, so will work in a similar fashion for casting units which have over 50 CT.
In the past, there was a tactic using slow-casting spells with higher speed units to automatically trigger Cast Cancelling, but due to recent speeding up of most spells, this is no longer practical. However, it is still possible to trigger in certain situations:

As a practical example, if Level 85 Chronomancer+ Rahu without Swift Charge casts Quicken on herself without moving, this gives her an effective 189 AGI with a Time Unit tier of 5 on the CT80 table.
In this state, if she casts Black Hole, a skill with a Cast Speed of 140 that normally goes off in 8 Time Units, she may get her next turn before Black Hole has finished casting even after applying Quicken’s multiplier to Cast Speed (5 time units, lower surplus), allowing her to move and retarget it.

Overclock Synchronisation Tables
One popular tactic in TAC is to have multiple Chronomancers cast the spell Overclock on a single strong unit, like Zangetsu.
This effectively gives the unit multiple turns, allowing it to clear difficult enemies with a combination of skills like Charge Up and Grand Cross.
Unfortunately, Overclock has range and height limitations. If multiple Chronomancers with different Agility and casting speeds cast Overclock at different times, it can be difficult to synchronise the skills, resulting in the strong unit moving out of range or letting an enemy get a turn in-between.
For this reason, it is usually ideal to have the first volley of Overclock synchronised so that they go off in the same Time Unit. This allows Zangetsu to wipe out troublesome enemies before they become a problem
Using the table below, it becomes easier to use Overclock effectively. The left three columns show the skill activation time and four columns from the right show the timing of each unit’s active turns.
| Time | SC+MM | SC+OC | OC (No SC) | AT1 | AT2-60 | AT2-80 | AT2-100 |
| 9 | 143~166 | 167~199 | 200~249 | 112~124 | 178~199 | 200~224 | 223~249 |
| 10 | 125~142 | 143~166 | 167~199 | 100~111 | 160~177 | 180~199 | 200~222 |
| 11 | 112~124 | 125~142 | 143~166 | 91~99 | 146~159 | 164~179 | 182~199 |
| 12 | 100~111 | 112~124 | 125~142 | 84~90 | 134~145 | 150~163 | 167~181 |
| 13 | 91~99 | 100~111 | 112~124 | 77~83 | 124~133 | 139~149 | 154~166 |
| 14 | 84~90 | 91~99 | 100~111 | 72~76 | 115~123 | 129~138 | 143~153 |
| 15 | 77~83 | 84~90 | 91~99 | 67~71 | 107~114 | 120~128 | 134~142 |
Legend:
| SC = Swift Charge |
| MM = Magical Momentum, Rahu’s Chronomancer+ version of Overclock. 3 TU instead of 4 – If casting MM without SC, use the SC+OC table as they are equivalent. |
| OC = Overclock |
| AT1 = Action Number on first turn |
| AT2-60 = Action Number on second turn if passing first turn (CT 60 reduction) |
| AT2-80 = Action Number on second turn if taking an action or moving only (CT 80 reduction) |
| AT2-100 = Action Number on second turn if both moving and taking an action (CT 100 reduction) |
This is probably very confusing to new players, so let’s do a worked example:
We are trying to synchronise Lofia with Swift Charge and 105 AGI with Chihaya (Chronomancer, AGI adjustment in process).
Using the table, we look up Lofia in her relevant column (SC+OC) and find her 105 AGI puts her in the Time category of 13. (For the curious, this is derived from her Time Unit tier of 10 + her Casting Time of 3)

Next, we look up the stats for Chihaya, who will cast Overclock without Swift Charge (in the third column). We can instantly see that to be in the same Time Category of 13, Chihaya requires 112 to 124 AGI. Our Chihaya is level 85 with 118 base AGI. We can see that giving her more than 6 AGI from gear is going to throw off our Overclock timing synchronisation, so we leave off the 5 star Battlefield Drama and equip Chihaya with Othima’s Illusion Rod instead.
Additionally, using the four reference columns on the right, we can see that on turn 13 when our Overclocks will go off, units with 77-83 AGI will be getting their first turn and the Rider Yomi with 168 AGI who ran off and used Leap Toss on her first turn (100 CT) will also be getting her second turn.
Alpha Strike – First Attacks

It is not uncommon for players in Multiplayer to use a fast unit and rush into an enemy’s attack range immediately before its active turn, then get hit for large amounts of damage, and then start spamming “Heal Me Please”. This is why players using glass cannon units with a bull-rush mentality have a poor reputation of being landmines who blow up instantly.
Occasionally, if one waits for an enemy to get its Active Turn first, it is possible to force it to move and consuming its CT before or without attacking. This time spent waiting also allows allies to provide support. Whether an enemy moves or it attacks, both actions will deplete 20 CT. Moving adjacent to an enemy to attack it without killing it often just saves the enemy the trouble of spending 20 CT to move to attack – meanwhile the attacker has spent 100 CT. In this situation, it is common for the enemy to get its next turn before the attacker can retreat and kill him.
On the other hand, being overcautious will likely give off the impression of being a chicken, which will also annoy other players, so please assess the situation carefully.
Continuing and CT
When defeated in battle and using gems to continue, all allied units are revived with 100 CT and all enemies are set to 0 CT.
For Charge-type attackers (e.g.: Holy Brawlers), using Charge Up skills on the spot without moving allows them to start accumulating CT from the 20 CT threshold. This can allow them to get the first attack on enemies which have a higher AGI than them. Moving would put the unit at 0 CT, which may allow faster enemies to escape or attack first.
On the other hand, as enemies are at 0 CT, turn-duration based debuff skills which reduce AGI are especially effective, like Chihaya’s AGI reducing dances and Othima’s Master Ability. Using such skills can greatly increase the time until enemies get their next action.
Overclock with 80 CT
Casting Overclock on a unit with 80 or above CT gives it at least 180 CT. In this instance, moving or acting alone would only consume 80 CT, allowing the Overclocked unit to take a second turn.
When a unit receives multiple overclocks, calculating the number of turns spent only moving or using a skill and multiplying by 20CT will give you a rough estimate of how many actual additional turns the unit will receive.
Advanced Charge Time Tactics
A few combat tactics rely on an understanding of Charge Time.

Calculating the next turn (Important)
Sometimes during difficult battles, it is useful to know how many Time Units are remaining before a unit gets its next turn.
- Change the map display to the Bird’s Eye view and find the target’s AGI and current CT.
- Apply the formula: (100- Current CT-0.9)⨉10÷AGI and round up the first decimal place.
- This is the number of Time Units until the unit’s next turn.
- If examining priority in detail, this can be calculated by the formula: Current CT+(Calculated Time Units in Step 2 ⨉ AGI÷10) – 100.
- Alternatively, make a copy of this Google sheet (Quick Turn Calculator tab).
The “100-Current CT-0.9” part is to account for surplus CT. If this is annoying, you can substitute it with “99-Current CT” in your mental calculations.
Using this formula, it is easy to determine if a spell will be able to hit a unit in time before it can get its next turn and move out of range.
Hit and Run tactics
A combat tactic which involves them jousting in and out of highly dangerous units’ attacks or active ranges. What can be done with position can also be done with CT – by carefully manipulating CT, it is possible to hit enemies and retreat before they get their turn.
This tactic is particularly effective on highly mobile and fast attackers – however it requires careful consideration of enemy CT, so be careful not to take too long during Multiplayer. For this reason, it is useful to look up an enemy’s AGI statistic in advance.
CT-only jousting
Basically, go in and attack when the enemy has low CT, then attack and retreat. For enemies with low AGI, you can MOVE+ATTACK > ATTACK + MOVE (Retreat to safety.), however, this is prone to accidents. A much safer method is to do MOVE ONLY > ATTACK + MOVE (Retreat to safety).
Status conditions like Slow and Delay greatly help this tactic.
CT-modified jousting
A tactic used with certain AGI-boosting attacks such as Soul Slicer (Shadow Assassin), Blood Temple (Fate Yomi) and The Flowering Dance (Chihaya).
Blood Temple boosts AGI temporarily by 50%
Soul Slicer boosts AGI temporarily by 80%
The Flowering Dance boosts AGI temporarily by 80% and also reduces enemy AGI by 20%.
Due to this large AGI boost, it is usually better to do MOVE + SKILL > ATTACK + MOVE(Retreat) rather than just moving alone. As these classes are somewhat fragile, it has the side effect of letting them manage Jewels safely.
Forever my turn (CT reduction)
Some classes are able to manipulate enemy CT values. Using these skills in combination with Agility debuffs (such as Othima’s Master Ability or Chihaya) which only tick down their duration on Unit Turns, it is possible to indefinitely deny strong and dangerous units their turns as long as skill uses remain. This tactic can be used effectively on stages such as Battlefield Drama farming.
Due to the aforementioned reason, AGI debuffs have a very limited effect when applied when the enemy’s CT is full, therefore they work best in combination with CT reducing skills. The effect of cutting an enemy’s CT by 60 is similar to casting Overclock on all your units. However, to be on the safe side, a cut of 30-40 CT on skills like Exploding Palm is sufficient.
Some examples of skills which affect enemy CT:
- Exploding Palm (Holy Brawler – Fist)
- Inflicts Phys Dmg (Low) & lowers CT by 50% [Range: 1, Area: Lateral (3), Height Range: 2]
- Random Strike (Martial Artist – Combat)
- Inflicts Phys Dmg (Low) & lowers CT by 50% [Range: 1, Area: Lateral (3), Height Range: 2]
- Speed Break (Kanon – Paladin – Blade of Light)
- Inflicts Phys Dmg (Low) & reduces CT by half [Range: 1, Height Range: 2]
- Black Hole (Chronomancer – Chronomancy)
- Inflicts Mag Dmg (High) & Stop & reduces CT to 0 [Range: 5, Height Range: 4]
- Gravity Jam (Lofia – Chronomancer+)
- Upgraded Black Hole.
- Gravitation (Astrologer – Astrology)
- Reduces CT of enemy units within target area to 0 [Range: 4, Area: Cross (3), Height Range: 2]
- Does not inflict damage, so the AI will not attempt to avoid it.
Quicken/Delay
As Chronomancers have a wide array of useful skills, it isn’t uncommon to see people who never cast Quicken or Delay despite having cleared Veda Tower. This is a short discussion of how powerful Quicken and Delay effects can be.
Quicken
As mentioned before and to recapitulate here, Quicken has the effect of increasing CT accumulation per Time Unit by 1.5 times. This isn’t merely a CT increase – as Quicken’s duration lasts a fixed 35 Time Units, it will persist for the next 34 Time Units after application. This makes it scale excellently with AGI.
This also has the secondary effect of making buffs and debuffs expire 1.5x faster in terms of Unit Time. Using Quicken, it is possible to wait out a 3 turn debuff simply by passing a unit’s turn and get to attack before the debuffing unit can re-apply its debuff. (Example: Gilgamesh vs Waginau’s Gravity).
The amount of CT produced by Quicken depends on the target’s Agility. At 180 AGI, it produces 18 × 0.5 × 34 = 306 CT. For a unit with 100 AGI, it produces 10 × 0.5 × 34 = 170 CT. If allowed to run out its full duration, this CT production is much greater than that of Overclock and at only a fraction of the cost – 16 Jewels!
For this reason, if turns aren’t immediately needed, Quicken is a stronger skill than Overclock. Unfortunately, Quicken is limited by its Range of 3 and Height limitation of 1, which makes it difficult to apply. Units that wish to get this buff should remain close to Chronomancers.
Do note that Quicken is undesirable in the following situations:
- When the strategy for a stage involves giving a unit multiple consequent turns (use Overclock instead).
- Randomly messing up CT-based tactics (e.g.: Synchronised Overclocks)
- When you want to maintain the longer duration of buffs (e.g.: Large short-term defense buffs, maximising Holy Brawler counterattacks after using Charge Up)
- When waiting for enemy reinforcements. (makes the battle last longer)
- Killing people off more quickly with Poison and Death Sentence.
Outside of these situations, it is advisable to spam Quicken as much as possible.
Quicken has the greatest effect on the following types of units, which should receive priority:
- Fast attackers (Fate Yomi, Basheeny)
- Spellcasters (Sages)
- Units with poor movement ranges
- Busy units that require lots of actions (Bards/Dancers)
- Units that wish to have their debuffs expire more quickly (But not Fast Attackers)
In the situation where the rearguard is easily separated from frontline units, Overclock becomes much less desirable and Quicken becomes much more effective.
To use a dramatic analogy – if an attacker has 200 AGI and a Chronomancer has 100 AGI, Quicken would be boosting the attacker for all of his turns based on his own superior AGI stat, while Overclock’s CT boosting frequency would be scaled off the slower Chronomancer’s 100 AGI.
Delay
Delay can be considered as the opposite of Quicken. One of the 2 least used Chronomancer skills (as Stop is usually superior), it actually has an incredibly strong effect. Additionally, it is rarely resisted. Stacking it together with an Agility Debuff (e.g.: Othima’s Ill Atmosphere) would result in the target getting 0.5 × 0.5 = ¼ the number of actions it usually does, also prolonging the duration of any other debuffs you apply to the unit.
With a fast casting speed of 400, Swift Charge lets you get off Delay within 2 Time Units. This can come in handy when separated from allies. Casting Delay when there are few enemy units left is superior to casting Quicken on all your allies.

Its biggest flaw is that it has a poor range and height restriction, similar to Quicken. Delay is particularly useful when waiting for enemy reinforcements.
End ( For now – thank you for reading this far.)


