—————————————————————————————————————
Account Switching and Starting Over
Given the new event and ability I’ve decided to add this since some people are confused by it.
On the start screen you will notice buttons on the right hand side.
DO NOT CLICK START
If you wish to switch account or start over click on User Center ( Top Right ).

From here you can Start a new game to reroll or Switch Accounts if you know the others information to login.
Note
This option is not available for steam. But if your account is linked to a mobile device you can reroll there.
—————————————————————————————————————–
All things said the first SSR isn’t really that important, they’re great for the collection achievement though. You should try to roll for an SR to help you farm initially. Ubume, Kanihime, Itsumade, or Kuro Mujou are good SRs to start with though you get a free Kuro Mujou a bit later so he isn’t a priority. The Rs you would probably want the most are Zashiki and Yamausagi. Zashiki is given to you but duplicates are good to have and feed her after you evolve her.
See Important R’s and Notable SRs for more info
—————————————————————————————————————–
If you plan on playing no matter what and don’t really care about rerolling on what units you pull skip this part.
—————————————————————————————————————–
10 Pull and Free SSR after tutorial

Out of these shiki I’d have to say the best farmer would probably be Yoto Hime followed by Yamakaze. Yamakaze will have most damage strength in pvp though.
—————————————————————————————————————–
Yoto Hime is recommended for those that want a strong PvE farmer to start.
Yamakaze is recommended for those seeking an early game PvP unit.
Enma is recommended for late game PvP.
Aoandon and Yuki are both recommended for event bosses.
—————————————————————————————————————–
Yoto Hime

Her strength lies in her damage and 3rd skill. Whenever she gets a kill she will move onto the next target with the lowest hp and continue her attack. When her 3rd skill reaches its max she will get 2 more attacks allowing the chain to continue.

Soul Recommendation is Seductress. Atk, Atk, Crit. Push 100% crit if possible.
—————————————————————————————————————–
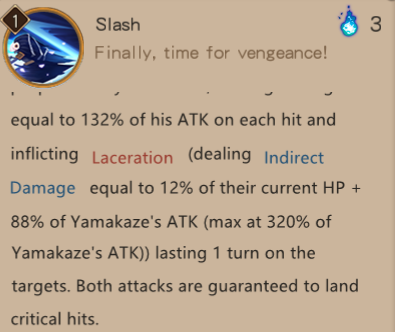
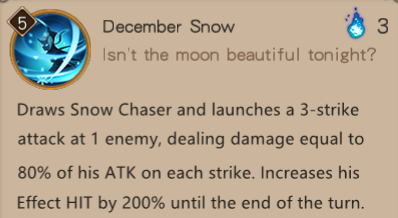
Yamakaze
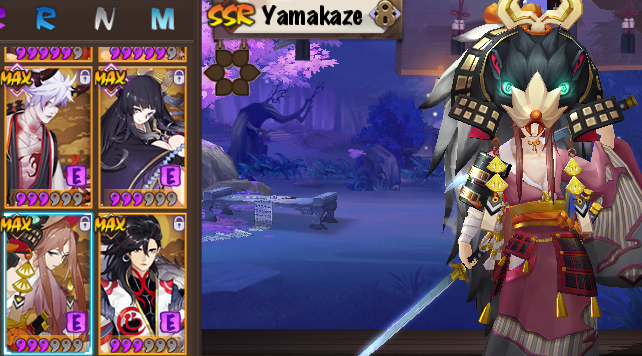
While he isn’t as great for pve, his strength definitely shines in PvP. His 3rd attack is always a critical strike. This allows you to stack attack and critical damage on him so he doesn’t really have to worry about crit. His downside is that in order to max him out if you like him that much is there are 3 skills to upgrade or a potential 12 skill daruma cost.
Soul Recommendation can be a bit random most however prefer Soul Taker. Crit Damage is preferred as the main substat due to the crit of the skill.
—————————————————————————————————————–
Yuki

He is a PvE SSR. He is used to CC targets with his freeze chance or do damage by breaking a freeze. He has been seen in Uber bosses usually paired with Kiyohime freezing the enemies first so he can break the freeze, freeze them and then break the freeze again with his 3rd ability.

His passive and 2nd ability which shows breaking freezes results in high damage.
His 3rd ability which shows his 3 hit attack and increased eff hit for freezing things.
House Imp and Shadow are his two priority souls. House Imp because he constantly damages targets which are frozen which is a controlling effect. Shadow is used when he is beating on something like an Ushi doll whose hp will not drop. A small amount of Eff Hit is recommended with either soul set even with his increased freeze chance.
—————————————————————————————————————–
Shishio
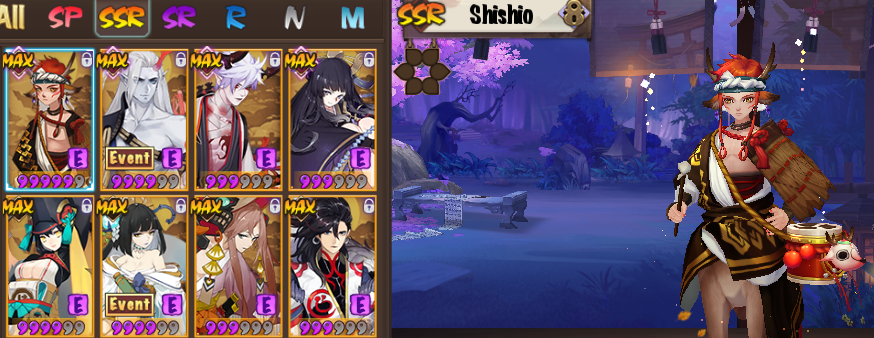
He is a PvP SSR. He is generally used to push targets and stun them if he pushes them to 0 on the move bar. He currently isn’t used much in the game though. So he isn’t a great starting SSR. Generally you wait until you have maxed his first and 3rd ability to evolve him. Evolving him will unlock his passive and skills may go there instead.
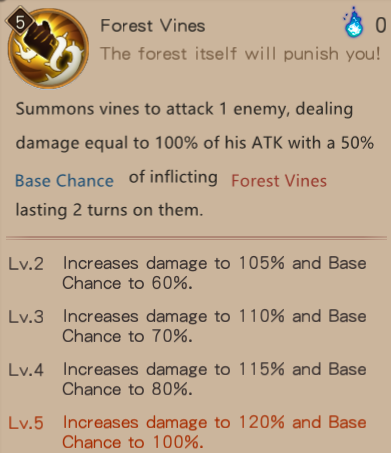
His basic attack. When maxed it has a 100% base chance to inflicted Forest Vines on an enemy. This debuff lowers their effect resist by 20%.

His 3rd ability uses charges from his passive. This has the chance to push enemy and stun them.
His passive which I left out has 2 other effects. Having it he can reflect CC effects back to the caster and whenever an enemy uses an Orb Skill he raises his move bar by 20%.
Fortune Cat and Soultaker were souls used quite often on him.
—————————————————————————————————————–
Enma

Another PvP SSR. She is still used quite often due to her speed and controlling effects she can place on enemies. She is a weaker starting shiki but she is quite strong in PvP.

Her passive increases her chance to Morph an enemy when she afflicts that effect on an Enemy. Her 3rd ability is granted this effect from this passive.

Her 3rd ability. Can afflict the enemy with Silence and Morph. This is an incredibly strong CC ability.
Evolving her gives her a bonus of 10 to speed while upgrading her speed by 10. All and all she has a very high base speed and a very high chance of afflicting 2 controlling effects on an Enemy. Souls don’t mean that much on her you generally want Spd / Hp or Eff Hit / Hp on her with Speed substats. If I had to recommend a soul set I’d say Azure Basan or Fortune Cat, if you can so she pays for the first CC herself. With her base chances to inflict CC being so high you don’t really rely on her for damage just going as fast as she can and inflicting a CC or CCs on the enemy.
—————————————————————————————————————–
Aoandon

More of a PvE unit she really sees use. She has seen use in an Uber as the orb provider your team needs and relies on with Kyoukotsu. Apologies for the Stress this reminder may have caused.

Her second skill has the ability to remove the Orb cost of abilities. This is strong with the Kyoukotsu set but also very random.

Her third skill does AoE damage and has the chance of removing 1 orb from every enemy hit. It’s fast cast has seen use in the early waves of a weekly Speed Challenge.
All and all, I can’t really recommend her for PvE. She rarely sees use and when she does, it’s usually based on her 2nd ability. This can be nice and maddening. She’s a unit to keep but you may want to wait until you build and skill her fully.
—————————————————————————————————————–
Ichimokuren

Ichimokuren is a support unit that rarely sees use. He specializes in shielding his allies which has seen use in Uber to keep people alive from bosses that do AoE damage.

His 2nd ability shields an Ally for a large amount and if that shield is broken it releases some AoE damage.

His 3rd ability shields all Allies. This ability is good when you need to protect your allies from CC effects that are caused by souls. He is another unit that is nice to keep but someone you may want to wait a bit before building.
—————————————————————————————————————–
Lord Arakawa
Lord Arakawa, once one of the great pvp units. Time has just made him less important.
His 3rd skill does really good damage, and has the ability to eat buffs of an enemy. He was once used to counter Shouzu in PvP.
I can’t really recommend him for pve. When they added Yuki who does the same but freezes all units linked by shouzu he lost a lot of his use.
———————————————————————————————————————-
First things first
Find yourself a mentor.
The best places to do this are World Chats, The Protection chat or Onmyoji’s Official discord in the # friends area.
Note
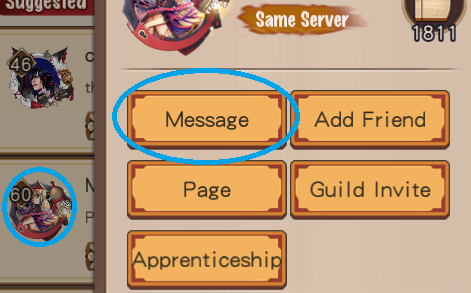
You can click on the Mentor’s picture and message them first. This allows you to make sure they are active and will communicate with you.
Note
If you’re looking for a mentor in the official discord post a message in #friends

Protection Area in chat selection.
Having a mentor will unlock quests for you to do and allow you to friend someone quickly.
The apprentice quests also have rewards, if you complete them all the reward is an SSR shikigami.
I would first ask your mentor for a speed soul for Yamausagi or Azure Basan souls for Zashiki if you need them. Damage souls are nice but getting your support running should be an early priority.
You may want to wait to join a guild and ask your mentor if it’s possible to join their guild. This will help with daily accompany quests and apprentice missions.
*Mentoring Tip* Save G4 Spd souls that have speed as a substat, and Azure Basan sets for your apprentices Zashiki.
—————————————————————————————————————–
Tips for friending someone quickly
– Tip 1 – Always like the person and send your daily friend friendship. These will both give friend points.

Like button.
– Tip 2 – Do Demon Parades with your friend when available. These will also raise friend level and can be done 3 times a day per person.

Parade invite button.
Note A Person can only receive a certain amount of these a day. So you may need to ask people to hold back if you’re trying to friend someone else quickly.
– Tip 3 – Do Co-op missions together. These don’t give much friendship but if you do them a lot it will add up.
It’s great to meet someone and help do the daily quests this way if you are in the same guild.
– Tip 4 – If you have extra shikigami shards that your friend needs be sure to send them the shard in guild. Please only do this with shards you do not need.
Note
You can switch the option from guild to friend in the wish menu. This will let you send more shards to your friend or guildmate.

Button in the wish area to switch between Guild and Friend.
– Tip 5 – As an apprentice ask your mentor if you can do co-op quests daily. The reward is highly worth it to newer players and grants 20 friendship and 60 ap. The easiest quest is The Friendship Pack quest. For souls I recommend giving your apprentice a speed soul for their Yamausagi and Azure Basan souls for their Zashiki.
Note The Friendship Pack quest is limited to level 15.
Note 2 You can’t invite people into demon parades until level 10.
Note 3 The benefits of friending are at tier 1 (150 friendship) you can use the other person’s co-op shiki. At tier 2 (1000 friendship) you can use the other person’s shiki for Heian Tales. At tier 3 (2000 friendship) you gain the ability to send the person SSR shards in the friend area of wishes.
150 reward pictures below (Co-oping)

This is where you go for co-op shiki.

The left shows which shiki you have made available for other people. The top shows which shiki you have chosen as choices to have available in battle. Once you are in battle you made select these shiki to help you a certain number of times. 15 in Normal Zones. 3 Times in Kraken. 2 Times against Nen. 3 Times in Realm Raids. When you switch shiki in battle they will show up and you can choose them there.

The last benefit of this is if you use someones shiki in battle each day they will get rewarded.
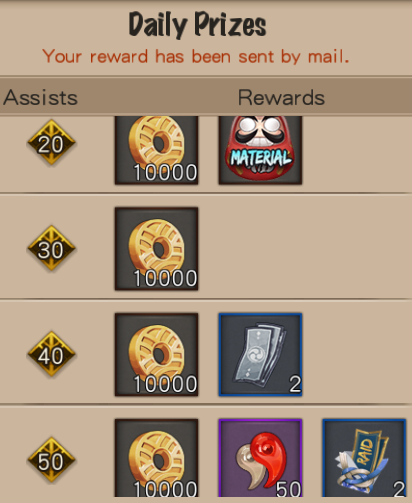
The first reward is at 10 uses and is 10,000 coins.
Heian Tale Pictures and Info
First go to the collection area is in Town on the left side. There click on Heian Tales.

When you have the shiki required in Heian Tales or friendship with someone.you will gain rewards for completing them and achievements associated with them.
——————————————————————————————————————-
Orbs
Most shiki use these for their 3rd skill.
Others provide orbs for you to use.
The most basic and the one you are given after chapter 2 is Zashiki.

Her second skill will unlock after evolution and grants you orbs at the start of each battle.

Note: The skill selected is only available after Evolution. The lock on the icon is generally the notifier they put on a skill that is locked behind Evolution.
When her skills are leveled up by feeding the shiki a clone you will strengthen the skill and get more orbs at the start of a fight.

The circle shows where to click to see how a skill changes when leveled up.
The orb bar also fills up each time someone takes an action.


Upon reaching max you will gain 3 Orbs.
Upon reaching max the second time you will gain 4 Orbs.
When you reach max the third time and further you will gain 5 Orbs.
5 Orbs is the max you can gain each turn.
Note
Later Oitsuki(Sr) begins to provide orbs to your team by speeding up the rate the orb bar will fill.
The major benefit to her is that she doesn’t need to harm herself to provide extra orbs.
The last major Orb provider is Kaguya, but she is an SSR and you won’t see her much outside of PvP.
——————————————————————————————————————-
Summoning
Amulets are best held until a rate up event happens. This generally happens once every 2 weeks or so. You can still get SSRs and SPs without a rate up but holding on until there is one is generally better.
Note
Luck is what will ultimately determine summons. I’ve summoned 1 SSR in 200. I’ve also summoned 3 in 30-50. Even with a rate up, just pull and hope luck is on your side today.
Note
SPs are technically not SSRs so if you draw one while you an unlucky streak it will not end your unlucky streak.
Note
When you summon anything, has a chance to come out up to grade 4. If the unit you summon is unneeded, it is best to hold onto until you need it to upgrade another shiki.
————————————————————————————————————————-
Fast Leveling
For fast leveling the most common way is to kill exploration zone enemies as fast as possible. It may be more beneficial to do a low level exploration zone if you can kill it faster. The first thing you should always look for is Exp Scrolled enemies. If you see none or kill them all before a boss shows up it’s time to restart the zone.
Note – Bosses have all 3 scrolls on them.

These enemies are worth twice as much exp when killed.
Remember when trying to level fast you will want to enable your exp bonuses.

Inside of a fight.

Outside in exploration.

Back in your courtyard.
Note – When a bonus is activated the symbol in the top right will swirl. If you are doing nothing and it’s moving Deactivate your buffs!!

Bonuses turned off.

Bonuses turned on.
You can run hard modes with a friend or guild member! This grants the exp bonus of friendship or guilded to the end of fight rewards. For this it’s recommended that the weak player invite the strong.

Teaming this way allows the stronger player to bring a killer and 2 fodder and the weaker will bring their Onmyoji and 2 fodder. You may also ofc bring 2 spectators each.
Spectating shiki automatically switch when they reach max level if you have more that can level.
Note – There are occasionally events where units will have 2 scrolls instead of 1. This is a great time to farm the exploration zones.
Another way to level fast is the Kraken. The Kraken is found by players after completing an exploration zone. The Kraken costs 30 Ap during the week and 45 on the weekend. It gives rewards of souls, evo materials, and coins with extra bonuses on the weekend. It’s not a bad idea to activate bonuses for coin and experience while doing a Kraken.
Note – You can activate these in the fight and do no need to before hand.

Kraken does have a certain etiquette as to what units to bring. Because most don’t follow this I’ll just type it up.
Usually 1 strong killer is needed, and 1 orb provider is needed. Because 3 people can go 1 Brings the orb provider and fodder. 1 Brings the killer and fodder. And the finder of the kraken can bring anything. Again most do not follow this etiquette so you may need to bring whatever is needed.
Note Suppressing
Some people do not level their Onmyoji at all. This is called level suppressing. In order to do this they avoid all activities that would grant their Onmyoji Exp. They always join other peoples activities so that they may keep their levels low. What this does is give them extremely strong shiki by granting them the exp at low levels instead of the Onmyoji. They appear low level but may in fact be stronger than some level 60s. Due to content unlock levels most suppressors stick to level 30 or very close to it.
Note – Tesso is a great unit to bring to this for the coin bonus he provides once evolved.
——————————————————————————————————————-
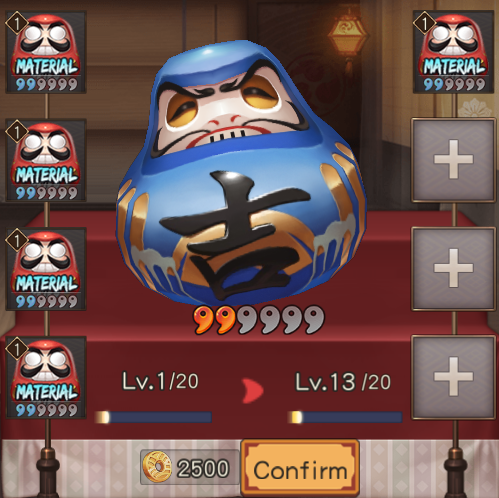
Promoting Shikigami
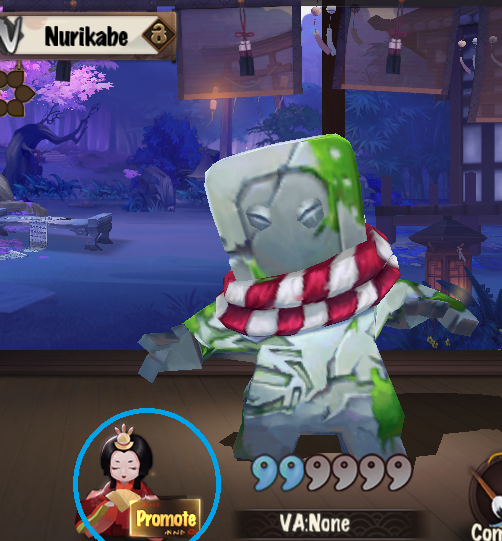
When a shiki reaches max level for it’s range it will require promoting.

Max level is shown by the sticker.
For Promoting you click on the button that says Promote to accomplish this.
Upon clicking this you will need to feed the shiki to Promote it.

Level 20-25
For each tier it required more leveled up shikigami to promote.

Level 25-30

Level 30-35
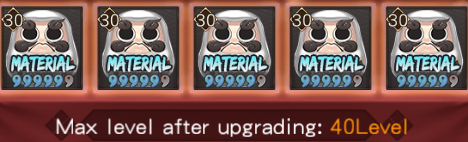
Level 35-40
Level 40 is currently the max, and upon promoting at 35 you will be in max level range at G6!
When you start focusing on leveling your DPS is very important. A stronger dps allows you to farm exp faster, do stronger evo, and stronger souls. Generally people keep supports Grade 3-4 until they need them to survive higher level content. Dps should always be pushed to be the highest level possible.
——————————————————————————————————————-
Auto-mode changes and buffs
You can now change auto-mode to smart mode. Smart mode allows you to choose the skills your shiki uses instead of them just picking skills on their own.
First, click on your picture to big up game options.
Then select the Interact tab and turn on Skill can be selected in Smart mode.

Once Smart mode is activated in auto-battle you can choose the skills the shiki uses.

In Yamausagi’s case we only want her to use Bunny Hop and never throw rings. This allows us to choose Bunny Dance as the only skill she will ever use. This is very important and useful to a team that uses 2 or more Yamausagi battle. Before Smart mode was implemented you had to manually cast each bunny dance or they would throw rings. Now you can tell them to only dance and this will make double accelerating with them much easier.
—————————————————————————————————————————
Demon Parade and Sharding
When you log-in, do your dailies (Kimodameshi), exploration fights, or realm raids you may acquire a Demon Parade Pass. These passes are used to do Demon Parade.

The first thing you do in Demon Parade is start the parade or choose a friend to come along. While the person you choose will not actually be there, a figure of them will be. If their figure hits a shiki with shards you both get rewarded.

Here is where you choose the friend to bring along.
Once you choose the friend if you decide to, you then Enter the Demon Parade.
After entering you must choose which shikigami you want to throw beans at for a chance at bonus shards.

Once you choose your target the parade will begin.
Upon beginning the parade you will see a bar in the lower left.

This bar shows how many beans you have ( far left ), and how many beans you are going to throw. 5 Beans is default and you can move the hexagon all the way left for 1 Bean or all the way right for 10 Beans.
During the Parade you will also see Oguna and Doujo flying across the top with buffs for you.

These buffs do different things for you. The Chance Up buff raises your chance to hit shiki with beans. Assist Up increases the chance the friend you brought will hit shiki with beans. Freeze will stop all shiki on the screen and freeze them in place so they won’t move for a while. Slow will slow them all down making shiki easier to hit. Got Beans will give you 50 more beans to throw. Fast Beans will increase the rate you throw beans so you can throw more at the shiki in a short time.
Upon completing a demon parade you will receive shards of the shikigami you hit. These shards add up, and if you collect the amount required you can summon that shikigami.
To do this you click the button in the bottom left of your Shikigami page.

Here you can check your shards or choose to summon whose shards you have collected.

Different qualities of shiki require different amounts of shards.
N – 25 Shards
R – 30 Shards
SR – 40 Shards
SSR – 50 Shards
SP – 60 Shards
SSR and SP Shards are often used as trading items. This is so people who have gotten SSR or SP shards can collect the shiki they need, or want. Check the # item-trading area on discord for more info and trades.
NOTE
You cannot wish for shiki shards you do not own shards of, unless you already own that shiki or it’s a collab shiki.
–
Demon Parade is random, you may not get the shards you want. Throw beans and pray.
—————————————————————————————————————————
Shikigami Shop and Demon Exploration Pricing
—————————————————————————————————————————
– Tip 1- Quite often you will see chests you have the choice to buy in demon counter for jade. Often these prices are not worth it. The only things worth it are the 100 Ap for 50 jade and 1 Amulet for 50 Jade.
– Tip 2 – On Wednesday and Saturday you’ll see shops in town. Again these shops rarely have good value. For coin you may be able to buy something you need easily but for jade that’s another matter. The shop may have an amulet for cheap. Please remember you should buy the 1000 jade for 11 amulets pack. In the General section of the mall, when considering Amulet prices. Basics for that are 1,000 / 11 or 90.1, for what price you should be willing to spend on an amulet. If it’s cheaper than that it’s okay to buy. You may want to keep math on how much jade you can get from a jade plate before buying from them, but remember your friends can also benefit from this jade plate too. So one that breaks even is technically a profit even if it’s not 100% for you.

These plates cost 85 Jade each(unless on sale). The profit is small but benefits both me and my friends.

These cost 60 Jade each. While they barely make a profit they do have the benefit of jade for my friends as well. Note The lowest a G3 plate can go is 12h at 5 jade each hour. This will make the plate only pay off itself.
Even if the plate only pays for itself, it’s still a good idea to buy it. You will want to level the Merchant and to do this you must buy things from him.


The daruma for Jade are often a rip off, it’s up to you to decide if you need them that badly.
——————————————————————————————————————————
Guild Tips
– Tip 1 – Always do Realm Raids.
These give medals and doing at least 3 of your own before resetting you will be rewarded with 5 jade.
3 Wins 6 Wins 9 Wins
**Note**
If you are going for 9 wins always do the hardest fights first so you know if you can hit 9 or not.
– Tip 2 – Always do Guild Realm Raids.
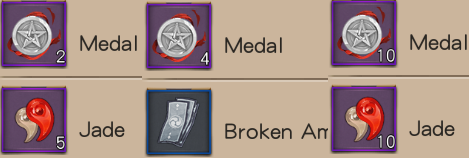
You can do up to 6 every 30 minutes or so and are rewarded medals and Realm Cards as well as Guild Medals if the guild KOs a certain number of people.
These Medals allow the guild to buy buffs, and do banquets twice a week.
**Note** Realm Raids are a great source of AP for newer players.
**Note** Guild Realm Raids are accessible in realm raids just click the guild tab on the right side.

Note
Picture for handling realm cards.

– Tip 3 – Try and show up for the Guild Boss
Every weekend the Guild Boss happens at 10 Server Time joining the fight will reward you as long as you try to help.
After the Guild Boss we always try to have a Feast for all players as a Thank you.
If there is a second Feast it will happen on Sunday at 9 Server Time.
– Tip 4 – Monday through Thursday the Kirin
If you can survive their attack and do 1 damage you will be rewarded with medals, guild medals, shiki shards, and a few souls.
Note
A Trick
If you cannot survive the Kirin a way to bypass them and still get a hit in for credit is Hiromasa.
If you have his Occult: Panther Maul unlocked he will hit the kirin at the start.
This will give you the hit needed for Kirin credit.

If your Hiromasa does not unlock this skill the only thing I can recommend is getting to G5 as soon as possible. At this point you should be able to survive the Kirin with Dps units.
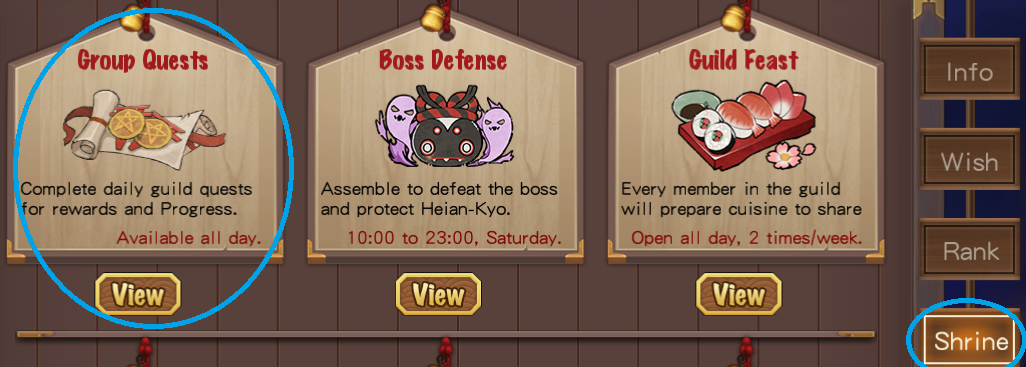
– Tip 5 – Do your guild quests! Doing at least 10 of these a day give you guild feat.
I highly recommend the Accompany Quest. The Accompany quest requires you to join up with a guild member and do missions at least 10 times. These missions give you Orochi Scales. 50 of these lets you gamble on a random soul.
Note
Some guilds may require you to do a certain number of these each week.
– Tip 6 – *Starter Tip* A great way for newer players to get done their guild quests is to ask people to do Evolve fights with you. A higher level player should be able to clear the content quickly and easily. This will grant you Evolve materials and complete your guild quests at the same time!
– Tip 7 – Go to the Guild Menu and click Map. This will bring up your current location if you click the icon in the top of the bottom left and you will be sent to your guild’s flag.

Click on your guild’s flag and you should be able to withdraw AP from there. 20 Ap every 8 hours, with a recharge of 4 hours for 10 or 8 hours for the 20 again.

Note The supply button in the top right is where you get your ap.
Note
Guild Feat may be used to buy a Skill Daruma shard pack each week ( 200 points for 3 to 5 shards).
And 2 amulets at 120 Feat Each.
There are other things to buy but it’s up to you to decide if you need them.
Note
Certain things are only purchasable when a Guild meets a certain level. You may want to search a bit for a higher level guild before you just join one.


———————————————————————————————————————
Unlocked content at level 30
Upon reaching level 30 you will lock 2 new content types.

The first of these is Secret Zones.
Each level of a secret zone will give you a different reward.
Coin Bonuses can affect the rewards from these zones.
A 10,000 coin reward will become 20,000. A 50,000 coin reward will become 100,000 and so on.
The big reward from these zones comes at level 9. When you will be rewarded a Skill Daruma for completing this level. The 2 zones that do not reward you with a skill daruma are the Yamausagi and Yoto Hime zones.
Upon completing a secret zone, it has the potential to unlock the challenge mode weekly.
Each week a different challenge mode will be available and the rewards for level are generally the same with Coin and Jade for levels 1-5, and Jade + Orochi Scales for levels 6-10.
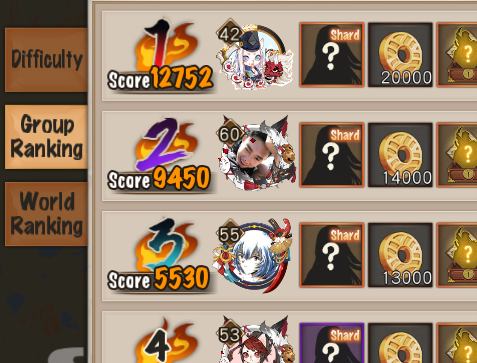
It also rewards those that perform the best or the fastest depending upon the challenge that week.
Note
You can ask for a shiki to be used from a friend or mentor to make the later soul zones a bit easier. For 8 and 9 I recommend an Orochi if you don’t have units for fighting here. Orochi is considered the game’s cheat code as many Secret Zones are quite easy with him.
Do not be afraid to ask for use of that unit or a different unit in particular.
Note
If you complete the weeks challenge zone you can share this for 20 Jade.
–
The second type of content you will unlock is Area Boss.
You can fight this boss or bosses with more fame.
The number of people who clear a boss each day rewards the players for that.

300 kills 600 kills 1000 kills
How well you do in your group will also reward you.
Shards Coins Souls
The Final reward for Area Boss is rewarded once per day for the person who does best on that boss.

Fane Coin Souls Other Rewards
Bosses that are unpopulated are generally best for building up your Fame. Once Fame is built up you should always try and send at least 1 to fight a populated area so you can receive jade and coin.
Note
Fame can only be gained from one area a day.
Note
The rewards might not seem like much but the achievements are nice. And the 20 a day adds up if the numbers are maxed.
20 a day is 600 a month for 1 Area Boss. 1200 a month if 2 Area Bosses are maxed and 1800 a month if 3 Area Bosses numbers are maxed.
Note
You can share an Area Boss each week and earn 20 Jade.
Note
Currently only 3 bosses produce max jade. 2 in North America and 1 in South China.
North America
Yellowstone Np.
Chinatown.
South China
Mount Danxia
———————————————————————————————————————-
Tips for Leveling Daruma Quickly
– Tip 1 – Do Nen whenever it’s available.
This gives you both Grade Daruma and Exp Daruma Shards, as well as Base Daruma.
– Tip 2 – Feeding the Grade and Exp Daruma
Feed the Exp Daruma 3 Base Daruma. This will make them instantly level 11.
Feed the Level 11 Exp Daruma to a Grade Daruma to instantly level it to 25 or G4.

Button to feed or upgrade the shiki

Feeding the daruma

Feeding the level 11 Exp to a G3 grade daruma to show it’s effects.

Grade Daruma after being fed and promoted to level 25. You will need 3 lvl 20 fodder to accomplish this.
– Tip 3 – Feeding the Exp Daruma to other shiki to level them quickly.
Feed the Exp Daruma 5 Base Daruma. This will make it level 13.
Level 13 is the best for Exp Daruma if you’re going to feed them to another
Shiki.
Fed to 13 for leveling other shiki.
Note You can level the Base Daruma up a bit (level 4 is optimal) if you want to take less to level up the exp daruma. You may also use them for leveling shiki’s if you need to.
——————————————————————————————————————-
Souls
These are the strength of all your Shiki. On certain days certain souls are available to find from the Souls Zone.
– Tip 1 – Soul Stats
Souls generally have a 2 Piece Bonus and a 4 Piece set Bonus. The 2 Piece Bonus will Provide a boost to ATK (Attack), DEF (Defense), HP (Health Points), Crit (Critical Hit), Effect HIT, or Effect RES(Resistance). The 4 Piece Bonus will have a Set Effect that takes affect if you have 4 of that soul equipped.

– Tip 2 – Soul stats
-1- Souls have Primary a stat depending on what slot they are in.
Slot 1 will always have flat ATK.

Slot 2 will have ATK Bonus, HP Bonus, DEF Bonus, or SPD(Speed).

Slot 3 will always have flat DEF.

Slot 4 will have ATK Bonus, HP Bonus, DEF Bonus, Effect Hit, or Effect Res.

Slot 5 will always have flat HP.

Slot 6 will have ATK Bonus, HP Bonus, DEF Bonus, Crit or Crit DMG.

-2- Souls also have Secondary Stats, and chance at more of these depending on their grade.
A G4 Soul will have 1-3 Sub stats. A G6 soul will have 2-4 Sub stats.
Sub stats can be any of the stats that appeared before. When you level a soul a Secondary Stat will gain a level every 3 levels. Pure souls are ones where all secondary stats have gone into the same stat. You generally want to avoid flat stats when leveling.
– Tip 3 – Soul grade
Grade 4 and Grade 6 are generally the souls you will max out
Grade 5 may be maxed if you find a Spd or Crit soul you really need. Exceptions are 3 and 5’s if they have great secondary stats.
Otherwise Grade 5 souls cost nearly as much as a G6 to max but provide far less stats.
This makes them not worth maxing outside of the special cases mentioned previously.
– Tip 4 – The Soul Shop
This place offers you cheap souls at first. I would personally buy G3 in slot 1, slot 3 or slot 5 at first. These souls can’t be Atk %/Def%/Hp%. They are static. So buying them makes it easy to obtain 3 of a 4 set that is at least useful for the set.
After you buy a certain number of souls the price will greatly increase. At this point the soul shop loses pretty much all value until you have a healthy amount of coin and the need for certain souls.
– Tip 5 – Which souls to use (Warning Long)
Damage dealers generally use an ATK Bonus soul on 2 and 4. The 6 slot is crit or crit damage.
Shiki such as Yamausagi who specialize in making your team faster should use an SPD in slot 2, with hp in 4 and 6 so they are tanky and don’t die.
Yama should use a soul set such as Fortune Cat or Azure Basan. Fortune Cat gives her a chance to create 2 orbs whenever she has a turn. This will cover the cost of her Bunny Dance.
Zashiki is the general orb provider. The souls she should use are generally all hp. Though the 2nd may be substituted for spd if she must move faster then another shiki to provide orbs to them.
For Soul Set look into getting Azure Basan if you can. Another alternative until you can get Azure Basan is Fortune Cat or Holy Flame. This will cause her to heal herself when she gets to low hp. This allows her to survive longer while hurting herself to provide orbs.
Now for Dps other then the Atk % 2 / 4 is crit 6. The Soul Sets are also important. If the Shiki is an AoE multi hitter such as Ubume or Ootengu. The set Seductress is the strongest. You want to get to 100% crit or as close as you can so the Seductress can proc.
Other dps that hit hard and once should generally use a Shadow soul set. This soul set makes them hit hard on enemies with more than 70% Hp. Along with trying to hit 100% crit with them, Spd can be useful. You generally want your Shadow using shiki to go before anyone else so they can benefit from the soul set.
As for your other 2 souls, any 2 set with crit if you don’t have 100% crit is recommended. Hitting 100% crit is probably the most important thing at first because the damage difference between a Crit and Non-crit is so huge.
Effect Hit Sets vary depending on the shiki. If the shiki is something like Higanbana they may be used with HP / Effect Hit / HP Sets or ATK / Effect Hit / Crit Sets. ATK / Effect Hit / Crit Sets are used to break Sea Sprite shields first so you can still affect them with a CC.
Other shiki like Kiyohime may be SPD / Effect Hit sets. This is so they go fast and get their CC off on an enemy. The Final Soul will depend on the shiki being used.
Sea Sprite and shields initial strength depends on the casters health. The shields damage reduction will be based on the shiki’s DEF stat. Shields like most things can Crit. So if you are trying to start with an incredibly strong shield HP / HP / Crit may be used on a Sea Sprite shiki.
Note
When farming Souls 9 is difficult and one units carries a Mirror Lady set. This makes Souls 9 not worth doing at all. Complete it once then forget it exists.
Note
At a certain point with Zashiki or Oitsuki providing orbs the best way to build. Yamausagi may not be best with a soul set but a broken set. This will be used to make her as fast as possible so you outrun enemies and win the battle.

You can do the same with 3 crit sets and 1 soul being crit damage on a dps if it’s needed. Not recommended for the shiki though as the bonus from shadow is hard to outweigh.
————————————————————————————————————————–
Gluttony Ghoul
When you start leveling you’ll find less and less use for low level souls outside of feeding them to level up other souls.
This is where the Gluttony Ghoul comes in handy.
Click on a shiki then go to it’s souls and Click Change.
In the bottom right you will notice the Gluttony Ghoul.
When you click on him you now must change his Eating Habits.
Once you click on that you can tell him which souls to eat, or which ones you’d just like to be abandoned first.
The top area will allow you to abandon souls and the bottom will tell gluttony which ones to eat.
The right side will tell him when to eat those souls.
You may also feed him now which will make the eating process fast and gain the exp from those souls faster.

Fed Ghoul
After you feed him you’ll notice when you click on a soul and press the gluttony ghoul icon while feeding it. The souls you fed to the ghoul will provide exp you can use to level up other souls.
This can run out so you may need to be careful with the exact amount you feed the soul but the interface explains that quite well and shows you what level you will get to.


Ghoul buttons.
Note
Souls level 4 and below are considered fodder for other souls. You may use them to level up other souls later on.
Souls level 5 and above that have no value are best released. These souls give you Orochi Reverse Scales. When you get 50 of these gold scales you can gamble on a soul of your choice.
—————————————————————————————————————-
Skill Leveling
For R and SR Shiki the best and cheapest way to level up their skills is to feed a clone of themselves to them.
Promote -> Level up will allow this. If you feed a shiki itself it will gain 1 skill point which will randomly be distributed.

For SSR Shiki the ONLY way you should ever level their skills is with skill daruma.
Any duplicate SSR should be kept and leveled as well or just sacrificed in the shrine for talisman.
You should not really feed SR shiki skill daruma as it tends to be a waste since they are much easier to obtain via Demon Parade, Wishes, and Summoning.
Note
A trick for leveling up an SR shiki’s skills if they need one skill in particular is to feed them the previously skilled up shiki. For example you feed a Chin to a Chin the 2nd chin will now have +1 in it’s skill tree. Obviously this will appear in a random skill sometimes one you don’t want or need to skill up. You can then feed the first Chin to another Chin. This will move the units skill ups to the next unit. So if you skill up a Chin and goes into its 3rd skill you can then feed that chin to another chin and it will gain 2 skill ups instead of 1. You may not want to level a SR at first if their skills are important and you are feeding them to another version of themselves.
————————————————————————————————————-
The Shrine
Inside Summon on the right side you’ll notice something called the Shrine.

– Tip 1 – Exchanging
Here you can sacrifice Shiki for Talisman. I recommend Exchanging duplicate shiki that you don’t use for these talismans.
Note
The exchange is found on the right after entering the shrine.

R’s are worth 5 talismans.

SR’s are worth 100 talismans.

SSR’s are worth 750 talismans and 10 Gold Talisman

– Tip 2 – What to buy with talisman
I recommend buying the G4 and G5 Grade Daruma because these will speed your leveling up process for new shiki.
Later when you have a good supply of Talisman buying the skill daruma or souls for a specific one is also an option.
– Tip 3 – Gold Talisman
They are obtained when you sacrifice an SSR shikigami. You can use these to buy Gilded Boxes or G6 Exchange tickets. Rarely a box costing 10 gold talisman may appear, within is the chance to buy one of the original SSR shikigami.
G6 Exchange tickets may be used to Grade swap a shiki with another shiki. You can swap a Shikigami’s Grade6 with another shiki of a lower level. The other shiki will become Grade6 after this is done and the original grade 6 will take on whatever grade the exchanged shiki was.
Note
SSR, SR and R shiki can all be sacrificed at the shrine for 750/10, 100, 5 talisman. Early on you may want to keep the R shiki because they can make good fodder if you don’t have any Ns available.
————————————————————————————————————-
Onmyoji
Seimei

Is the first Onmyoji whose totem you should max.
His Spell: Protect(Shield) and Spell: Star (Damage Buff) are most common but he is generally the best Onmyoji to use for PvE content.
He is also used in PvP with Spell: Bind and Spell: Protect.
Amulet: Death is another good spell of his that can be used as an alternative to or together with Spell: Star. Amulet: Death makes enemies take increased damage and should only be used with Spell: Star if you don’t need the shield at all.
Kagura

Another Onmyoji her strength lies with the skill Channel: Storm. This allows you to give a shiki a turn immediately. If the Shiki is faster then Kagura this can allow them to have 2 turns in a row.
For PvP Summon: Purgatory and Channel: Storm or Summon: Afterlife and Channel: Storm are generally used.
Summon: Afterlife allows a shiki to come back as a spirit for 2 turns and fight even after death.
Hiromasa

Probably the least used Onmyoji
His best abilities are Occult: Shadow Double, and Rapid Release
Occult: Shadow Double summons a clone of Hiromasa that will auto attack every time one of your shiki takes a turn.
Rapid Release is a multishot ability focused at a single target.
Yao Bikuni

Probably most used in PvP for her ability to dispel a debuff every time it’s her turn.
Commonly used abilities are Starlight Curse, Starlight Shower, and Divination Sigil(The One that Revives).
Starlight Curse has a chance to seal Shiki passive and souls. This makes them inactive until the debuff wears off.
Starlight Shower is an AoE damage ability that has the chance or lowering the max hp of a target hit by 20% for 2 turns.
Divination Sigil has many forms. The most commonly used is the revival sigil. If killed while this sigil is on them, they will be revived during their next turn.
Notes
Hiromasa is occasionally used in PvP with a lower damage tanky team as an additional source of damage.
Hiromasa’s Occult: Panther Maul is incredibly useful during guild Kirin as it allows you to do damage even if your shiki can’t survive the Kirin’s attacks.
When Seimei uses a basic attack he has the chance to lower the targets damage by 20% for 2 turns.
———————————————————————————————————————–
Important R’s
Zashiki
The first on this list and one you acquire early is Zashiki. She provides orbs to the team at the start, so more people may use their abilities. Souls you should look for are generally Azure Basan so at the start of each battle you are maxed on orbs. Before you have an Azure Basan set a Fortune Cat set or Holy Flame set may be used as well.
Azure Basan increases starting orbs by 3.
Fortune Cat gives each turn of hers a chance to generate 2 more orbs.
Holy Flame causes units to heal at the end of their turn.
First obtained after chapter 2 exploration, also has a challenge within chapter 2

YamaUsagi
The second on this list will be YamaUsagi. She is acquired through summoning or her shards which come from Chapter 9 challenges or Demon Parade. YamaUsagi’s Bunny Dance increases your teams movement by 30%. Later this will become more and more important for moving before the enemy even has a chance to. Souls you should look for are Fortune Cat. This will give a chance that her souls pay for the bunny dance themselves. She should always have a Spd 2 so she moves before anyone else. Another soul set she could use is Azure Basan.
Note Your YamaUsagi must have a total speed of 163 for Stage 10 of Souls.
Summonable also has a challenge in chapter 9.

Ushi no Toki
The third on this list will be Ushi no Toki. She is acquired by summoning or her shards which come from Chapter 10 challenges or Demon Parade. Ushi no Toki links a doll to the target which will share damage with the target. She becomes increasingly useful in boss battles or a few higher level fights. Souls you should look for are Water and the boss soul Odokuro.
Generally she wants to be a bit fast 135ish or so but some fights may want her to be slower.
Another soul she commonly uses is Kyokotsu but that becomes important much later.
Summonable also has a challenge in chapter 10.

Note
It’s important that these R shiki get evolved. Zashiki unlocks her passive skill which gives orbs at the start of battle and YamaUsagi unlocks Bunny Dance which is by far her most important skill.
Notable R Shiki
Shouzu
A shiki you can obtain through summons or Demon Seal. When she activates her ability it will link all of your units together and spread damage done out. She is especially good with shiki that use the scarlet set. Since you want the link asap Spd / Hp / Hp recommended with the soul sets of Jizo or Fortune Cat.
Summonable also has a Demon Seal

Kamikui
He is the opposite of YamaUsagi. His 3rd ability hits enemies and slows them down. Soul recommendations are Dawn Fairy for the chance at even more slow and Shadow in some cases for more damage. The 2 piece set should be Tsuchigumo for its 10% slowing effect. Spd / Hp / Hp recommended.
Summonable also has a challenge in chapter 5.

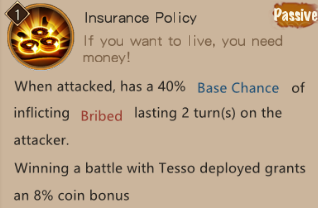
Tesso
He is used to increase the coin amount you get per fight. When evolved he will grant you an 8% coin bonus. The extra coin is great for Nen, Coin Spirit and Kraken fights. I suggest giving him an Azure Basan set just so you have some orbs with your dps to start the fight.
Summonable also has a challenge in chapter 3

Note
Most R’s can come from broken amulets the exception would be shrine based shikigami.
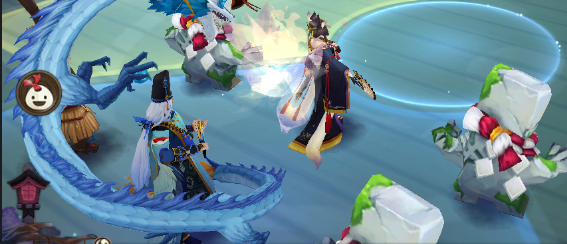
The pics are of unevolved form without skins for clarity.
——————————————————————————————————————————-
Notable SR Shiki
Damage Dealers
-1- Ubume
She is the SSR of the SR world. She will hit across the group of enemies and then land a bigger hit on the final enemy. This makes her damage very good for an SR especially with a good Seductress Set.
Summonable
Soul Recommendation: Seductress

-2- Kuro Mujou
A strong unit you get at the end of a chapter. He is best built with the Shadow Set. Like most Shadow users he is best when going first. If he gets a kill he will get another turn, this can happen multiple times.
Story Unit with a Demon Seal
Soul Recommendation: Shadow

-3- Itsumade
Another strong shiki. Her AoE isn’t as strong as the other two but her single target is incredibly strong. Currently she is favored by Shiranui and Itsumade comps.
Summonable
Soul Recommendation: Seductress

-4- Kuro
Another strong SR but he is like Itsumade and you must summon or shard him. His 3rd skill once evolved will hit again when it defeats an Enemy, this can happen multiple times in one attack. If he is hit his passive can proc and then he will cast his 3rd skill for free. For souls Seductress is recommended. Because of kills continuing his 3rd skill he is great partners with Ushi.
Summonable
Soul Recommendation: Seductress with 2 piece of Odokuro.

-5- Inugami
You start with him but don’t see much of his real power until later on. If you evolve him he will protect the person with the lowest hp and any time they take damage he will counter attack. Souls recommended are generally scarlet at lower levels and seductress once you level up. If he uses his 3rd skill the multi attack can be incredibly powerful especially with seductress.
Story Unit, extras may be summoned.
Soul Recommendation Scarlet or Seductress.

-6- Kisei
A strong finisher to a team. He attacks 9 times randomly but if there is only 1 target left all shots will hit that one target. The soul set generally recommended to him because of this is Seductress. It’s important to note that his passive attack which adds massive damage to that attack, can be added to by multiple Kisei on the same team.
Summonable

Soul Recommendation: Seductress with Ghostly Songstress.
-7- Kanihime
She’s a newer SR units but her aoe is incredibly powerful. She does have a downside with this power and that’s that she can stun herself after using the aoe ability.
Summonable
Soul Recommendation: Shadow

——————————————————————————————————————
Healers
-1- Sakura
She heals each time you take a turn so her heals are very nice especially if you are using the Scarlet set.
Summonable

-2- Hiyoribo
The opposite of Sakura she heals after the enemy takes a turn. She can also revive someone who dies but if she revives someone she loses her ability to heal while the skill cools down.
Summonable with a Demon Seal

-3- Momo
Quite the basic healer but a good healer, she is kept for later because she needs crit for her heal to affect everyone.
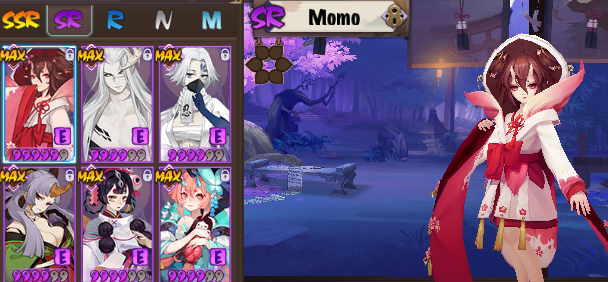
Summonable, also has a Challenge in Chapter 8.
Note
- Most healers use Hp to scale their heals but heals can still crit so an Hp / Hp / Crit set may be used later. Kusa is an exception as she requires attack.
- Challenge modes must be found and reward shards of the unit.
Units to collect for later.
-1- Bukkuman
For bosses when paired with Ushi No Taki he will double the damage you do, he also provides heals when he throws a scroll. He should be kept for later because while he is very strong he needs his skills leveled up to make him top notch. The damage his scrolls do is based on his health so he should be very HP heavy. 3x HP sets or an HP Heavy Fortune cat is recommended.
Summonable
Soul Recommendation: Mixed 3 starting set HP for high HP or Hp / Hp / Crit. If you want to use a complete set Fortune Cat is recommended as it will allow him to pay for his own skills. 2 of his set is recommended to be Hp Shinkirou pieces so he gets the shelter effect from them.

Note
He should be slower then Ushi no Toki but faster then your dps.
-2- Oitsuki
Her 3rd skill causes the orb bar to jump twice. When evolved up her passive starts the orb bar closer to another turn of orbs. This starts the orbing process even faster. Recommended sets are Fortune Cat or Azure Basan. Either way she should be quite fast. Spd / Hp / Hp Recommended.
Summonable
Soul Recommendation: Azure Basan or Fortune Cat.

-3- Kiyohime
She is used to spray the enemy and reduce their armor or freeze the enemy. She is often used against Oboroguruma to freeze the frogs so they never get a turn. Her commonly used souls are Frost Spirit with Spd / Eff Hit / Hp. Her 2nd soul set should be something that helps increase eff hit or a Tsuchigumo set to apply the slow and an additional poison. Another soul set used with her is often Dawn Fairy and Tsuchigumo for the push back and additional poison as well.
Summonable
Soul Recommendation: Frost Spirit. Spd / Eff Hit / Hp or Cdmg. 2 Piece should help with the effect hit and be Azure Basan or Sea Sprite. Alternatively they can be Tsuchigumo to apply addition poison and slow.

-4- Chin
She is a dps that is used later and better paired with multiple Chin if possible.
You want to max her 2nd skill as well. Soul Set recommended is Scarlet so she can counter whenever she takes damage. Both her attack and 2nd skill can apply the feathers for damage after the enemy moves. Spd / Atk / Atk, Spd / Atk / Crit, Atk / Atk / Crit are all good sets for her.
Her feathers are a poison. But crit is used for her basic attacks.
Summonable
Soul Recommendation: Scarlet or Soultaker.

Note
When poisons hits it lowers an enemies defense. When defense gets low enough anything can crit. This means her poison dots will always crit as well as other abilities. At this point Spd / Hp / Crit Dmg or Spd / Eff Hit / Crit Dmg becomes more useful for damage.
Generally Note
Crit can effect heals as well as shields. Units that heal may use critical hit for that, and units or souls like Sea Sprite that provide shields, provide an even larger shield when they have crit.
Note
Most units can be obtained through shards gotten from Demon Parade, or Daily Quests. The exception being Shrine shikigami.
————————————————————————————————————————
Encounter
This event takes place twice a day at 6:00 – 9:00 and 19:00 – 22:00 server time each day.
The Encounter has you click a button in the bottom right 4 times to uncover different things.
These things can be treasure chests, Shiki, or a Quiz. The treasure chests were covered earlier and are only valuable in certain circumstances. Quiz help link below.
To the right of the large Demon Encounter button you will notice a demon face with a magnifying glass on it. This button is how you find a boss each day. The only other way is a random chance when you search through Demon Encounter. This is a rare find though and if you find the boss you can do 2 bosses that day.

This is the search for boss button
.
——————————————————————————————————————-
Royal Battle
The Royal Battle happens on Friday through Sunday. For this there are a few things you should know.
First off all shiki start completely bare. You must choose their souls and stats. There are two ways to do this.
Clicking Set is one way.

The right Button lets you setup the shiki.
This will let you choose the stats and souls yourself. You will start in Stats. You may try different stats to see what may work.

Stats Page
You have to click down a tab into Set to set the souls you want to shiki to use.

Souls
Clicking Top Sets is the other way and probably the beginner friendly way.

This shows you which souls and stats people have been having luck with.

You then click on the set if you think this will be better for you and press Set.

Confirms selected setup.
It’s very important to choose a stat and soul set before you begin fighting otherwise you may be quickly defeated by someone who has. If you are new and don’t know the units fighting you may want to fight a few times and try to learn them. There are many units to learn but many used in these fights are the same. You can try as many times as you want to but the rewarding will reset at 3 losses. After each maintenance the Royal Battle will reset and a new list of fighters will be chosen. If a new shiki comes out, it’s quite common for them to be available in Royal Battle before they are available in game so you can test them.
Being helpful
I previously went over 2 ways for a newer player to be helpful to stronger players. They are a fast YamaUsagi and an Azure Basan owning Zashiki.
The YamaUsagi should run spd / hp / hp.
Look for Spd substats as well if you can.
The other ways may depend on the person you are partnering with so be sure to ask them which units they need.
Note – It’s smarter to keep Zashiki’s slot 2 open so you can change her speed if need be.
Another R may be useful to some along with Zashiki is Ushi. This R will link to a unit and then whoever attacks it will do damage to Ushi no Toki’s doll as well as the target itself. If they use AoE it will affect both the doll and the enemy allow for double damage.
Common souls for this are Watcher and Odokuro. You will have to speed the Ushi no Toki properly so it’s faster then the Aoe but slower than the first attacker.
This team is common in S10.
The last thing and probably the most important thing for a newer player in higher level content will be a Seimei with level 36+ totem and maxed Spell: Star. Having a level 36 totem will make Seimei the fastest he can possibly be. This is important so you don’t end up slower than the dps.
Some players may be happy to take a lower level on if you can run a fast Yama and Zashiki at the right speeds with Seimei casting star. They may not even need anything else to accomplish victory other than this.
——————————————————————————————————————–
Skill Daruma Acquisition
The current ways to acquire a skill daruma as f2p are 500 medals a week, Or collect 25 Skill Daruma shards for another. Skill Daruma shards are acquired through the weekly guild feat pack for 200 feat, Netherworld Gate for 1, 2, or 3 on Friday, Saturday and Sunday, and the Demon Encounter Boss each day will reward 1 or 2 if you do well. Duels each week also offers you 2 shards for honor (1080) for both, and 1 for 5 duel wins. You can also receive shards from guild boss each week if you do well against the boss.
Note
To receive the shard from Demon Encounter Bosses you must do some damage and survive. It may take time to do this or the leveling of a good healer.
To earn shards from the Netherworld Gate you must pass levels 40, 45, or 50. You earn 1 for 40, 2 for 45, and 3 for 50. Achievements for jade go up until level 70. You may see if someone has a strong shiki who can carry you in guild. Ask first though as they may have requirements.
The other way to obtain Skill Daruma currently is through events or to buy them with SJade where they are listed.
You may also trade SJade with a friend assuming they are on the same operating system as you.
The operating system requirement was not there initially but Ios or Android demanded this from them so they had to listen.
——————————————————————————————————————
Alt Accounts
Many people start or use an alt account. One account on Pc(Steam) and one on a Phone or an Emulator. This is because Onmyoji gives so many rewards for partnering up with another person but many people don’t want to spend the time looking. The other purpose of an alternate account is to hope the alt gets a shiki or shards in demon parade you may want. If they have the shard they also may open the window to trading on multiple account which depends on friendship with your alt can make shard acquisition twice as fast.
Note
You need max friendship to send shards to another person that way. While it may take a while a lot of people do this with an alt. They speed friendship by doing the mentioned tactics as much as humanly possible.
Note
Never get rid of the last shard of a shiki you do not own. If you get rid of the last shard of a shiki you do not own you lose the ability to trade for that shiki’s shard. So if you give your main all the shards your alt can no longer help trade for shiki shards.
The only shiki shards you can trade for without owning them or a shard first is a collab shiki.
——————————————————————————————————————-
Exp Notes
This was done to show the exp differences in playing solo vs. playing with a friend while grinding chapters.
Note – This was done with the 15% bonus from monthly pack, on the Chapter 28 Hard Mode.
Exp scrolled enemy
Solo
No Buffs
1932
50% Buff
2898
100% buff
3863
Both Buffs
5796
With a friend that is also in the same guild
2704
50% Buff
4057
100% Buff
5409
Both Buffs
8114
With the 10% Guild Buff
Solo
2125
50%
3187
100%
4250
Both
6375
With a friend who is in the same guild
2975
50%
4462
100%
5950
Both
8925
——————————————————————————————————————–
Collection
Use it for sharing your shikigami collection each week for 1 amulet.

You can also find Heian Tales here which with a good friend or the right units you can complete for some jade.
It also contains your Area Collection which after collecting certain shikigami will reward you with coins, base daruma, grade daruma or a skill daruma.
—————————————————————————————————————————–
Endnotes
Helpful Links
Onmyoji Official Discord. Many players offer help here.
Note
The section on Daruma Tips is highly recommended but you will need to search lower to see it.
Where to find the discord link In-game.
Onmyoji Guide. It’s a bit dated but the Bounty Location Link can help with dailies. https://onmyojiguide.com/guide/bounty-list/
Encounter Quiz
Shikigami
Global has different names for some secret zones.
Secret of Evil Blade is known as Blade’s Secret
Umbrella’s Guard is known as Ubume’s Shield
Umibozu’s Secret is known as Tender of the Sea
Vampira’s Secret is known as Blood Moon Rises
Youko’s Secret is known as Youko’s Romance
Adding these.
Yuki 1 – 3 dogs, 3 haha, 3 nurikabe
Yuki 2 – 3 lantern soul, 3 umbrella, 3 Yamawaro
Yuki 3 – 3 grave, 3 red imp.
Yuki 4 – 3 Parasite, 2 Doujo with 1 Oguna, 4 Gaki
Yuki 5 – 3 Kyonishi Imoto,2 Kusa with 2 Chocho and 1 Shouzu, 2 Kanko with 2 Karasu Tengu
Yuki 6 – 3 Kyumei Neko with 1 Inugami, 2 Vampira with 2 Hone Anna, 2 Momo with 2 Mio
————————————————————
Kiyohime 1 – 13+ dogs
Kiyohime 2 – 3 grave, 3 lantern boy, 4 sakura
Kiyohime 3 – 3 hahakigami, 4 akashita total.
Kiyohime 4 – 3 Mio, 3 Gaki, 3 Yamawaro with 2 Karasu Tengu
Kiyohime 5 – 3 Kyonshi Ototo, 4 Tanuki, 4 Kyumei Neko
Kiyohime 6 – 3 Warrior Soul, 4 Hone Anna, 5 Futakuchi
————————————————————
Higan 1 – 3 lantern boy, 3 nurikabe, 3 hahakigami
Higan 2 – 3 lantern boy, 3 green imp, 3 ushi
Higan 3 – 3 lantern boy, 3 blue imp
Higan 4 – 3 Parasite, 3 Satori, 4 Kyumei Neko
Higan 5 – 3 Parasite, 4 Chin, 4 Mio
Higan 6 – 3 Parasite, 4 Futakuchi, 5 Kuro
————————————————————
Vampira 1 – 3 grave, 3 nurikabe, 3 parasite
Vampira 2 – 3 lantern soul, 3 haha, 3 lantern boy
Vampira 3 – 3 green imp, 3 yellow imp, 3 blue imp
Vampira 4 – 3 Akashita, 2 Satori with 1 Ushi, 4 Kyumei Neko
Vampira 5 – 3 Dog, 2 Chin with 2 Kiyohime, 2 Puppeteer with 2 Mio
Vampira 6 – 3 Kanko, 2 Futakuchi with 2 Squirrel, 2 Kyonshi Ototo with 2 Kyonshi
————————————————————
Kingyo 1 – 3 Grave Digger , 3 Miketsu, 3 Enera
Kingyo 2 – 3 Shiro, 3 Kuro, 3 Hangan
Kingyo 3 – 3 Kiyo, 4 Yuki Onna, 3 Yuki Onna
Kingyo 4 – 4 Koroka, 4 Mushishi, 2 Koroka with 1 Mushishi
Kingyo 5 – 2 Blue Imp with 1 Tanuki and 1 Shouzu, 2 Satori with 2 Momiji, 2 Kyonshi Ani
Kingyo 6 – 4 Yamewaro, 4 YamaUsagi, 2 Mannen with 1 Kaoru
————————————————————
I may add 7-10 of the new zones but most of the time the effort for these is not worth it.
If a unit does not appear in mass to kill I hope you have them unlocked in the Chapter challenge because that will be the fastest way to Max them.
Pics for fighting Hakuzosu
In this pic Hakuzosu is protecting Seimei, you can notice this by the mark beneath him.

In this pic Tama has suffered a little damage but the Hakuzosu protection has shifted over to him.
Hakuzosu will protect the person with the lowest health.


")


