Monster Super League Beginner’s Guide
Contributors: AznElite123, Julia, Lecasualrage, NestiaZitrone, Stupy, Turinqui, Zyli,
If you want to learn something that isn’t on this guide, please let me know!
WARNING! VIEWERS AGE 13+ LOTS OF ****ing cussing. (Don’t let your kids read this)
I have official quit the game. All my youtube videos are deleted cause someone complained about me using their art. My bad to the artists. Thanks.
Also, I can personally help you via PM on reddit, discord, twitch as well!
Reddit: aznelite123 (i have no idea how the reddit system works :V)
Twitch: www.twitch.tv/aznelite123
Discord: https://discord.gg/bMYXXUP new discord
Youtube: https://www.youtube.com/AznElite123
Chinese Traditional Translated Version thanks to /u/asyoucansee20702
Want to help support me? Spread the word 🙂
Last Updated on: 6/14/17(I lazy.)
Notes:
- New update spotlight!
- Youtube video on a guideline of setting up a titan team
- Late game Missions! (3rd continent) by Julia
- Fuck my guide, I found an even better guide! Added NestiaZitrone to Contributer, and added his guide to my titan list.
- Revamped the gem rating algorithm!
- Youtube farmable teams videos placed on Golems B7-10, also a video on midgame rush for yalls who like to watch 🙂
TABLE OF CONTENTS
Mid Game Rush Guide
Alternative B7 Rush
Alternative B8 Rush
Tragedies to Avoid
Heroes Contract
Missions
Astromon Gem Equipment:
Gem Sets
Flat vs %
Gem Substat Builds
Perfect Gem Template for Astromon Classes:
Resist Soft caps
Defence Diminishing Returns
Progression Level Builds
Rating Your Gems
Selling Gems Guidelines
HP and DEF Aggressor builds
Useful Farmable Astromons
Fire Astromons: Usable in Golems 1, 3, 5, 6, 8, 9, 10
Water Astromons: Usable in Golems 1, 2, 3, 5, 6, 7, 8, 10
Wood Astromons: Usable in Golems 2, 3, 4, 5, 7, 8, 9, 10
Light Astromons: Usable in all Golems depending on team build
No Useful Dark Farmable Astromons
Farmable Monster Priorities
Gold Farming
Astrogem Currency Farming
Exotic and Rare Farming
Astromon League (PVP)
Gleems
Using Friend’s Representatives
What to do when you use all of your friend reps
What packages to buy first for newbies
Package Calculations by Lecasualrage
What to buy with crystals
How does the clan system work
Titan Battles
Rewards
We United
We Divided
What to spend your clan tokens on
General guidelines on how to setup a team
Fodder Units for Astromon Rebirth
Golem’s Guides
Golems B6 – Light Boss
Golems B7 – Water Boss
Golems B8 – Fire Boss
Golems B9 – Wood Boss
How to Early Mid Game build…
Double Healer Team:
Sapper Team:
Self-Sustain Team:
Normal Team:
Example Farmable Team:
Proven Farmable Team:
Golems B10 – Dark Boss
Dragon’s Guides
Dragons B1 – Water
Dragons B2 – Dark
Dragons B3 – Wood
Dragons B8 – Wood
Dragons B9 – Fire
Dragons B10 – Light
Astromon Values:
NAT 5’s:
Arthur
Garuda
Indra
Nightmare
Odin
Persephone
Shiva
Siegfried
Valkyrie
NAT 4’s:
Anu
Banshee
Boltwing
Mera
Cupid
Cura
Hana
Ifrit
Jeanne
Loki
Nezha
Succubus
Sura
Tigar
Vampire
Venus (limited addition)
Victoria
Wildfang
Yaksha
Yuki
Contents
Update Spotlights:
Guide is not finished yet
Welcome to the game, new players! I hope you guys are enjoying the game so far and hopefully not raging at the moment like I am. So what should we be focusing as a starting out player specifically free to play?
I suggest you check out the Mid Game Rush Guide below to reach mid game much quicker. If followed step by step you can make it to mid game in a week or two.
Mid Game Rush Guide
Youtube Turtorial: https://www.youtube.com/watch?v=yljUK4O2gO8&index=1&list=PLcyNxKrSeUIJMccGYjzLFwCE2NzGlj7xO&t=53s
So you want to get to mid game (Golems B7+) as fast as possible?:
Step 1:
Build a water team to level 40+ as fast as possible. The following astromons are prioritized from top to bottom in terms of efficiency for farming Pagos Coast Extreme without a rep:
- Water Perse (Best fucking healer in the fucking game)
- Water Garuda (DPS) – hp flat, att% x2
- Water Nightmare (Tank) – hp flat, att% x2
- Water Valk (DPS) – hp flat, att% x2 (obtainable in heroes contract)
- Water Mona (DPS) – hp flat, att% x2 (Best farmable in pagos coast)
- Water Victoria (DPS) – hp flat, att% x2
- Water Anu (DPS) – hp flat, att% x2 (farmable super rare)
- Water Odin (DPS/Tank/Utility) – hp flat, att% x2
- Water Phibian (Tank) – hp%, att% x 2
- Water Seiren (Healer) – hp flat/% x3 (farmable in Aria Lake)
- Water Latt (As Main Tank) – hp%, att% x2
All Gems should be 4* at least and +6 or higher, conviction prefered if you’re using reps to farm.
You should order your early farming team: Water Seiren Lead (doesn’t even matter if she’s variant or not, she’s there to act like a punching bag), the other two after and the astromon you are leveling as last.
Note: Some of these gem builds are limited to Pagos Coast farming ONLY and definitely needs to be rebuilt for anything else
You will only need 3 of these astromons (Preferable NAT5’s or DPS) to help power level other astromons on Pagos Coast Extreme.
Step 2:
Fill up your friends list with 50 Level 50-60 astromons (Refer to “Using Friend’s Representatives”). You would want all types of elements in order to push through easy, hard, and onto extreme up until Pagos Coast where you want to use water reps if you do not have a water team. If you’re leveling up astromons, make sure to use one astromon at a time so that all the exp gained from the scenario will go onto that one astromon. Later on, you can replace the friend’s representative astromon with your own maxed level astromons.
ORDER OF UNLOCKING PAGOS COAST: Phantom Forest Normal -> Lunar Valley Normal -> Aria Lake Normal -> Mirage Ruins Normal -> Pagos Coast Normal -> Seabed Caves Normal -> Magma Crag Normal -> Star Sanctuary Normal -> Pagos Coast Hard -> Seabed Caves Hard -> Star Sanctuary Hard -> Pagos Coast Extreme -> go to exp stage.
ALSO make sure to upgrade your capture rate as high as possible (4 upgrades early on then increase to 6 or 7 once you have a stable b8 team) on Pagos Coast.
If you run out of representatives, start farming for water seirens and water monas on easier stages of their respective locations.
To autofarm Pagos Coast Extreme on your own, the minimum level requirement is 40 and 4* gems at +6 at least.
You can probably start farming Pago’s Coast EXP stage without rep with:
- Evo 2 Water Seiren Level 40: HP flat x3
- Evo 2 Water Mona Level 40: HP flat x2/3, Att% x1
- Evo 3 Water Latt Level 40: HP% x1, Att% x2
This team will not work on the first half of pagos coast because of water pinchee 3* skill counters same element, which is your water team.
Alternative B7 Rush
Note: the Alternative B8 Rush is much faster to get to mid game. Scroll down more.
Step 3:
Once your water team is maxed leveled (40 or 50 preferably to speed run faster), you may work on a leveling and gearing a wood team for B7 Golems. Gem your water team with pure 4* att % or hp flat gems at least +6 in order to increase the run speed (can be any gem sets). Water Seiren can be built normally since she will be used for B7 Golems and will be your main tank for Pagos Coast farming. She should be built HP HP HP|DEF on conviction. If she is not evo 3 yet, you can slap HP flat gems but the REC stays %.
You can probably start farming Pago’s Coast EXP stage without rep with:
- Evo 2 Water Seiren Level 40: HP flat x3
- Evo 2 Water Mona Level 40: HP flat x2/3, Att% x1
- Evo 3 Water Latt Level 40: HP% x1, Att% x2
This team will not work on the first half of pagos coast because of water pinchee 3* skill counters same element, which is your water team.
Step 4:
For the wood team to bring to B7, you will need an evo 3 Wood Miho/Seedler variant to get extra resist % and this astromon will be your team leader and tank. Wood Miho will be built HP% DEF% ATT% with conviction set. Wood Seedler will be built HP% HP%/DEF% DEF% with conviction set. Then you will have 2 DPS with defense break or extra DPS. You will also have one primary or secondary healer which will be on the second or third position. Your entire team will have a conviction set on in order to boost resist with at least +9 upgrade for consistent and fast runs. If you want to see a free to play team check B7 Golems in Golem’s Guide section.
Basic starting Golem B7 team:
- Variant Wood Miho Evo 3 Level 50 : HP DEF ATT | Conviction/Yellow set
- Water Seiren Evo 3 level 50: HP HP HP/DEF | ^
- Wood Squirrus Evo 3 level 50: HP DEF ATT | ^
- Water Latt Evo 3 level 50: HP DEF ATT | ^
On my alt I used 2 Wood Squirrus, which bumped up the speed then the team used above
Can also position this team as: Wood Miho | Water Latt | Water Seiren | Wood Squirrus
Remember this team here is just a template and can be easily changed but KEEP IN MIND that an evo 3 astromon is much better than an evo 1 and maybe even an evo 2 astromon. Example: Wood Squirrus Evo 3 > Wood Anu Evo 1. Stat has a great importance towards new players.
Step 5:
Congrats you entered the beginning of mid game! To further progress through golems I highly suggest you check my viable astromons for golems and dragons spreadsheet: https://docs.google.com/spreadsheets/d/107Ilx0-yGfluNvvsvnlvi-1-FPArgF84BjwBchEqSM8/edit#gid=0
Alternative B8 Rush
Step 3:
Instead of having 3 water astromons for farming pagos coast, build a 4th water astromon to be ready for B8 golems. Gem your astromons with 4 star gems at +12 enhancements. A template can be found under B8 Golem Guide. Once your team is all level 50 and gemmed out, you may skip B7 golems with a wood valk rep and head on towards b8 golems.
B8 golem is much easier and also faster to grind than B7, meaning you will get faster income.
Do’s and Don’ts
Now everyone makes mistakes… Hopefully the “detailed” explanation below helps:
DO:
- Once arena is unlocked, participate in PvP immediately and spend all of your tickets (win or lose you still get medals) as they will reset every time you level.
- Start using all your candlings to evo 3 a fire candling (square diamond x2)
- Start building and leveling a Water seiren immediately
- If you can try to go for astromons with triple square slots for easier gem gearing as a new player.
- Only add level 50+ astromon representative friends and cap your friends
- Only upgrade 1*, 2*, 3* gems for story quest. Otherwise sell them. Once you get to pagos coast you would want to save 4*: hp flat, hp%, att%, def%, rec% gems.
DON’T:
- Only do 1-2 summons at the beginning to start off with some astromons, after that save all your astrogems to either progress or summon for clan festival and hero festival for better Nat 5’s rate.
- Don’t build Fire Miho, you would definitely want a Wood Miho or Water Miho towards evo 3 first!
- Don’t collect stamina from the mailbox immediately; leveling does not accumulate the stamina, the stamina just resets.
- Do not throw away your Water Latt!!!
- Fuck Birdies, throw the 2* away and rebirth the 3* ones (If the rebirths are not the birdie themselves)
- Don’t kill rares in scenarios unless you failed to catch
- Don’t build a Wood Mona, build a Water Mona instead for gb8 and faster overall progression
- Don’t buy the gold packs with your astrogems (1000 astrogem gives you 1 mil gold from the pack. 1000 astrogems net you 3.3+ mil gold via mid game level farming golems)
- Don’t buy 4* soulstones in the shady shop until you’re able to farm b8 golems
- Don’t use Nat 5’s to evo 2 another Nat 5, You want to use evo 2 Nat 5’s to evo 3 a Nat 5.
- Fusion will not guarantee a variant just because you used a variant!
- AS A NEW PLAYER, do not partake in hero’s REBIRTH. There are better Nat 4’s for progression outside the new Nat 4’s from Hero’s Rebirth
Heroes Contract
The contract system allows you to pick one of three NAT 5’s, which only requires you to log in 15 consecutive days to obtain. So the three NAT 5’s includes:
Fire Arthur (Most Picked)
- 3* 100% stun, 5* 60% defense break for 3 turns
- Extremely viable in every situation except against water enemies
- Primarily used as a utility DPS
- I use this bad boy in High Tier PvP, ToC, Wood Dragons, Titans
Wood Odin (Second most)
- 3* Self Heal proportional to damage dealt, 5* 80% defense break for 2 turns
- New Player Exclusives as she is able to help farm b7, b9, b10 golems
- Second highest attack in terms of elemental (Highest is fire Siegfried)
Water Valk (Least Picked)
- 3* 30% extra damage, 5* 100% defense break for 2 turns
- One of the hardest hitting water units. Usually picked because of lack of water attackers in general
- Good for farming Pagos Coast as a new player, and mainly more of a pick for late game players because a strong water valk is usually late game build and up
- Good for b8 golems, still can farm b8 without water valk though.
Hopefully this helps you decide which NAT 5 is the best option for your progression!
Missions
Missions are rather easy at the beginning but can get rather difficult and tricky once you reach the later stages of the Missions, this guide will feature late-game Missions only.
You can clear most Missions just with using gems to revive, etc. I will feature Chapter 29 & 30. Before even attempting these Missions, you need to be aware of the need of good gems and rather decent Astromons. The team setup should be able to survive but at the same time deal damage. You will need evo3 nat4’s or good evo3 nat3’s like Shellie. The Problem with these Missions is that there are no deaths allowed at specific parts of the Missions. Another problem is that you need to capture an s-rare Mon at extreme. Do not try it at normal or hard, it won’t work. I would advise to search a stage fitting for your team and auto it with a counter team. There are stages with only one element on Monsters so you can build a complete counter team to clear faster and make the runs save. Sky Falls Boss at stage 6 could get you into problems as you are trying to beat a boss that is not only regenerating hp but also is able to stun you, you should bring something to sustain against him. Shields are highly recommend for these Missions. The Skyfalls stage 12 Boss is possible to be beat with no deaths if you have a good team-setup. I would recommend Two attackers, one shield unit, one debuff unit (defbreak, attack down, etc.). Even shock works as the minions can be a pain to deal with as well. Defbreak is highly recommend though. The Boss defbreaks for 3 turns so you should pay attention to your shield and try to keep it up, a defbreak for 3 turns can lose you the Mission. After being able to clear Stage 12 at extreme, you should start farming Gems again. *Comming soon*
Astromon Gem Equipment:
Pay attention to your astromons gem shape. There are three gem shapes: Diamond, Square, and Triangle.
Gem shape unique main stat capabilities:
- Diamond = Resist %
- Square = Crit Rate %
- Triangle = Crit Damage %
For a beginning player, there are 3 important things to know regarding gems:
- Diamond gems are the easiest after square to find when you reach mid-game (due to farming Golem b7). What this means is that if you have multiple copies of an astromon, you should use & level the one with the most Diamond slots.
- Square gems are now the easiest for farm because of b8 golems has been nerfed. Square gems are required for monsters that are effective on crit. This is primarily important for monsters that have an effect-on-crit on their basic and/or active skills, as well as Dark type astromon (who have a bonus 50% to crit damage inherently). If you have one of these astromons, make sure it has at least one Square slot (Diamond are still ideal for the other slots).
- Flat stat gems will give you the most help early in the game. Further down, you can find a chart for when to switch an astromon from flat runes to percent runes.
Gem Sets
There are a total of 14 different sets:
| Set Name | Set Color | Set Bonus | Where to get it |
| Tenacity | Pink | 2500 HP | Phantom Forest |
| Fortitude | Brown | 150 DEF | Lunar Valley |
| Ferocity | Light Blue | 150 ATT | Aria Lake |
| Healing | Light Green | 150 REC | Mirage Ruins |
| Conviction | Yellow | 20% RESIST | Pagos Coast |
| Protection | Orange | 20% DEF | Seabed Caves |
| Life | Red | 20% HP | Magma Crags |
| Valor | Blue | 20% ATT | Star Sanctuary |
| Vitality | Green | 20% REC | Sky Falls |
| Intuition | Purple | 20% CRIT RATE | Golems+ |
| Ruin | Grey | 40% CRIT DMG | Slumbering City |
| Leech | Black w/ Red | 20% HP Siphon | Dragons+ |
| Siphon | Black w/ Blue | 40% SP Siphon | Dragons+ |
| Pugilist | Black w/ Purple | 20% Stun | Dragons+ |
Flat vs %
When is it acceptable to use a flat gem? When is it important to use a % gem?
Flat gems are primarily used towards beginner game level. Normally low leveled or low evo astromons will require flat gems. Otherwise, mid game level will require % gems based on the stats that an astromon provide.
When to use a flat gem?:
- Who the fuck uses Nat 1’s?
- Nat 2’s under Evo 3
- Nat 3’s under Evo 3
- Nat 4’s under Evo 2 occasionally
- Nat 5’s under Evo 2 occasionally
When to use a % gem? This is when you would want to look at the astromon stats:
- ATT: 1100+
- DEF: 1100+
- REC: 1100+
- HP: 18500+
Source: https://www.reddit.com/r/MSLGame/comments/533dmn/flat_vs_on_12_gems_when_is_win_over_flat/
Gem Substat Builds
As a new player, you don’t really look at the sub-stats of a gem until you’re able to farm b7 golems and up (Using the Mid Game Rush Method). However, it still helps when you’re using the conviction (or yellow) gems to have extra resist% substats to boost overall efficiency.
Warning: Just because a gem is completely shitty does not mean you can just throw away that gem… well until you become a mental breakdown dumbass like me who gets shit rng.
Perfect Gem Template for Astromon Classes:
This is just a small template for new players to KIND OF follow. Most astromons are different and require different builds. For example, dark kraken, light nike, water perse, dark miho will require different gem builds compared to Wood Leo, Fire Odin, Water Nightmare, etc.
Reminder: This is just for when a gem is considered Perfect for specific type of classes. You can not have the same type of sub-stat as the main stat. For example, you have a def % main stat you cannot have a def % sub-stat.
Tank and Defenders
| Main Stat | HP% | DEF% |
| Substats(ALL %) | RESISTDEFATTCR | RESISTHPATTCR |
Attackers
| Main Stat | HP% | DEF% | ATT% | CR% | CD% |
| Substats(ALL %) | RESISTCRCDATT/DEF | RESISTCRCDATT/HP | RESISTCRCDDEF/HP | RESISTATTCDDEF/HP | RESISTATTCRDEF/HP |
Healers
| Main Stat | HP% | DEF% | REC% |
| Substats(ALL %) | RESISTDEFRECATT | RESISTHPRECATT | RESISTHPDEFATT |
Balance types are built with either attacker or tank/defender route.
Resist Soft caps
Let’s say that one of your astromon has 100% resist and golems or a pvp astromon stunned it. What is your reaction? (Mine’s basically rage induced rage of fokin bullshit)
So developers have confirmed that there is a hard cap on the resist where you cannot go over 85% (so if you have 90% total then it goes down to 85% automatically). Through this announcement, ideally you would want to stop building resist on an astromon between 75% to 85% if you want maximum rng consistent resist.
Warning: If your astromon got debuffed/cc’d at high resist… I am not responsible for any broken devices.
Defence Diminishing Returns
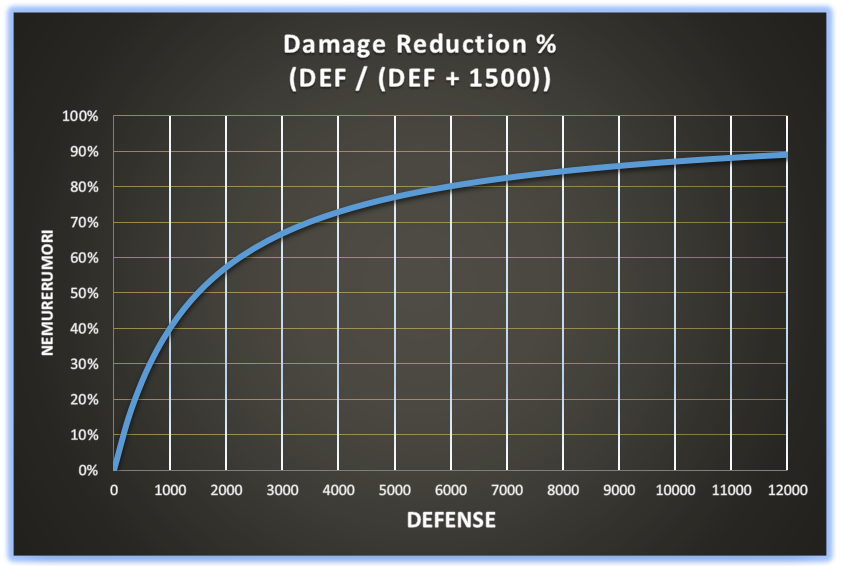
As you can see the graph above, the more defense an astromon have, the less damage reduction an astromon will receive!
Typically, once you get astromons to level 60, you would want to check each class and their ideal amount of defense:
- Defense Aggressors:
- These little shits don’t care about diminishing returns, just keep stacking defense
- Defenders and Tanks
- Only really need one def % gems typically to get around 3.5k to 5.5k for 70% damage negation +
- Attackers
- Already have extremely low def, but can be built bruiser where the astromon can use def% gem, typically 2.5k defense is ideal for a DPS build for an attacker. Otherwise you would want at least 3.5k+ defense for a bruiser.
So overall, typically for all type of astromons, you only want one def % gem, while any other survivability gems should be hp flat or %.
Progression Level Builds
Will work on this next time~
Beginner Level:
Mid Game Level:
Late Game Level:
Endgame Level(Theory)
Rating Your Gems
So you want to know how your gems are graded? Just a mini guide on how I grade gems.
But first, let us start off with gem tier:
| End Game Tier | Late Game Tier | Mid Game Tier |
| S+ only | A- -> S | C+ -> B+ |
Reference Sheet: So every points that you miss will degrade the letter by 1 but the starting grade will be S+
S+, S, S-, A+, A, A-, B+, B, B-, etc.
Guidelines here: https://goo.gl/Xood9A
Example:
You can see that there was one proc into: Attack flat and Recovery flat. So you can see that this gem started off with Att flat and Crit Dmg at +0, at +3 proc’d Recovery flat, and +6 proc’d CR. In terms of losing points:
2 pt lost for being a five star gems
2 pt lost for missing 2 substats
4 pt lost for having two proc’s in attack flat
4 pt lost for having two proc’s in recovery flat
1 pt lost for not having resist (This may vary because other gem’s resist substat may add enough to have over 70% resist)
So in total: This gem is missing 13 pts degrading the gem quality towards:
S+ -> S -> S- -> A+ -> A -> A- -> B+ -> B -> B- -> C+ -> C -> C- -> D+ -> D
A D flat grade gem, which is god awful.
Selling Gems Guidelines
So this guideline will be from my own perspective:
Farming Pagos Coast:
- Sell all ATT flat, DEF flat, REC flat, RES%, CR%, CD%
- Once you have 2 REC %(Preferable a RES% substat start) of each shape, sell REC%
- Sell anything not 4 stars
Able to farm B7 golems:
- I would highly recommend new players that are now able to farm B7 to keep all 6* HP%, DEF%, REC%, ATT%, CR% gems regardless of what substats are to used as temporary stats enhancements until better gem quality to replace.
Good Gem Quality
- 4 stars
- Sell all diamonds but conviction if you are using them for high golems stages
- Keep all triangle and squares
- 5 stars
- Sell all ATT flat, DEF flat, REC flat, RES%, CR%, CD%
- Sell all flat set gems
- Do not sell gems that have RES% and CR% substats and at least 1 more % substat
- 6 stars
- Only use a ATT, DEF, REC flat gem if they are to replace a 4* gem
- Sell any gems that have less than 2 substats
Able to farm up to B8 golems:
- I would highly recommend new players that are now able to farm B8 to keep all 6* HP%, DEF%, REC%, ATT%, CR% gems regardless of what substats are to used as temporary stats enhancements until better gem quality to replace.
Good Gem Quality
- 4 stars
- Sell all diamonds and squares but conviction if you are using them for high golem stages
- Keep all triangle gems
- 5 stars
- Sell all ATT flat, DEF flat, REC flat, RES% CR%, CD%
- Sell all flat set gems
- Do not sell gems that have RES% and CR% substats and at least 1 more % substat
- 6 stars
- Sell all ATT flat, DEF flat, REC flat, RES%, CR%, CD%
- Sell any gems that have less than 2 substats
Able to farm up to B9 golems:
- I would highly recommend new players that are now able to farm B9 to keep all 6* HP%, DEF%, REC%, ATT%, CR% gems regardless of what substats are to used as temporary stats enhancements until better gem quality to replace.
Good Gem Quality
- 4 stars
- Sell fucking everything
- 5 stars
- Sell all ATT flat, DEF flat, REC flat, RES%, CR%, CD%
- Sell all flat set gems
- Do not sell gems that have RES% and CR% substats and at least 1 more % substat
- 6 stars (Read conditions from top to bottom!!!)
- Sell all ATT flat, DEF flat, REC flat, RES%
- Sell all gems under 2 substats start
- Sell all REC% gems that doesn’t have RES substats
- Sell all HP% gems that doesn’t have RES OR CR substats
- Sell all DEF% gems that doesn’t have RES OR CR substats
- Sell all CD% gems that doesn’t have CR
- Sell all Red, Orange, Yellow set gems that doesn’t have RES substats
- Sell all Blue set gems that doesn’t have either RES or CR substats
- Sell all Purple and Gray set gems that doesn’t have CR substats
- Sell all flat set gems that doesn’t follow the REC%, HP%, DEF% requirements.
- Do not sell ATT% gems because you can use the shitty ones(No RES or CR) to boost some astromons for extra DPS for titans!
Able to farm up to B10 golems:
If still lacking gems on large amount of astromons:
- 5 stars
- Sell all ATT flat, DEF flat, REC flat, RES%, CR%, CD%
- Sell all flat set gems
- Sell any gems that doesn’t start with 4 substats. The gem needs RES AND CR as well as at least 1 % substat
- 6 stars
- Follow the up to B9 golems gems guidelines
If you want to follow the elitist harsh late game guidelines:
- 5 stars
- Sell the fuck out of everything
- 6 stars
- Sell all ATT flat, DEF flat, REC flat, RES%
- Sell all flat set gems
- Sell all gems that doesn’t have 3 starting substats
- Sell all gems that have more than 1 flat substat
- Sell all REC% gems that doesn’t have RES
- Sell all % color set gems that doesn’t have RES% AND CR%
HP and DEF Aggressor builds
Useful Farmable Astromons
All astromons listed below are easy to farm towards 3rd evolution in various scenarios and are viable for new players to be used in golems. These astromons may be replaced later on once new astromons are obtained through summoning. Do note the current builds given are respectively for new players and can be changed in term of player’s progression.
Fire Astromons: Usable in Golems 1, 3, 5, 6, 8, 9, 10
| Astromon | Found/Farmable | Gem Build | Leader skill | Notes |
| Bron 2* Attacker | Magma Crags | Conviction/ValorHP/DEF/ATT | Whole team HP increase | Extremely strong DPS vs Wood with added sapping |
| Candling 3* Attacker | Lunar Valley | Conviction/ValorHP/DEF/ATTorConvictionDEF/ATT/ATT | Whole team Crit rate increase (dungeons only) | Strong DPS with defense breakCan be replaced by Fire Yuki |
| Cotteen2* Recovery | Buy in Shady ShopFarm evo in Aria Lake/ Seabed Caves/ Magma Crags | Conviction/LifeHP/DEF/REC | Whole team Blue soul recovery boost | One of the strongest early game to even late game healers primarily for the 5* skill that provides an attack boost to the teamCan be replaced by Fire Cupid |
| Squirris2* Balanced | Lunar Valley/ Magma Crags.Farm evo in Phantom Forest | Conviction/ Protection/ Life/ ValorHP/DEF/ATTorConviction/ ProtectionHP/HP/DEF | Whole team ATT increase | DPS or Tank with attack break |
| Starrov2* Attacker | Pagos Coast | Conviction/ValorHP/DEF/ATT | Whole team Crit rate increase | DPS that can purge and defense break |
Water Astromons: Usable in Golems 1, 2, 3, 5, 6, 7, 8, 10
| Astromon | Found/Farmable | Gem Build | Leader skill | Notes |
| Cotteen2* Recovery | Magma Crags/ Seabed CavesFarm evo in Aria Lakes | Conviction/ Protection/ LifeHP/DEF/REC | Whole team Blue soul recovery boost | Can increase defense on team during heal |
| Latt3* Tank | Early tutorial reward/ SummonableFarm evo in Mirage Ruins | Conviction/ Protection/ LifeHP/HP/DEF | Whole team ATT increase (astro league only) | Tank that can defense break as well as attack break, a budget Wood Leo |
| Lumo2* Defender | Seabed Caves | Conviction/ Protection/ LifeHP/DEF/REC | Whole team REC increase (useless) | Tanky healer that can attack buff the team |
| Miho3* Balanced | All hard story stages in first 2 continents.Farm evo in any difficulty, all story stages in first 2 continents. | Conviction/ Protection/ LifeHP/HP/DEF | Whole team resist increase | Tanky Sapper |
| Mona3* Attacker | Rare spawn mon in Pagos Coast | Conviction/ Protection/ Life /ValorHP/DEF/ATT | ATT increase for Water mons | DPS with SP sustain and Def Break |
| Monkiki3* Defender | Summonable. Farm evo in Slumbering City | Conviction/ Protection/ Life /ValorHP/HP/DEF | Whole team ATT increase | Tank with Defense Break and Thirst |
| Pinchee2* Attacker | Pagos Coast | Conviction/ Protection/ Life /ValorHP/DEF/ATT | Whole team DEF increase | DPS with increase crit rate vs water and single target defense break.Only effective against Golem B7 |
| Seiren3* Recovery | Given as early quest reward.Rare spawn mon in Aria Lake | Conviction/Life HP/HP/REC | DEF increase for Water mons | Strongest beginner’s healer in the game for overall healing and 5* Healing Per Turn SkillCapable of soloing against water and fire type scenarios or dungeon |
| Shellie3* Attacker | Sky Falls | Conviction/Valor HP/DEF/ATT | Whole team red soul recovery increase | 100% defense down 3* skill, 100%+ attack power on 5* skill |
Wood Astromons: Usable in Golems 2, 3, 4, 5, 7, 8, 9, 10
| Astromon | Found/Farmable | Gem Build | Leader skill | Notes |
| Cotteen2* Recovery | Aria LakeCan farm evo in Magma Crags & Seabed Caves | ConvictionHP/DEF/REC | Whole team Blue soul recovery boost | Removes all debuffs from your team on heal |
| Miho3* Attacker | All extreme story stages in first 2 continents.Farm evo in any difficulty, all story stages in first 2 continents. | Conviction/ValorHP/DEF/ATT | Whole team Resist increase | Utility DPS capable of applying defense break |
| Mona3* Defender | Summon only. Farm evo in Pagos Coast | Conviction/ Protection/ LifeHP/HP/DEF | ATT increase for Wood mons | Self Sustain Tank capable of soloing B7 Golems |
| Mushi2* Attacker | Seabed Caves. Can farm evo in Aria Lake | Mid Game Build:Ruin/Valor/ IntuitionATT/CR/DEF or HP | Whole team HP increase | SP sustain Nuker |
| Phibian3* Attacker | All extreme story stages 3rd continent.Farm evo in any difficulty, all story stages in 3rd continent. | Conviction/ Protection/ LifeHP/DEF/ATT | Whole team ATT increase (clan battles only) | Defense Break on both skills, may replace Wood Squirrels. |
| Seedler3* Tank | Mirage Ruins | Conviction/ Protection/ LifeHP/HP/DEF | Whole team Resist increase | Tank that can apply sap damage |
| Squirris2* Attacker | Phantom ForestCan farm evo in Magma Crags & Lunar Valley | Conviction/ Protection/Life/ ValorHP/DEF/ATT | Whole team ATT increase | DPS with DEF break |
Light Astromons: Usable in all Golems depending on team build
| Astromon | Found/Farmable | Gem Build | Leader skill | Notes |
| Ghos2* Tank | Star Sanctuary | Conviction/ Protection/ LifeHP/HP/DEF | Whole team ATT increase | |
| Kilobat2* Defender | Summon or Guardian DungeonFarm evo in Mirage Ruins & Star Sanctuary | Conviction/ Protection/Life/ ValorHP/HP/DEF | Whole team Crit Rate increase | Provides 100% attack break and AOE 60% def break, basically a budget reverse Water Latt, Wood Leo, Fire Odin |
No Useful Dark Farmable Astromons
Farmable Monster Priorities
This is my own priority list of farmable astromons to tackle towards future content.
NAT3:
- Water Seiren
- Wood Seedler (If no Wood Miho Variant Lead)
- Water Latt
- Water Mona
- Fire Candling
- Wood Phibian
NAT2:
- Wood Squirrus (Rush this immediately, if no other strong wood units)
- Fire Cotteen (If not using Fire Cupid Evo 2)
- Fire Bron (Back up Fire astromon for B9)
- Water Lumo (If not rushing Water Seiren)
- Light Gigabat
- Water Cotteen
Gold Farming
Gold may be a large problem for new players. Whenever you are farming a scenario for exp for your astromons, focus on gold stages. Do not forget the daily gold dungeons. Make sure to sell the gems that you do not plan on using for added income. Working on story quests and regular quests can provide large amounts of gold as well.
While grinding a scenario, you may capture up to three astromons per run. These captured astromon may be used to either create one of the farmable astromons or released. The released astromons may grant gold, fruits, gems, or even a high egg!
Once you have set up a decently leveled and geared wood team, you will be able to farm golems b7. There are two benefits in farming high level golems: increase in income from selling the non useable gems and further improving your current astromons with higher tier gems.
Astrogem Premium Currency Farming
Live video from Fantasee!:
https://www.youtube.com/watch?v=tM1mQGqRB_E How to
https://www.youtube.com/watch?v=5bEmKd37hjU Math
Astrogem is MSL’s “Premium currency.” Astrogems can be obtained through:
- In-app purchases
- Quests
- Capturing variants, super rares, and legendaries
- Astro League Division Ranking
- Releasing Astromons
- Push Events
- Facebook Events
- Freebies from 4:33
In terms of Astrogem Farming, the general method is to convert gold to gems via astromon evolution and quest pick ups. The current and cheapest method involves the need of at least 330k gold which will grant you at least 100 gems.
Once you have obtain 330k gold, you will need sixteen of the same astromons, which can be different elements. The 330k gold will only apply to 1* and 2* astromons, any higher will increase the cost in gold.
Start off and sacrifice three of the same astromons into one base and evolve the base. Close the astromon inventory, select quest and collect the 10 gems. You will have to repeat the evo 2 method four times which will result with a total of 40 gems. Next, place three evo 2 astromons into a base evo 2 astromon and evolve. The quest will grant 60 gems this time and you can do whatever you want with the astromon that you have just finished evolving. If this is the first time you evo 3 that specific astromon, you can check the astroguide and collect even more gems.
Keep in mind that if you want a continuous gem farming expedition, a successful steady farming of golems b7+ (definitely B8 golems now) is required to make up in terms of gold/stamina. Only then would you be able to make up the gems lost in refilling for stamina.
Exotic and Rare Farming
So a large amount of players have been asking… What is the best way to farm exotic astromons? Well first of all, there are no Spawn Rate boosts between the difficulties of the scenarios. For examples, an extreme stage will still have the same spawn rate of exotic as normal and hard. The main strategy that most people use to farm exotics is to clear the stages as fast as possible. So this starts with:
Normal:
- Advantages:
- Beginning players will be able to clear fast runs
- Best way to level the player/account in terms of exp/stamina
- Also good for farming farmable Nat 3’s in terms of runs/stamina
- Disadvantages:
- Inefficient astromon leveling in terms of exp/stamina
- No dragon sigils drop (for dragon dungeons)
- Low gold income
Hard: Basically between normal and extreme
- Advantages:
- Mid level players will be able to clear fast runs (level 60 astromons with decent gems)
- Much better leveling than normal
- Disadvantages:
- No dragon sigils drop
Extreme:
- Advantages:
- Fast farming for late level players (Siphon Gems on 3* Morale boost AOE astromons built high DPS)
- Dragon sigils
- Highest Gold Income
- Best astromon leveling in terms of exp/stamina
- Disadvantages
- Worst way to level player/account in terms of exp/stamina
- Worst way to grind for Nat 3’s in terms of runs/stamina
- More Astrogem consumption
So basically the strategy I showed for exotic and rare farming is that all stages are good, but it will also depend on your progression level. Happy farming!~
Astromon League (PVP)
Arena is not required but should not be ignored. You will earn tokens through both winning and losing a match. These tokens should be used in the arena shop for weekly eggs and gleems. The gleems are the main priority from the arena shop as they are used to evolve astromons. Gleems will be further explained later.
When in arenas, set a level one astromon as your defense to stabilize your points for easy farming. Focus on players that have level one astromons or teams that seem weaker than your own. Beware however, most players tend to hide level 60 astromons.
As a new player who just got into arena, if you are about to level up, make sure to spend all of your arena tickets to grab as much medals as possible. It is absolutely fine to lose if you do not want to wait for arena refresh. You do not want to waste any tickets whatsoever, especially because even if you lose, you will still get 1 medal.
Getting in different divisions within the Astro League will grant Astrogems. The higher the division you achieve, more gems will be given to you. Usually during the last two or three days, you would want to provide an actual defense team and climb the ladder as high as possible.
Gleems
Gleems are extremely valuable evolution materials for high tier astromons. There are two types of gleems currently: Holy and Elemental. Holy gleem can be used for any elemental astromons, while elemental gleems are limited to its respective element.
You may earn up to 10 gleems per month:
- 4 elemental gleems from Astromon League: 1 gleem of your choosing per week
- 3 random elemental gleems purchased from the crystal shop (600 crystals)
- 1 Holy Gleem from monthly log-in: can be claimed on the third week every month
- 1 Holy Gleem from monthly quest
- 1 Holy Gleem from finishing Floor 50 of Chaos Tower
- Maybe we get lucky and 4:33 sends gleem to us.
There are standards for when using the gleems.
This is my own personal priority:
- Holy Gleems -> Light and Dark Nat5 -> Light and Dark Nat4 -> Elemental Nat5
- Elemental Gleems -> Elemental Nat5 -> Elemental Nat4
There is no variant gleem to make an astromon variant.
There is no evo 2 type gleem to make an astromon evo 3.
Using Friend’s Representatives
Make sure to add friends that have powerful reps. You may want at least level 50 astromon reps or above, at best level 60 reps.
These reps are used for:
- Leveling single astromons at a time in higher difficulty scenarios, this can be done until you have at least three max level astromons to speed level any other astromons
- Clearing through scenarios to reach higher difficulties
- Clearing through Golems floors to reach to B7
- Extra reliability to help clear through higher end dungeons like B8+
Reps usage will reset per day, so if you use all of your rep, then all of those reps will become available to you again after daily reset.
What to do when you use all of your friend reps
You have the option to remove 5 friends per day. When you are done using all of your friends rep, you would want to delete any friends with under level 50 astromon reps. Then you would want to delete your friends with level 50 astromon rep and try to fill up your friends list with only level 60 astromon reps.
Other ways to keep yourself occupied, you should usually do this when you do not have a farming team for Pago’s Coast Extreme or higher Scenarios:
- Arenas
- Story quests
- Milestone Events (Airship -> Special Event)
- White Starstone Dungeon to obtain evo mats
- Daily Starstone Dungeon to obtain evo mats
- Level up your astromons by auto grinding the level on Aria Lakes or Pagos Coast in which you can farm without using a rep
- Gold Dungeon
- Build farmable astromons
- Daily quests
- Mestarbait Fiercely
What packages to buy first for newbies
Thank you for choosing to support our developers! There are all of these fancy looking packages and you don’t know what to buy first? If you are planning to spend on the game, start so immediately because the extra gems provided will help with progression by a large amount. So from top to bottom are the packages you should start off on and why!:
- 30 Day Package – 200 gems starter + 30 gems per day for 30 days (900) = a total of 1100 gems. The costs of the gems itself would total up to 10 times the amount you pay for this pack.
- Adventure Package I – This package is more of a progressive milestone to collect after clearing through the scenario which is extremely easy if you use reps to blast through the scenarios (Refer to “Using Friend’s Representatives”). You also get a total of 3 different elemental gleems.
- 15 Day Package – 300 gems starter + 100 gems per day for 15 days (1500) + 100 energy per day for 15 days = 1800 gems and 1500 stamina. The cost of gems and stamina would total up to 4 times the amount you pay for this pack. Oh, you get a holy gleem if you buy 3 of these.
- Level-Up Package – Another progressive milestone that just involves leveling your character. At level 50 you will obtain a total of 3000 gems which is 4 times the amount you paid for this pack. Oh yea, leveling from 40 – 50 takes a pretty damn long time. Good luck!
- Event time limited packages – These packages contains exclusive items which is only limited at a time, these packages usually have a purchase limit as well.
- Strongbox Package – 2000 + 400 gems = 2400 gems. You also get a 4*-5* elemental egg, a 3*-5* light or dark egg, 200k gold, and 100 energy.
- Chest Package – 1000 + 150 = 1150. You also get a 3*-5* light or dark egg, 200k gold, and 100 energy.
- Coffer Package – 600 + 60 = 660. You also get 200k gold and 100 energy.
Package Calculations by Lecasualrage
For those that are not looking to read: TL;DR:
- Best VALUE is 30 day package.
- Best utility VALUE is adventurer package. If you are balling but you want to be efficient, $3.60 USD is generally the number to go to per “astropackage”
I’ve looked into a lot of this before and I’ve bought a couple of these packages myself. For people that are looking to get into supporting the developers while getting something nice for yourself, the 30-day Package and Adventure Package I is always going to get the best value out of it.
- 30 day Package consist of an upfront of 200 gems + 900 gems (30 gem/day for 30 days) for $5.50/$4.49, depending on if you’re on iOS or Android. if you were to do the math on how much you’ll be spending on the gem, ~.41-.50 USD per 100 gems. Which isn’t bad because sometimes there are going to be promotions on this and you can easily get this for $1 USD.
- Adventure Package I gives you a total of 600 gems, RGB gleems, L/D egg and a high egg for $8.99. So about $1.49 per 100 gems but you get 3 additional gleems. These gleems will save you 3 weeks worth of time in evoing your nat 4s or nat 5s. Not to mention, you can get yourself a 10+1 pull and a L/D egg. Literally giving you so much utility for a small price.
- Level up Package is about 3000 gems if you can get to level 50, for $33 dollars @ $1.10 per 100 gems.
- Astrogem Sack Packages
- $8.99 for 210 gems + 100 energy
- $26.99 for 660 gems + 200k gold + 100 energy
- $44.99 for 1150 gems + 200k gold + 100 energy + 3-5* L/D egg
- $89.99 for 2400 gems + 200k gold + 100 energy + 3-5* L/D egg + W/T/F 4-5* Egg
- $89.99 Holy Gleem Package for 600 gems + 100k gold + 100 energy + 2 L/D eggs
Lets say that with that 100 energy, you can get about ~180k** in gold from golems and if we were to convert the 380k** gold into gems, we would get about another 100 gems (disregarding if you have completed the astroguide or not). *Assuming you’re able to do Golem B7, Astrogem Sack Packages after conversion from energy + gold to astrogems $8.99 for 210 gems + 100 energy(180k = ~30 gems) = 240 gems $26.99 for 660 gems + 200k gold + 100 energy ( 380k =~ 100gems ) = 760 gems $44.99 for 1150 gems + 200k gold + 100 energy ( 380k =~ 100gems ) + 3-5 L/D egg= 1250 gems + 3-5* L/D egg $89.99 for 2400 gems + 200k gold + 100 energy ( 380k =~ 100gems ) + 3-5* L/D egg + 4-5* W/T/F Egg = 2500 gems + 3-5* L/D egg + 4-5* W/T/F Egg $89.99 Holy Gleem Package for 600 gems + 100k gold + 100 energy (280k ~30 – 40 gems) + 2 L/D eggs + holy gleem = 640 gems + 2 3-5* L/D Egg + Holy Gleem If we were to count how much gems we get per package, ~ $8.99 astrogem package = $3.75 per 100 gems $26.99 astrogem package = $3.55 per 100 gems $44.99 astro gem package = $3.60 per 100 gems + 3-5* L/D egg $89.99 astro gem package = $3.60 per 100 gems + 3-5* L/D egg + 4-5* W/T/F Egg $89.99 Holy Gleem Package = Can’t really calculate this one since you have 2 L/D eggs + holy gleem and holy gleems are the highlight of this package. Feel free to correct me on my calculations and add to it if you like. Formula (Price per 100 = price/gems * 100)
What to buy with crystals
So you have been spending gems for large amount of summons! Hopefully you got some good pulls. So we know that the only way to get crystals is only from gem summons. You will get 33 crystals from a 10+1 and 3 crystal from a normal gem summon. To determine the priority of how you should spend your crystals shall be separated into two parties: Low-Median Spender, High Spender.
L-M Spender:
As a lower spending player, you would rather have either gleems or a guaranteed NAT 5 eggs.
Why gleems?:
- You have too many NAT 5’s to work on
- You have too many NAT 4’s that needs to be worked on before entering mid game
- You want to store more incase you get more NAT 5’s or 4’s from golem eggs
- You just want to use these little shits for your Arena Defense.
Why the Nat 5 eggs?:
- You have too many gleems
- You don’t have any Nat 5’s
- You want more Nat 5’s
- Fok Birdiee for stealing our Nat 5’s
After those 2 packets above then you can buy the legendary egg then the L/D 3*-5* egg or you can start saving for the next reset. You may also save up for the 4*+ L/D egg of disappointments but I can’t really stop you.
DO NOT buy stamina packets, gold strongboxes, L/D Banshee eggs.
High Spender:
Buy the fuck out of everything in this order:
- Gleems
- Nat 5 Eggs
- Nat 4 l/d Eggs
- Legendary Egg
- High L/D Egg
- L/D Banshee
- Gold
- Stamina
Get out of here you glorious bastard.
How does the clan system work
How are you guys doing in clan battles? I wish you the best of luck in clan progression not as one but as a whole!
Titan Battles
I’ll do this later.
Rewards
So an excessive amount of players have been asking on how the clan system works especially the rewards:

Well first of all there are several stages.
We United
Your entire guild must work as one to climb as high as possible up the titan levels. It is up to how your guild coordinate to tackle each level strategically. As you can see there are separate rewards on each boss milestones and if you place first in the region your guild will get the Top Clan rewards.
We Divided
Now everyone within that guild will gain the same amount of tokens, however, it is different for gems. Note on the right lists the contribution distribution rewards. To find your current contribution, it is on the clan screen with the titan on the right. Everyone’s contribution will be different so you will all compete one another for the highest contribution to gain the most gems.
For example,
Let’s say your guild reached the Top clan reward with 10,000 gems and your contribution level is around 3rd place. This means you will gain 5% of the gems that your guild accumulated resulting in a total of 500 gems! (See math is easy!)
What to spend your clan tokens on
Definitely buy:
- Save for the
GarudaSiegfried egg, It’s a free fucking 5 star egg.
May buy:
- Astrogem Lucky Box (But don’t go too ham)
Definitely don’t buy:
- Energy Package
- Gold Lucky Box (It’s a scam… like Tina)
- Any Gem Chests
- Dragon Sigils.
General guidelines on how to setup a team
HIGHLY RECOMMENDED READ by NestiaZitrone: https://docs.google.com/document/d/1xCVpq2L5kBW9Sn5VFg9J8br5Gb1cKcZUSp3qEpIT4Jo/pub
Titan Guide
Light party – Attack Down aoe – Seal (Also always crit)
Water party – Seal aoe – Attack Down
Wood party – Taunt aoe – Buff Break
Dark party – Silence aoe – Defense Break
Fire party – Thirst aoe – Stun
Aoe status ailment will only happen on the 1st wave.
Aoe on the 2nd wave will hit much harder but does not inflict status ailment
The only status ailment that won’t be much of a problem would be the wood titan, because sap can be easily out sustained with healers (may be an understatement). So for wood titan, you can have your best astromons in the 1st wave instead of the back
The rest, however, your best team may as well start in the back so they don’t have to deal with status ailment. If you would like to see how I usually build team for other players please check these out:
Mid Game Titans https://www.youtube.com/watch?v=dQ9S84OPOIk
Mid Game Titans https://www.youtube.com/watch?v=JfqY2dvO_RI
Late Game Titans https://www.youtube.com/watch?v=ajT0KvDG-fM
Here is a nice little template I would like to use
Blind after buff, will definitely be viable in titans. You may replace a defense break astromon with blinder.
1st Wave:
Left:
Leader Skill – RES > HP > DEF > ATT | CR > CD (Varies on team types: Tanks,
Attackers, etc)
2 of your tankiest defense breaks, if no tanks then attackers are fine
1 of your tankiest attack down or a dps (varies if you have a high dps attack
Down, which should be on the right if no other DPS)
1 healer with priority: Shield > DEF UP, ATT UP, others (again varies)
Right:
Leader Skill – RES > CR | ATT > CD > HP > DEF
3 Highest DPS and 1 Healer with priority: Shield > ATT UP > DEF UP > others
2 Highest DPS and 2 Healers combo includes: Shield and ATT UP > Shield and
DEF UP > ATT UP and DEF UP (again may vary on your style)
2nd Wave:
Left:
Leader Skill – HP > DEF > ATT | CR > CD > RES
2 of your tankiest defense breaks, if no tanks then attackers are fine
1 of your tankiest attack down or a dps (varies if you have a high dps attack
Down, which should be on the right if no other DPS)
1 healer with priority: DEF UP > Shield > ATT UP > others
Right:
Leader Skill – CR | ATT > CD > HP > DEF
3 Highest DPS and 1 Healer with priority: ATT UP | DEF UP > Shield
2 Highest DPS and 2 Healers combo includes: ATT UP and DEF UP > ATT UP
and Shield > Shield and DEF UP > others
Clarifications (Must Read)
- There should always be at least 2 defense break on the left side in order to TRY to have a backup defense break in case the first defense break missed or get defense break. No defense break = less dps in general
- You may have defense breaks on the right as long as you have the left covered.
- Ideal Defense breakers on the left includes: Double defense break skills, 100% defense breaks, defense breaks stacked with attack down or blind or any other debuffs.
- 1 blind can replace a defense break
- Attack down does not need to be on the left side, if your attack down astromon has high dps compared to some on the right.
- Double healers are usually used to make up for the rng in blue orbs to grant higher survivability.
- ATT UP and DEF UP usually overrules in 2nd wave in healing primarily because of the DPS is typically going to be the same as the the Shield and DEF UP, if you do the math. This may be wrong in terms of courageous strike astromons as DPS.
- To distinguish from which DPS to put on the 1st wave and 2nd wave. Glass cannon DPS (ATTx3, ATTx2 CRx1, ATT CD CR, etc) should be on the 1st wave, and your tankier DPS (with around 1 HP or DEF gem) should be in the back. Defense Aggressors can take a beating so they can definitely be used in the back.
Farmable Astromons absolutely fucking amazing for titans
- Fire Candling Double Defense Break DPS
- Fire Cotteen Attack Up healer (first get from shady shop)
- Fire Bron Temporary single target DPS and HP lead
- Fire Squirris Double Attack down
- Fire Miho Resist lead Attack down
- Water Cotteen Defense Up healer
- Water Lumo Attack Up healer
- Water Bellpup Attack Down healer
- Water Shellies 100% defense down
- Water Seiren Usuable as a defense up lead, but a replaceable healer
- Water Miho Only used as a temp sap dps
- Water Mona Water DPS
- Wood Mushi Motherfucking penis head looking ass thing that hits
Like a vehicle running over a fucking hamster
- Wood Squirris Double Defense Break
- Wood Miho Resist lead and defense break on 3*
- Wood Cotteen Replaceable healer, primarily useful against status ailment,
But replaceable
- Wood Beth Anti water single target tanky DPS
- Light Gigabat 100% attack break 1t, 60% defense break (Replaceable)
Other Good Sources
Fodder Units for Astromon Rebirth
This is more of which astromons are extremely useless and should be just thrown into the rebirth. Well first of all only limit to NAT 3’s. Your NAT 4’s are better off released for better gold, astrogem, or egg rewards.
NAT 3’s fodder unit includes:
- Monkiki (after you make a water one (optional)
- Seastar (If you don’t have or already evo 3’d Dark and Light Seastar)
- Monas (After Evo 3 Water, Wood(Not needed), Dark, Light Monas)
- Crowhooks
- Jellai (After Evo 3 Light, Dark Jellai)
- Beths (Fuck beths, unless you want to build for counter elemental titans)
- Seirens (After Evo 3 Water, Light, Dark, Fire Seirens(only for titans))
- Mandragoras (After Evo 3 Dark Mandragoras)
- Latts (After Evo 3 Water Latt)
- Candlings (After Evo 3 Fire Candling)
- Birdies (Fok Birdiee)
- Hunters (After Evo 3 Dark and Light Hunter)
- Phibian (You can choose to build Wood or Water Phibian but after these)
- Cosmos (If not planning on doing Fusion)
- Wolfs (If not planning on doing Fusion)
Golem’s Guides
Welcome to mid game! This is where the money rolls in once you are able to farm B7 at least consistently. This is the order of the golems that you are recommended to go through: B7 -> B8 -> B9 -> B10.
Before you go into golems please check out this spreadsheet which lists viable astromons to be used for golems: https://docs.google.com/spreadsheets/d/107Ilx0-yGfluNvvsvnlvi-1-FPArgF84BjwBchEqSM8/edit#gid=0
^List may be outdated because I’m lazy as fuck
Sources that helped me make this guide: https://www.reddit.com/r/MSLGame/comments/5k5t2x/golems_megathread_how_to_build_teams_analysis_on/
Golems B6 – Light Boss
This is a theory craft and not tested atm. You should be able to clear B6 golem with the B7 team or your pagos coast team or B8 team. The untested theory is if the teams are able to clear B6 golems at level 40 and ofc with at least some decent 4 star gems.
Golems B7 – Water Boss
Youtube tutorial: https://www.youtube.com/watch?v=hr3mFpG5GWs&index=3&list=PLcyNxKrSeUIJMccGYjzLFwCE2NzGlj7xO&t=3s
Through self research on multiple account I have concluded to have an ideal farmable team for farming B7 consistently and around 3:30 to 4:30 time:
| Monster | Level/Evo | Gem Set/+lvl | Gem Subs |
| Wood Miho | 50/Evo 3 | Conviction +12 | HP DEF ATT |
| Water Seiren | 50/Evo 3 | Conviction +9 | HP HP HP |
| Wood Squirrus | 50/Evo 3 | Conviction +12 | HP DEF ATT |
| Water Latt | 50/Evo 3 | Conviction +9 | HP DEF ATT |
The gems should be at least 4* grade and are farmable in Pago’s Coast Extreme Mode, which should be easy to get to if you reference the Mid Game Rush Guide at the top.
For improving the speed of this run, replace the water Seiren with a Secondary Healer DPS (like a wood boltwing) required to be at least evo 2 or higher, and to replace the water latt with another Wood DPS that is evo 2 or higher. I replaced the water latt with another wood squirrus and it boosted the speed significantly
Golems B8 – Fire Boss
Youtube Tutorial: https://www.youtube.com/watch?v=4fWdhjz_I0U&index=2&list=PLcyNxKrSeUIJMccGYjzLFwCE2NzGlj7xO&t=744s
B8 is now much easier than the old light golem. Your Pago’s coast team should be able to clear B8 Golems at ez but with 4* gem and at least +12. I simply used:
Water Mona Lead – HP% ATT% x2 | Conviction
Water Seiren – HP% x3 | Conviction
Water Valkyrie – HP flat ATT% x2 | Conviction
Water Latt – HP DEF ATT | Conviction
The Water Valk is a Hero’s Contract astromon but can be replaced with any other Water Astromon, you may build another water mona or a water beth!
Another result: I can three man b8 golems with Water Seiren lead, Water Mona, Water Latt as well. This show how easy the fire golem is! Happy farming~
Golems B9 – Wood Boss
Youtube Tutorial: https://www.youtube.com/watch?v=GcbLgNiVeB0&index=6&list=PLcyNxKrSeUIJMccGYjzLFwCE2NzGlj7xO&t=96s
This team does require at least all level 50’s and +12 4* gems or even better. Counter-element teams will have an easier time compared to neutral teams. The waves are much easier where the boss is the main threat, with an extremely tanky right minion. The primary DPS from the boss to your team, that you will have to watch out for, is the sap debuff. On top of that the boss and ads are capable of providing stun to your team as well. To counter the wood golem you will need either:
- High resist
- Conviction set, substat resists, resist leaders (Wood or Fire Miho, Fire Vampire, Wood Seedler) Goal Resist: 60%
- Shield healer
- Wood Cupid, Dark Cupid, Light Hana, Fire Cura (Best with high CR)
- Cleanse healer
- Fire minicat, Wood Cotteen
- Att buff healer
- Fire Cotteen, Wood Minicat
- Self-sustain astromons
- Fire Vampire, Fire Succubus
- Fire Wildfang can solo B9 if built properly, at least level 60, and evo 2.
- Defense Break Astromons
- Fire Candling, Fire Odin, Fire Nightmare, Fire Yuki, Fire Arthur Other DPS type astromons
- Other DPS types
- Fire Bron, Fire Leo,
- Sap types
- Fire Perse, Fire Loki, Wood Seedler, Wood Perse, Wood Shellie
- Any other elements except water can be brought to fill out any of these missing astromons (Like a wood valk is an amazing self heal and secondary healer).
How to Early Mid Game build…
- Attackers or Balanced
- HP %/flat ATT ATT | Conviction set
- Self Sustain DPS
- HP %/flat ATT ATT | Conviction Set
- Crit based astromons: HP/DEF ATT CR(need to farm b8 or b5) | Crit Damage/Conviction set
- Tanks, Defenders, Balanced
- HP HP DEF | Conviction set
- Healers
- HP HP REC or HP REC REC | Conviction set
If possible, you may use broken set gems to fill in 6* gems into diamond slots from B7 golem farming. However, do keep check on your astromon’s resist. Using 5* gem is fine if you can place them within a set.
If you use a wood miho as a variant lead, make sure that she is built HP HP DEF | Conviction to keep her survivability rate high. Getting her to level 60 may be must if she does die. If possible, definitely get 6* gems on her and at least +9 or better.
Double Healer Team:
If you would like to start off with a slow but safe team build, definitely go with two healers. One of the two healers must provide att buff, while the other can either be a shield or cleanse type healer. The att buff will make up for the lacking dps that a dps unit may replace. The shield can prevent sap from even landing at all, and cleanse will remove any debuff placed on your astromon. You don’t need a leader skill for this build, but will help. You will need at least one defense break astromon to increase DPS to the boss especially since the boss is extremely tanky.
Leader skill priority: RES > HP > DEF > ATT
Sapper Team:
If you would like to build another slow but extremely tanky team, you will be having 2-3 sappers with 1 Healer. You’re entire team will probably be built HP, HP/ATT, HP/ATT | Conviction besides healer which one of the HP will be REC. An extremely good leader that is farmable in Mirage Ruins, will be the Wood Seedler. Funny thing is, you might as well have 3 of the Wood Seedler/Shellies if you don’t have a Fire Perse, Loki, etc. For a healer, you would want either shield or cleanse. If you want to use an attack buff, use the fire cotteen since it can 3* skill sap as well. This run is pretty slow due to the fact that the wood golem has high resist as well, so any sap that didn’t land will lessen the dps.
Leader skill priority: RES > HP > DEF
Self-Sustain Team:
A self-sustain team requires at least half of the astromon that you bring to be capable of healing itself. Some example include the Fire Wildfang, Fire Succubus, and the Fire Vampire. If you have all three of these, then you are 100% set. A fire wildfang can clear the dungeon alone if you build her HP ATT ATT any set as long as the resist remains around 70% total to counter the CC and sap. Incase you only bring two self sustain, then you should bring a defense break as well as att buff healer.
Leader skill priority: RES > ATT | HP > DEF
Normal Team:
A normal team consist of a regular setup that is used throughout all golems. This includes a tank, defender, or tanky attacker to be the leader with two dps and one healer. Your tanky attacker should be built HP HP ATT on conviction. You must have at least one defense break astromon to increase dps output, so if possible, try to grab a leader that has def break so that leaves one dps room to be pure dps. Your healer can either be att buff or cleanse.
Leader sill priority: RES > HP > ATT > DEF
Example Farmable Team:
| Monster | Level/Evo | Gem Set/+lvl | Gem Subs |
| Fire Bron (var lead) | 50/Evo 3 | Conviction +12 | HP HP ATT or HP ATT ATT |
| Fire Cotteen | 50/Evo 3 | Conviction +12 | HP HP REC or HP REC REC |
| Fire Candling | 50/Evo 3 | Conviction +12 | HP ATT ATT |
| Fire Attacker (can be another candling) | 50/Evo 3 | Conviction +12 | HP ATT ATT |
- Gems has to be +12
- 50% resist or higher
- Fire bron lead provides extra HP to team
- No defense gems at all since sap chews through defense
- Higher the crit rate the better for more DPS
- Level 50 at least!!!
Proven Farmable Team:
Fire Miho 50 evo 3 HP% ATT% ATT% | Conviction 4* +12
Fire Cotteen 50 evo 3 HP% HP% REC% | Conviction 4* +12
Fire Candling 50 evo 3 HP% ATT% ATT% | Conviction 4* +12
Fire Bron 50 evo 3 HP% ATT% ATT% | Conviction 4* +12
Golems B10 – Dark Boss
Youtube 100% farmable team: https://www.youtube.com/watch?v=dPOLTR6cE6s&index=7&list=PLcyNxKrSeUIJMccGYjzLFwCE2NzGlj7xO&t=169s
Alright boys and girls! This is the last floor on golems, congrats on making it this far! You are basically halfway through mid-game~
Assuming you are able to farm B7, B8, and B9 … B10 is basically a gem quality, astromon quality, and team combo quality check. Having a strong variant lead will also make a difference for this floor. The main threat of this floor is both the waves and the boss itself. The main threats of the waves would be the dark mandragora (which everyone wants) that has 50% crit damage on both skill that if the little dark piece of shits focuses on one astromon; that astromon may or may not get decimated depending on build. The boss itself silences at full gauge so having your healers (except passive healers) on high resist will keep your team alive. Below half health, his aoe slam will implement defense break on your team which is also threatening if you bring light astromons. The boss itself will have extremely high resist so have fun trying to get defense break on this little cuntfuck.
Variant Skill Priority: HP, ATT, DEF, RES
Willo has brought up that due to the new patch with lower resist on golems, you may follow a template of: 1 healer, 1 wave clearer, 1 sap, and 1 dps
Dragon’s Guides
Theorycraft:
So if you are able to farm b7 golems to b9 golems, you should be able to b1 dragons to b4 dragons with the golems teams that you are using at level 50 and using 5-6 star gems at +12 (Welcome to late of mid game you fucks)!
Overall Tips:
- Do not auto dragons, manual until you consider yourself late game(able to farm db7+).
- Dragons cannot be sapped, cc’d, or thirsted
- Dragon’s hitbox is fucking cancer so you may untarget it accidentally so make sure you hit the bottom of your astromon bars…
Dragons B1 – Water
So I have used my B7 farmable team and that team is able to clear this dragon.
Wood Miho lead HP% DEF% ATT% | 6* broken set
Water Seiren HP% HP% REC% | 6* broken set
Wood Squirris x2 HP flat ATT% ATT%| 6* broken set
1st Wave:
- Focus at least one minion down first
- Focus the Water Latt so it doesn’t defense break your astromons
- Focus Water Perse next
- In all honesty I don’t even think the order matters
Dragon:
- Dragon will begin non-skill aoe that petrifies after your first turn
- Right minion provides defense up
- My team was able to survive the dragon’s aoe on crit.
- Focus Dragon only especially with defense break, aoe should take out minions eventually
Dragons B2 – Dark
No farmable team yet…
1st Wave:
- Focus Dark Ghos > Dark Colt > Dark Bee > Dark Valkyrie
Dragon:
- Dragon will being non-skill aoe that thirst after your first turn
- Right minion provides shield
- If dragon crits, it crits hard…
- Focus Dragon only, and defense break will definitely help. Aoe will take out minions eventually and the shield for the dragon can be broken through easily if you have enough dps.
Dragons B3 – Wood
This is definitely going to take a while so go fuck yourself.
Dragons B4 – Fire
Dragons B5 – Light
Dragons B6 – Water
Dragons B7 – Dark
Dragons B8 – Wood
Requirement:
- All astromons level 60
- All astromons evo 2.1+
- 6 star gems at +12 for healers and tanks, +15 for attackers
- At least one extremely high resist healer (Fire Cupid, Fire Cura, Fire Cotteen)
- At least one NUKE type or DPS (Fire Leo, Fire Vampire, Fire Succubus, etc)
- Stun, defense break, attack break are optional, if you do not use defense break you will need more high dps or nukes.
- The more cr on your attackers the better
- HP, DPS, or RES lead
1st Wave:
- Fuck the minions up before the Wood Valk
- Prioritize minions: Wood Squirrus > Wood birdiee > Wood Jellion
Dragon:
- Pop Attack Up at first turn and keep the attack up consistent or heal if needed, Shield before you know if an aoe is about to happen.
- Aoe the fuck out of everything and hope it kills the minions before you get the dragon to half health, all regular attacks or single target 5* are targeted on Dragon (I honestly don’t think you can nuke this fucklord)
- Dragon skill bar aoe will thirst, non skill bar aoe starts below 50% and will sap x3.
- If your healer is thirsted and your team is low on HP, you’re fucked and will need to gem(optional).
Dragons B9 – Fire
Requirement:
- All astromons level 60
- All astromons evo 2.2+
- No healers unless water perse
- Attackers, Attackers, Attackers, Attackers, Attackers, Attackers, Attackers, Attackers, Attackers, Attackers, Attackers, Attackers, Attackers, Attackers, Attackers, Attackers, Attackers, Attackers, Attackers, Attackers, Attackers, Attackers, Attackers, Attackers, Attackers, Attackers, Attackers, Attackers, Attackers, Attackers, Attackers, Attackers, Attackers, Attackers, Attackers, Attackers, Attackers, Attackers, Attackers, Attackers, Attackers, Attackers,
- 100% defense break recommended (Water Shellie)
- 100% stun recommended (Water Sura)
- Everything else is attacker type DPS or Nuke (Water Valk, Water Victoria, etc)
- 6* gems, +15 the fuck out of everything. If you have CD sets or high CR in general use them.
- DPS leader
1st Wave:
- Focus: Fire Candling > Fire Latt | Fire Arthur > Fire Cocomaru
- Stun Fire Arthur if you can
Dragon:
- If your first turn is able to 35-45% the fire dragon’s health you are in a good position. DO NOT DEAL MORE THAN 45% DAMAGE or face a risky aoe wipe.
- Only focus dragon, if expected DPS is over 45%, focus left minion.
- Hopefully you land a defense break.
- On 2nd turn, all out fire dragon, if no defense break try again. God Speed if no defense break(maybe).
Dragons B10 – Light
Welcome to the end game piece of cunt filth muffin.
My only hint is: If you don’t land shit, gem through 😀
Astromon Values:
As a new player, you will want to understand which high tier astromons to work on specifically 4* – 5* astromons. I will provide you a basic understanding of which element is viable for which specific purposes.
First, some easy terms to take note of:
PVE
- Early Game: Farming Scenarios Extreme and ends once able to clear Golems B7
- Mid Game: Farming Golem dungeons and ends at start of Dragons B4
- Late Game: Farming Dragons B7+
- End Game: Farming Dragons B10 with no gems refresh to clear (absolutely fucking no one)
PVP
- Early Game: Focusing low level teams or solo monster teams
- Mid Game: Fighting level 50+ astromon teams with semi-weak/strong gems (5* or less)
- Late Game: Fighting level 60+ astromon teams (debuff is extremely easy til now) with 6* gems
- End Game: Rank 200+ usually. Debuffing and CC are hard to land. This is when you need strong bruiser DPS type teams over Debuff and CC.
NAT 5’s:
Arthur
Leader: Increases allies’ HP by 40~45% in dungeons.
| Fire | Extremely strong built bruiser for late game PvP and DPS for late game PvE |
| Wood | Strongest early game but falls off towards end game PvE, built bruiser for late game PvP |
| Water | Strongest throughout as a DPS SP battery for PvE and tanky PvP |
| Light | Strongest attacker in Evo 3 form |
| Dark | Bruiser Sapper but limited to ToC 55 only |
Balrona:
Fire – General Occasion bring against elements except water and wood
Water – Anti Titan Specific
Wood – Mid Game PvP Specific only (Seal only hard counters aggressors)
Light – Decent Kit for PvP and Dragon Crowd Control and 5* defense break
Dark – Passive healer used in every general occasion
Garuda
Leader: Increases allies’ critical hit rate by 20~25% in clan battles.
| Fire | PvP Restricted |
| Wood | Titan Restricted |
| Water | Pretty damn good attacker with def break and elemental adv. |
| Light | PvE and PvP Utility DPS |
| Dark | Built Bruiser for PvP Offense |
Indra
Leader: Increases allies’ attack power by 40~45% in clan battles.
| Fire | Extremely strong counter every element DPS throughout |
| Wood | Limited only to Mid Game + PvP |
| Water | Limited only to clan battles |
| Light | Extremely strong counter every element DPS throughout |
| Dark | Limited only to clan battles |
Nightmare
Leader: Increases allies’ resistance by 20~25% in the Astromon League.
| Fire | One of the best 3* defense break astromon |
| Wood | Fodder |
| Water | Variant-wise strongest in pvp throughout against defense aggressor teams |
| Light | Trophy |
| Dark | Limited to mid game PvP |
Odin
Leader: Increases allies’ HP by 40~45% in the Astromon League
| Fire | Good throughout the entire game (I use for B8 dragons, high tier PvP, and titans) |
| Wood | Limited to Mid Game PvE, strong bruiser for late game PvP offense |
| Water | Limited to Mid Game PvE, strong bruiser for throughout PvP |
| Light | Has the ass and is extremely strong for late game PvP if variant. Also has a place in some PvE content like GB10. |
| Dark | Limited to mid game PvE and late game PvP offense |
Onmyoji
Fire PvP specific, may be used for pvp defense and offense
Water We finally got our water nuker! Definitely worth building
Wood Pure PvP astromon limited to mid game
Light late game PvP!
Dark Water Onmyoji but on steroids with healing
Persephone
Leader: Increases allies’ critical hit rate by 20~25% in dungeons.
| Fire | Limited to Golems and ToC Floor 55 only |
| Wood | Limited to Golems and ToC Floor 55 only |
| Water | Best secondary healer in game. Extremely strong throughout |
| Light | Limited to Mid Game PvP and PvE |
| Dark | Second strongest attacker at Evo 3 |
Shiva
Leader: Increases allies’ HP by 40~45% in dungeons
| Fire | Mid-game limited PvP, can be used for dragons as stun utility |
| Wood | High DPS wood astromon, strong throughout all gameplay |
| Water | Only fucking use for this still sack of bullshit is GB10 5* sap and 3* thirst :> |
| Light | Extremely tanky self sustain bruiser |
| Dark | Unavailable |
Shinobi
Fire Anti-Titan Astromon
Water Counters every element except Wood, not worth to bring
Against Fire
Wood not as great as the other shinobi but used for PvP
Light Extra DPS 3* and DPS converted to HP 5*
Dark late game DPS for PvP and PvE
Siegfried
Leader: Increases allies’ defenses 40-45% in clan battles.
| Fire | SP sustain DPS, counters all elements |
| Wood | Limited PvE and Decent PvP |
| Water | Fodder (or can be built for ToC 55, gb 8 and 10) |
| Light | Titan Restricted |
| Dark | A NAT 5 TANK DPS FINALLY?!?!? (DEF Aggressors) Best one |
Valkyrie
Leader: Increases allies’ attack power by 40~45% in the Astromon League.
| Fire | Limited to Mid Game PvP and PvE |
| Wood | Extremely valuable early game and strong throughout |
| Water | Extremely valuable late game to end game |
| Light | Is a pop star singer apparently. (LORE) Also great for PvP Offense, and most Pve Content |
| Dark | Limited to mid game PvP only |
Wukong:
Fire Anti-Titan Astromon
Wood Attacker utility double defense break!
Water its maybe eh, balanced with heal proportional to damage
Light Tanky utility for both PvP and PvE!
Dark Good for golems and ToC but useless everywhere else
XuanZang:
Fire Fire version of a water perse!! (Not big of difference either!)
Wood Tanky utility double attack down, good for titans
Water What the fuck is this shit
Light PvP specified but not great in general
Dark Think of an aoe Dark cat but as a trap
NAT 4’s:
Anu
Leader: Increases allies’ critical hit rate by 15~20%.
| Fire | Fodder |
| Wood | Wood Nuke. Strong throughout for both PvE and PvP |
| Water | Water “Nuke.” Strong late game for dragons and PvP |
| Light | One of the best 3* defense break(100%) for all gameplay |
| Dark | Unavailable |
Banshee
Leader: Increases allies’ defense by 30~35%.
| Fire | Fodder |
| Wood | Strong throughout for both PvE and PvP |
| Water | Fodder |
| Light | Trophy |
| Dark | Trophy |
Boltwing
Leader: Increases allies’ critical hit damage by 40~45%.
| Fire | Late Game and used as EVO3 mat fusion for Light Shiva |
| Wood | Limited to Mid Game PvE and PvP |
| Water | Fodder |
Mera
Leader: Increases allies’ HP by 30~35%
| Fire | fodder |
| Wood | fodder |
| Water | Best Mera but still shit |
| Light | Unavailable |
| Dark | Unavailable |
Cupid
Leader: Increases allies’ HP by 30~35%.
| Fire | Strong throughout especially late game for PvE only |
| Wood | Limited to Mid Game PvE only |
| Water | Fodder |
| Light | Trophy use only (useless as hell) |
| Dark | Stronger than Wood Cupid in Shield strength and DPS, can be used throughout |
Cura
Leader: Increases allies’ red soul recovery by 20~25%.
| Fire | Limited to Mid Game PvE only |
| Wood | Resilience Buff team build for titan |
| Water | Strongest Cura for PvE content |
| Light | Strongest Cura for PvP content |
| Dark | Falls under Water and Light Cura |
Hana
Leader: Increases allies’ recovery by 30~35%.
| Fire | Fodder |
| Wood | Used throughout in PvE |
| Water | Resilience Buff team build for titan |
| Light | Used throughout in PvP and limited to mid game PvE |
| Dark | Falls under Light, Wood, and Water |
Ifrit
Leader: Increases allies’ critical hit rate by 15~20%.
| Fire | High DPS useful for mid game PvE and late game PvP |
| Wood | fodder |
| Water | Good for titans only |
| Light | Unavailable |
| Dark | Unavailable |
Jeanne
Leader: Increases allies’ attack power by 30~35%.
| Fire | Fodder |
| Wood | Last choice wood dps, If lacking wood attackers |
| Water | Limited to Mid Game PvP and lower, can be used for dragons as stun utility |
| Light | Bruiser good throughout all gameplay |
| Dark | Just a really tanky PvP Defense Unit that can aoe silence, did you know you can silence golems? Dark Jeanne does |
Leo
Leader: Increases allies’ Hp by 30~35%.
| Fire | Nuke type – strong for all gameplay |
| Wood | 3* def break, 5* att break – strong for throughout gameplay |
| Water | Limited only to Mid game pvp and lower |
| Light | Useful as a variant only, otherwise trophy |
| Dark | Good for titans |
Loki
Leader: Increases allies’ defense by 30~35%.
| Fire | Sap type useful in golems and ToC |
| Wood | Strong throughout all gameplay |
| Water | Nuke type – strong throughout all gameplay |
| Light | Best Loki useful for both late game PvP and PvE |
| Dark | Strong for late game PvP |
Nezha
Leader: **check**
| Fire | Tank Debuff type, reverse wood leo/water latt/fire odin |
| Wood | Titan’s and medium tier PvP |
| Water | PvP restricted |
| Light | May be good against titans?? |
| Dark | Effective when built Bruiser |
Succubus
Leader: Increases allies’ HP by 30~35%.
| Fire | Nuke type sustain and def break – strong throughout all gameplay |
| Wood | Fodder |
| Water | SP Battery, genderbent water arthur |
| Light | Passive healer useful for midgame PvE |
| Dark | trophy |
Sura
Leader: Increases allies’ critical hit rate by 15~20%
| Fire | fodder |
| Wood | fodder |
| Water | Best out of all elemental, is crit based strong in mid game PvP and late game PvE |
| Light | Passive healer useful for mid game PvE |
| Dark | Single Target Nuke type good for late game PvP and PvE |
Thor:
Fire – General Occasion double defense break, fall off for late game players
because of 5* 50% defense break
Water – If you have lack of water attackers, build this
Wood – Anti Titan with blind (you would rather have the dark one)
Light – PvP Specific, however 60% is pretty shit for a l/d NAT4
Dark – Best Anti Titan because of 100% CD base.
Tigar
Leader: Increases allies’ attack power by 30~35%.
| Fire | Extremely useful for B9 Golems and Titans |
| Wood | Strong DPS due to lack of wood attackers |
| Water | What the fuck is this |
| Light | Great for Late game PvP and Dragons CC |
| Dark |
Vampire
Leader: Increases allies’ resistance by 15~20%.
| Fire | Best elemental Vampire, Nuke type self healer, useful in late game PvE and PvP |
| Wood | Fodder |
| Water | Good only cause of lack of water attackers |
| Light | Best overall Vampire and useful in late game PvE and PvP |
| Dark | Trophy |
Venus (limited addition)
- Light
- Basically a self-healing version of Dark Cupid/Light Hana. Can be used in any situation (offensive PvP as well)
- Probably the best choice for new players for golem progression!!
- Dark
- Same setup as a Fire Cupid except possible higher stats. Can be used in any situation except PvP
- This bitch also uses her 5* skill the moment she gets full guage, meaning more DPS for the entire team??
Verde
Fire Blind is useless, but Anti-Titan cause of courageous Strike
Water Pure PvP but limited to mid game, can be used as a CC for
dragons
Wood Tank version of a Wood Leo
Light late game PvP usage
Dark Sapper…
Victoria
Leader: Increases allies’ attack power by 30-35%.
| Fire | Fodder |
| Wood | Good for mid game PvP but usually fodder |
| Water | Best elemental Victoria (I have 2 water nikes), used for late game PvE and mid game PvP |
| Light | Most valuable through all game content |
| Dark | Can be a high DPS Utility if built towards DPS, Useful for mid game PvP and late game PvE |
Wildfang
Leader: Increases allies’ blue soul recovery by 20~25%.
| Fire | Best Elemental Wildfang, can solo B9 Golems, offers high DPS, limited to PvE and Titans |
| Wood | fodder |
| Water | Limited to mid game PvP but fodder |
| Light | Extremely strong for mid game PvP and late game PvE |
| Dark | Late Game type Astromon, Nuke Type if built correctly, can be used up to late game content |
Yaksha
Leader: Increases allies’ critical hit damage by 40~45%
| Fire | Best out of all elemental for titans |
| Wood | Pretty fucking amazing for Late Game PvP and dragon CC |
| Water | Overall decent DPS mid game level |
| Light | Best overall Yaksha for high DPS |
| Dark | Mid-Late Game PvP and PvE |
Yuki
Leader: Increases allies’ critical hit damage by 40~45%.
| Fire | Extremely valuable throughout all game content except PvP |
| Wood | Fodder |
| Water | Sapper limited to golems, toc 55, and hopefully titans |
| Light | Trophy |
| Dark | Trophy |
NAT 3’s:
Gatito:
Fire Fodder used for fusion or evolving
Wood 100% Defense Break, an always must get
Water 100% Attack Break, Titan astromon imo
Light 100% Sapping, good for TOC 55, golems, and Titan
Dark Mother fucker that hits like Zeus throwing a spear through your
genitals, get this fucker.
Lamia (March ‘17 Rebirth)
- Fire PvP Restricted
- Water PvP Restricted
- Wood Sap for 3 turns???
- Light Crit Based DPS and Utility (Highest priority to get!!)
- Dark Blind + ATT down
Videos and Streams!
Can’t Find what you’re looking for from this guide? Please Check out these bad boiz/grillz!
If you want to be added to either of these lists PM me via discord, twitch, youtube, etc:
- Youtubers – must make MSL videos at least once a week or contain guides
- Streamers – streams consistently weekly
Youtube
Twitch
Communities
Emulators
4:33 has confirmed that emulators are fine to use to play MSL as long as you do not use 3rd party programs.
Emulators included:
Error 16 for Nox:
Press or type this link on your emulator and update!:


