
Contents
Introduction & General Tips
Expert and Master HDT are here and you need to start getting it into gear to do these raids as shits only gonna get harder later and the further behind you get the less content you have access to because of Might gating.
The guide will go into detail but not that much detail for each of the HDT I was able to successfully do and learn by muscle memory. I haven’t done HZD or HJT but I heard the latter is a joke just like the original one if you have Gleo HDT weapon and if you don’t then don’t even bother.
The two Cycle to break into eHDT is
eHMC > eHBH > e HMS / eHZD > eHJT
Website that will save your life:
https://junlico.github.io/dragalia-lost/stats/en
This website is your best friend. I want you to use it, Love it, Appreciate it, and most importantly always click the top left check button to check if you live the opening blast from the respective HDT. Adjust Halidom stats accordingly to your Halidom always.
That being said here is some general Tips
– eHDT pattern of attacks are the same as sHDT and Prelude HDT so if you know those then you know the pattern of attack
– DPS is crucial and you should be looking for ways to max out DPS when you can and if possible do NOT bring the HDT wyrmprint. 5* Dragons are basically mandatory for the DPS but you CAN bring 4* STR dragon but know you are basically asking your allies to pick up your slack especially if you don’t have a HDT weapon made already.
– Know your roles and stick to it. In PUBs people are relying on you to do your job and to do it well if you fuck up then everyone is fucked. The same goes for them to you. This isn’t GBF, there is no Rank 250 player who can solo the raid that will come in and save you. If you got carried it didn’t mean that one person carried you, it means ALL 3 other members carried you. Don’t be that guy please contribute your fair share.
– Mistakes will happen. All we ask if you learn from it and get better. If you stagnate and don’t improve that’s when you become a huge liability.
– Off Meta units are not welcomed in PUBs. Anecdotal evidence will differ but the general rule is that if you aren’t meta and you aren’t STACKED then you aren’t gonna be accepted as people want comfort that they can clear and not waste 5 min. of their lives just to find out they don’t have the DPS needed to clear. With that said most people set min. Of DPS units to 7K+ and for healers about 6.2K+
– NEVER EVER bring a 5.3 weapon to the fight. Even if it is MUB. Yes I know some people have cleared with them. Yes I know it still meets the DPS check. I DON’T care!! Seriously do not bring it. There is literally no excuse to not have a MUB Void weapon with Dragon Bane. It’s cheaper to make, Does more damage, and helps pick up the slack if someone isn’t contributing their DPS. Be an asset, not a liability in this fight it’s already hard enough to meet the DPS check. (Some healers can ignore this part)
– Finally, know that when you craft your HDT weapon you need a 5.3 and the respective 5* void weapon of its element/type crafted. No the HDT trial won’t eat your weapons and its relatively cheap to make about 1.3 mil per weapon and 3 weekly chest will be enough to craft 1 HDT weapon of its respective element. Waste Dama bars only if you lack Ashes to farm or if you need more power for a said HDT fight like eHBH.
Clarifications / Foreword
First of all I would like to thank people for using the guide in any way shape or form. It was originally meant to just help crew members so it is very humbling to know other people can use it as well. Regardless of how many people use it if it has in any way shape or form helped you in learning about the fights or breaking into the cycle then I am happy for that. I would like to address some concerns that people have with why some units aren’t recommended and why some are and the logic of why I chose to omit some information.
No Sword Characters recommended in eHMS
So I looked back to what I wrote about sword characters and tbh past me does kinda have a point. That’s not to say I think sword characters are worthless or anything but the guide is meant to help beginners break into the cycle. So at the point of recommending a harder to use character when cheaper and easier alternative exists seems very counterproductive. That’s not to say I will stop you, if you wanna use Marth or Lea or whoever go ahead. It’s just not a priority for me to make a write up about them in my limited spare time when other units fill their role better and are more accessible cause you know we can’t roll for Marth anymore Note in the future if I start doing mHDT guides added to this as I have been clearing those. I will obviously add meta relevant characters because if you can get to masters I assume you’re at least an intermediate/advance players so I have no qualms on pushing the harder stuff on you.
You recommended X dragon for Y units why not recommended them for Z units too
So I want to make this as clear as possible, this guide doesn’t assume you have unlimited resources to uncap any dragon you want. I wanted to make recommendations as F2P friendly as possible considering how suntones don’t really fall from the sky. If you spend monthly for a sunstone then good for you but most players including myself don’t. Therefore I only wanna recommended Dragons that either u may have laying around from dupe city or optimal dragons that you wanna uncap that are future proof (I.E. useful for multiple content/units). Which is why someone like Prometheus might not get recommended over Sakuya for Fire Marribelle because Sakuya is just an objectively better Dragon and you’re better off just using augments to offset your HP then rely on an elemental resistance dragon.
Why are you recommending me xyz Wymrprint when clearly abc is better
This one is just due to how often the guide is updated. New WP will come out with almost every new banner and that can or cannot shakeup recommended WP usage. I will try to keep up as best whenever I do another update but the reality is I might be out of town or busy for days or weeks. So I’m sorry I will try to be better about this but if the update log reflects a date before the WP you are asking for was released then you now know why I didn’t add it in. Also I want to make it clear that I am trying to NOT recommended seasonal/event limited WP as much as possible because if you weren’t there for those events/banners then you straight up missed them. It would suck if my entire recommendation section was just event/limited wp and some new player was like “whelp I guess I’m SoL”. Therefore I try to use general WP as much as possible as long as it does not extremely impact getting a clean clear which it shouldn’t cause eHDT aren’t as rigid as mHDT. Obvious exceptions are when you have to use the WP and its non negotiable like Chocolatiers for Thaniels. In those cases I kinda make it obvious that it’s non negotiable and you need to use this print.
I think X character should be recommended for Y eHDT
The truth is that so many characters are viable for so many of these eHDT that I probably won’t get to them all. That being said this guide assumes 99% of your clears are from PUBs and the 1% is when you’re desperate and go to the discord and magically find a group that is actually good and willing to run it multiple times. If it wasn’t obvious Discord can be very hit or miss but you should try it, it’s getting better slowly. Therefore I wanna recommend as many “Meta” units that PUBs will take more often rather than obscure units that PUBs might avoid. Like I know Orsem can 100% do eHBH but if you come in to PUBs with a lvl 100 Void dagger Orsem then you’re probably gonna be “Sorry” spammed to leave cause people would rather get a G! Elisanne or S! Celery to be a baiter. Ofc if you come in with a HDT 2 weapon big meaty claw Orsem no one gonna reject you but at that point you aren’t even a beginner anymore so why you here
Will there be more memes?
Yes! Whenever I get around to eHJT and eHZD I will always have a relevant meme in place that is related to them in some way shape or form.
Expert High Mercury (eHMC)
The Easiest of all HDT and people will still somehow find a way to fuck it up despite Noelle handling 95% of the mechanics. This fight is made abundantly easier if you run it with someone else and one of you is Noelle that way you can handle 100% of the mechanics between the 2 of you to insure PUBs don’t fuck it up.
This is ideally where you start the loop and made abundantly easier when people have their HDT weapon from finishing eHMS
You do not bring HDT wyrmprint for this fight and if you do then you’re a liability for costing the team DPS. So make sure you have the HP to live the opening blast and if need be put some augments or finish your Dojos. All of which you can check at the website linked before in General Tips.
https://junlico.github.io/dragalia-lost/stats/en
Change Log
*** December 13th, 2019***
-Changed some WP recommendations
-Edited to reflect only Elly should Dragon up in break phase if they have TSO and if time is not a concern.
Meta Units/Dragons/Wyrmprints:

| Don’t bring off meta combos if you’re starting the loop here unless you actively don’t wanna contribute and just get carried. At least have the courtesy of doing this not in PUBs and instead in a pre-constructed team on Discord or with friends to test out if you even meet the DPS check. |
| NoelleThe Most F2P Unit in the fight Your job is to do 95% of the mechanics and baby the fight. Your S1 is Crucial for DPS and must always be used when up unless you wanna save it for 2 seconds to i. frame a shotgun blast. Double Stacking S1 buffs is just too good so try to do that. | |
| Freyja – Best dragon by far skill haste to help double Stack her S1 is such a huge DPS boon. Might will suffer but pubs should take you when they see her Zeph – 2nd best dragon, DPS is crucial in fight so 60% STR is good High Mid / Mini Mid – F2P dragons to help meet HP check and contribute some DPS | |
| Cheer Corps – Easy way to increase Skill fill gauge while force striking to insure stacking S1 and some skill haste. JoTs – If you’re poor in WP exp or eldwater and don’t have Cheer corps and have a lvl 100 JoTs then you can use this From Whence He Comes – Use it, please use it!! Your S1 is so crucial so Buff time increasing is so good. |
Some specific things to know as Noelle:
Shotgun Blast should always target you because it locks onto the unit who is furthest away from HMC. 2 dodge rolls should be enough to dodge it and 90% of the time she will only do 2 shotgun blasts back to back before moving to the next mechanic. Sometimes she will do 3 at certain moments of the fight just learn those and keep an eye out for it always and you can use skills to iframe through it.
Stay at the center for Whirlpools so you can move in comfortable areas if Whirlpools stop you from attacking it means you aren’t doing DPS and aren’t filling up that S1 which is again crucial.
| Wedding Elisanne The MOST in demand unit as of right now Your job is the proxy healer/debuffer your s1 placement is crucial so people can DPS while recovering inside the area of effect. Your S2 Debuff is also crucial to add to the DPS. Also you like break the dragon and stuff. | |
| Zeph – The arguably better dragon for W!Elly as this means her FS do more damage and trust me you will be FS a lot. Vayu – Wind Skill dragon can never go wrong with it. Personally if you lacking on sunstones uncap this one as it has more uses in the future if you get a Victor or Addis Roc – F2P dragons to help contribute to DPS, if your W! Elly isn’t stacked you’re probably gonna have to micromanage a ton to contribute to DPS but expect for ppl to possibly pick up the slack | |
| Resounding Rendition – Self-explanatory it’s just hands down a really good general WP and tons of people have +200 it with augments so if you did too use it. Shining Overlord – replacement for RR its personal preference United by One vision – A better JoTs assuming your allies don’t die in the last min for some reason JoTs – STR and Skill haste what more can you ask for |
Some specific things to know as Wedding Elisanne:
S1 is the only form of healing people are gonna get in this raid so placement is crucial. The best placement of S1 is a slightly diagonal in relation to HMC so it makes an X with HMC body. This way people can DPS and avoid stomp and tail swipe. Also remember that your S1 or S2 will be needed to pop bubbles so if you know if a bubble mechanic is coming then make sure one of your skills is ready. Assume no one is gonna do it except you. It’s better to have 3 skills go off for bubble pop than none.
| Victor The MOST saturated unit in eHMC Your job is just to stack bleed and pray you have good RNG. | |
| Vayu – Victor best dragon by far. Like you almost have to bring it because of how good it is and how much DPS it can make up cause Bleed Scales with Skill damage Zeph – 2nd best dragon for Victor but know its a pretty big downgrade and will be noticed Roc – F2P dragons that will substantially decrease your DPS and no you’re aren’t doing as much DPS as you think you are | |
| Resounding Rendition – Bleed scales with skill damage so bring the best general skill damage WP makes sense. United by One vision – A better JoTs assuming your allies don’t die in the last min for some reason JoTs – STR and Skill haste what more can you ask for Beautiful Nothingness – A good secondary WP with some added crit |
Some specific things to know as Victor:
Don’t bother saving your S1 for iframes. Like just use it when its off cooldown all the time because you need those bleed stacks for DPS. Also Bleed only has a 80% chance of hitting so you wanna up those chances by using it as much as you can. If they don’t stack don’t take it to hard it’s out of your control its just RNG. Also save S2 for when bubble pop mechanics are coming as it has great range and also decent buffs for the team.
Mechanics of the Fight
From here on we will go in detail step by step on the mechanics and the flow of battle you should expect to see from eHMC and how to deal with each one of them one by one. I will generally post a screenshot along with explaining what the crucial characters should be doing. If nothing is said about your role it means you just DPS as normal.
Introduction
The beginning of eHMC is pretty standard. Physical DPS characters FS during the last part of opening blast in order to make sure you stay in place and don’t get blown away. Then you bait eHMC roughly to the gap on the top left corner of the map as shown above. The process of baiting it will always have a set attack rotation with no markers. It’s Stomp > Dash > Tail swipe. Its crucial batiers move eHMC to the top left as this is a very easy location to stay in and avoid all whirlpool. Noelle will have to just avoid Whirlpool normally along with tail swipe. Elisanne stack S1 in top left corner for faster regen heals. Many Elisanne spend it before the dash and while an experienced Elisanne will be able to make up the SP asap to regain S1, that might not be you if you’re starting the loop here with minimal practice.
Mini Mechanic: Shotgun Blast
So shotgun blast targets the player farthest away from HMC so it should always be Noelle if anyone else gets targeted then that person just fucked up cause that would mean physical DPSer were not in physical DPS range or Noelle fucked up as that meant they were in physical DPS range. Either way this is a very telegraphed and easy to dodge move. When eHMC has 2 “!!” symbols over its head it means that shotgun blast is coming asap (usually 2 sets back to back). As Noelle just dodge roll twice to the left or right to dodge comfortably. This mini mechanic will be very prevalent so keep it in mind as Noelle as you never really get healing in this entire fire so you have to play perfectly. Don’t worry, it’s not hard but it is a lot of pressure for beginners and you will mess up and that’s ok just learn from it and ignore toxic pubs that spam Argh on you.
Mechanic One: Whirlpools

So this is the first real mechanic on the fight which is Whirlpools. They are incredibly annoying for new players and will probably kill you if even a little bit of it touched you. Despite all that it is very easy to dodge as long as baiter put eHMC in the top left corner. You can all just huddle there and even Noelle too after dodging both Shotgun Blast to avoid every different pattern of whirlpool.
Mechanic Two: Sphere of Salvations / Waterfall


So this is where people straight up just die from either panicking or they just reveal their hands that they don’t know what they’re doing. Sphere of Salvations basically spawns 4 bubbles as seen above and they have some rules to them. No two units can be in the same bubble or it will pop. Being inside the bubble makes you invulnerable to all damage even eHMC shotgun blast. These bubbles are here to help you survive the waterfall mechanic which is an instant wipe if you are not inside your bubbles. So it is imperative we get this right the first time. Signal your bubble by dodgerolling into it and out to show that you are claiming that bubble. Note that Noelle should always be bubble 4 (far right) unless someone really wants to be a jerk and claim that bubble even though they are physical DPS. With that said lets go over the rotation eHMC will do before summoning the waterfall. After whirlpools eHMC will do
Sphere of Salvation summon > Stomp > Dash > Tail swipe > Shotgun blast 1 > Shotgun blast 2 > Waterfall
As always baiters must keep her in the top left corner and Noelle must dodge shotgun blasts. After the 2nd one she will summon the waterfall immediately so get in your bubbles.
Mechanic Three: Water Prison / Homing Bubble


After first waterfall mechanic is the first water prison ninjutsu bullshit mechanic. It targets the player furthest away from HMC. Please for the love of god if you’re Noelle move in so it’s not you. Please for the love of god if your victor or W!Elly move out to be further away than Noelle just incase the one in pub is clueless. After you have the Purple AoE below you move all the way in to the RIGHT side of the HMC where your allies will break you out without losing DPS. After that a homing bubble will target the farthest player (thats you Noelle) then you dodge roll in the lower half of the map and avoid it. If anyone touches it, its an instant kill. Also if HMC Stomp > dashes > Tail swipes in the middle its a dead run as Noelle won’t have enough space to run around to avoid bubbles and your allies so baiters do your job and keep eHMC in the top left corner or at least in the top part of the map.
Mechanic Four: Bursting Bubbles

This is the last unique mechanic of the raid as eHMC will just repeat what she has done before with slight differences and timing which we will go into so don’t worry about it. During the Homing bubble phase eHMC will do a Stomp > Dash > Tail swipe that baiters must keep at the north side to give Noelle space. Then eHMC will do two consecutive shotgun blast in a row before finally finishing it off with a Whirlpool. Again the top left corner is a safe spot for that so keep it in mind. After eHMC will walk to the center and do bursting bubble circle in which case everyone and i mean EVERYONE huddles in the middle and Victor or Elly will pop it with their s1 or s2 so it spreads outward hitting no one. Noelle then go to the edge while everyone stays at the center where eHMC will do THREE total shotgun blast so be sure to iframe them accordingly or dodge roll. Following that is whirlpools so dodge that normally.
Mechanic Four: Bursting/Homing Bubbles Electric Boogaloo

No I’m not crazy I know I put Mechanic Four back to back and that’s because this part gets kinda weird depending on team DPS. So depending if your teams DPS wasn’t dogshit and if the Ellys did their job in FS combos then after Bursting Bubbles eHMC SHOULD in theory break at this point while Noelle is dodging shotgun blast. All Ellys w/ The Shining Overlord equipped can Dragon for extra permanent Deeps if time isn’t a concern. Also note if you only have 1 W!Elly look at your Dragon gauge first and if it’s below 70%-80% don’t dragon up you probably won’t be able to get a 2nd dragon ready for waterfall dodge if 2 sword units aren’t their doing their optimal combo as you need to OD it ASAP to get 2nd dragon ready sooner. Example above is a non 2 Elly lobby where Noelle doesn’t have dragon up at all to tank Homing bubble.
** Continued in Next Page**
AFTER HMC is back up she will do ANOTHER bubble circle mechanic so huddle up and let Victor or Elly pop them and as soon as that happens Noelle has to run out to be the target for homing bubble and then Dragon up and tank the bubble so you can be free of it earlier and can DPS faster for S1. Remember that shotgun blast will still be coming towards you even after tanking the homing bubble so dodge them or iframe them.
Rest of the fight is just normal as usual and at this point you are close to killing eHMC. All waterfall mechanics now will be met by a water prison with them as well so make sure as Noelle you get targeted then dodgeroll in to have ppl break u out and DPS eHMC at the same time.
Also all waterfalls after the 1st one is where you just dragon tank the waterfall. As soon as the words “Water heed my command” occur you should already be in dragon form and using your Dragon skill when you see that text so you can tank the waterfall animation.
That’s it you did the fight and you have finished your first eHDT now do it 2 more times for the weekly chest to make the weapon for eHBH
Addendum: Dragon Tanking / Conclusion

So This is added at the end to show a visual representation of Dragon Tanking every waterfall after the first one because of how important this is to survive. Every Waterfall mechanic after the first one will now summon rats that will attack your bubbles and cause them to burst if they take enough damage. In order to ignore this we instead Dragon Tank the waterfall instead of dealing with the rats. eHMC will typically do something like Stomp > Dash > Tail swipe like she always does before summoning the waterfall. After the dash is your cue to dragon up for some damage AND DO NOT GET HIT BY TAIL SWIPE. After she spins around while saying “Waters, Heed my Command” is when you use your Dragon skill to extend dragon time long enough to tank waterfall and survive that mechanic. The rest of the fight just continues as normal and you dodge accordingly. After your clear you should do this every week for your weekly chest if ashes and feathers are limited in order to fully uncap a weapon for eHBH if you need assistance choosing characters suited for you please refer to the next section of the guide explaining eHBH in detail as it is the hardest eHDT by far.
Credit
Credit to these Youtubers and Videos I used to crop the images from to visualize the guide
Enixale: https://www.youtube.com/watch?v=YpXH8eoIh3g
Expert High Brunhilda (eHBH)
Introduction
Objectively the hardest eHDT due to the sheer amount of instant kill mechanics that exist on top of the unforgiven difficulty and damage needed in order to clear this eHDT. eHBH is a clusterfuck of a raid and it will make you realize that Cygames isn’t infallible when it comes to making raids. If you’re trying to do this with PUBs as of the time of writing this guide PUBs will only accept you if you are 7K+ on all DPS and support units but the reality is its more like 7.2K for DPS and 7K for Elisanner and Thaniels want to be 6.2K+ but ideally over 6.5K. If that sounds like a big hurdle to reach that’s because it is. Realistically you will probably not even be attempting this fight without your HDT weapon from eHMC and even then the fight is incredibly brutal. I will try to go into detail about what you need and the Units you could bring into this eHDT and hopefully we just pray Cygames releases better burn res DPS units and a Water Lowen with burn res.
It is important to understand that this fight while simplistic on paper is hard to execute and I want to stress this over and over again as you will be frustrated and have dozens of failed runs in the attempt to just finish 1 copy of a HDT weapon. Therefore please understand that patience is needed and that if you fail you failed and you have to get up, learn from it and move on. Also if you missed out on both water facilities its probably best to just be Elisanne and leave the DPS and healing to people who have finished event facilities. I have cleared without the dragon pinata facility and Yueltree at lvl 17 so its kinda doable but expect a TON of augments to make up for the loss of those stats.
Change Log
*** December 13th, 2019***
-Added Gala Elisanne & Jiang Ziya
– Changed some WP recommendations to better reflect current WP in the game (Excluding Megamans one’s until the events over)
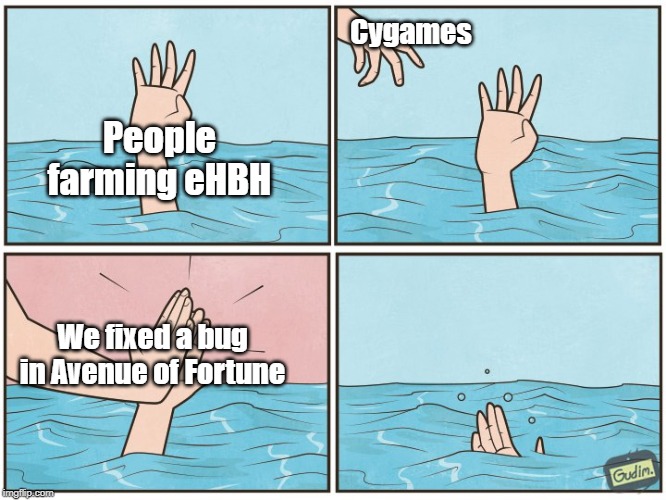
| So Cygames has just not addressed the issues plaguing eHBH at all and at this point you might as well assume that they aren’t gonna do anything about it at all. While not technically bugs the desyncing issue will 100% lead to a dead run as eHBH teleports across the map unleashing an instant kill hellfire. If that wasn’t bad enough the raid is so poorly balance that nearly every single attack from eHBH is an instant kill leading to a very unforgiving raid. |
Meta Units/Dragons/Wyrmprints:
| ElisanneThe Most F2P Unit in the fight If you’re looking for the most F2P option then you wanna go with Elisanne. You have one job and that is to stack your S1 all the time for the double stack buff of 40% STR on all allies. S2 and S3 will be used conditionally when you wanna iframe moves or just take advantage of break damage. Yet remember the most important thing is to stack S1 so do that. | |
| H! Martimus – Elisanne best Dragon if DPS is not an issue as her S1 > her natural DPS. Yet this is only true if everyone else DPS is good if not take a DPS dragon. Also doubles as a dragon for Thaniel if you hate yourself for some reason. Leviathan – STR Dragon is better b/c you don’t have a S1 that does Skill damage to justify Siren Vodyanoy – F2P alternative, you can use it I know I did but your gonna need some augments to offset lack of damage. | |
| Beach Battle / Fireside Gathering – This isn’t negotiable these have to be your WP setup for Elisanne if not then don’t even bother as you will be a detriment and not an asset. You need the Buff time +20% and the extra Burn res to have 100% burn res. |
| Gala Elisanne The Savior of eHBH Gala Elisanne is here and she is no pushover. Gala Elisanne is the savior of water in eHBH raids. Her S2 gives 25% Flame res to all allies making it one of the best ways to help Lily live the opening blast along with Thaniel S2 so they can enable double offensive WP (they might need some augments). Her S1 is a whopping 30% STR boost to water adventurers basically solidifying that Gala Elisanne has power-crept regular Elisanne in eHBH rooms. | |
| H! Martimus – Elisanne best Dragon period. She values Skill Haste so much due to her S1 being such a strong buff that if you double stack it, then DPS will skyrocket. Leviathan – You use this dragon because you didn’t pull H! Martimus when that banner was live Vodyanoy – F2P alternative, you can use it but expect to get some judgemental looks from party members | |
| Beach Battle – Gala Elisanne values buff time and skill haste so nothing is better than Beach Battle in that regard. Chocolatiers – This one isn’t negotiable for the most part. Elisanne really wants to use her S2 right away to enable double offensive prints on lily and Chocolatiers are the best way to do that with 100% Skill prep. |
Notes: Gala Elisanne kit conflicts a ton with Regular Elisanne so its not highly recommended to have both in the same party. That’s not to say the party can’t clear but it is seen as a lack of DPS if you have two Elisanne running Martimus focusing on buffing and not dealing DPS like S.Celery and Lily can do.
| Summer Celliera The primary baiter and DPSer S.Celery is the one in charge of baiting and that is final. People will tell you S.Julieta can do it to and she can but she doesn’t have burn res and finding Thaniels in pubs who can clear burn well is so far and few between thats its just dumb to rely on something you have no control over. As S. Celery your job is to bait eHBH to the north all the time and bait fire breath away from everyone. You also use your S2 in certain key moments to help everyone survive. | |
| Siren – S.Celery best dragon hands down if you have it use it. Leviathan – Alternative Dragon you can use if you dont got Siren Vodyanoy – F2P alternative, DPS is tight and you’re basically one the prime DPS dealer so this isn’t recommended even with MUB HDT weapon. | |
| TSO – you actually will be dragoning up at least twice in the fight so it’s worth using RR – Use this instead if it already has augments on it Sisters day out – The truth is your S2 is kinda important for some mechanics so having a way to bring it out faster is important United by One Vision – Seeing how the fight has to be run perfectly there’s no reason to run JoTs as a skill haste print considering that a death anywhere in the run is an instant wipe. |
| Lily The Lin You of the fight (AKA the one who dies to mechanics) Lily has the simplest job in the world or the Hardest depending on how much they choose to take. Either Lily just shits out DPS and thats that OR Lily assist in doing Dive Bomb Cancels whenever she can (DPS is tight so not super recommended but do it if Thaniel can’t cancel for shit) | |
| Siren – Honestly this is the only acceptable dragon for Lily to bring. DPS is tight and you wanna do max DPS as the primary DPS unit so a skill dragon kinda required. I know it sucks if you don’t got Siren blame Cygames for not releasing a 4* Skill Dragon and being bad at balancing. Leviathan – Alternative Dragon you can use but know that DPS decrease will be noticable and you’re basically asking Eli and S.Celery to carry extra hard. | |
| Candy Courier – 40% Skill damage for wand users and as the Primary DPS unit you wanna bring this WP RR- Only use it if it has Max Augments on it Volcanic Queen – You might have to use this WP you literally cannot live the opening blast even with thaniel def buff. You can avoid using it if a Gala Elisanne in the room with chocolatiers Crystalian Envoy – You can use this as an alternative to Volcanic Queen if you notice a Gala Elisanne in the room with chocolatiers (You might still need some augments so double check on the site https://dragalialost.info/stats/en) |
| Thaniel Healer with a Thankless Job If you’re a Thaniel you either hate yourself or thought this was a nice F2P option to break into rooms. Well either way you Fucked up as Thaniel is without a doubt has the hardest role in this raid but the most crucial one. Your 20% def buff is needed to help people survive opening blast because Cygames sucks at balancing AND you have to perform an exploit to cancel dive bombs, all while juggling enough heals to keep the party alive. This is the most stressful role in the game and Cygames needs to add a new Healer in the form of Water Lowen to save this sinking ship. | |
| H! Martimus – Your best dragon and best bet in actually getting enough heals and def. Buff to survive this raid Simurgh – 2nd best dragon and also comes with healing Poseidon/HMC – Your desperate/F2P option that you can bring but know DPS isn’t your job | |
| Chocolatier – You have to bring this WP if you don’t have it cause you didn’t redeem it then you can’t play Thaniel and that’s that. Volcanic Queen – You have to use this WP you literally cannot live the opening blast even with thaniel def buff. |
Specific Things to Know:
Thaniel as all healers have their heal scale based on not only Healing Potency but on your max HP. So the higher the HP of the healer then the bigger the heals. The ideal HP value for Thaniel for good heals seems to be someone where above 3100+ from personal experience. Also GMYM is not a better print than VQ for beginners as you are often not topped off in HP enough to event take full advantage of the 20% defense boost.
| Jiang Ziya Water Lowen This is the unit you pull for when you’re tired of playing thaniel. Shutting up all the “Thaniel won’t be replaced cause blah blah blah” naysayers, Jiang Ziya is literally the perfect healer for eHBH and mHBH. Her kit is exactly the same as Thaniel except she has 100% Skill prep and her S2 gives a regen bonus on top of the defensive 20% boost Thaniel would usually give. Jiang Ziya makes healing a breeze in eHBH and mHBH so consider yourself blessed if you managed to pull her. It’s important to note that Thaniel does his role just as well but Jiang Ziya is just strictly better in every way. | |
| H! Martimus – Jiang Ziya best dragon without comparison if you have a Martimus for her then just give it to her as there can be no better Healer/Dragon combo. DPS will also be less tight thanks to Gala Elisanne existing. Simurgh – 2nd best dragon and also comes with healing Poseidon/HMC – Your desperate/F2P option that you can bring but know DPS isn’t your job | |
| Cheer Corps – This is a nice emergency WP to have when you need emergency healing during the Muspelheim stack if you somehow messed up the timing. Give Me Your Wounded – Unlike Thaniel, Jiang Ziya actually has no problems always being at full HP thanks to her amazing heal regen on her S2. Therefore you can take advantage of GMYM 20% def buff way better than Thaniel could and replaces VQ while increasing your Healing potency. |
Dive Bomb Canceling
So Divebomb Canceling is a CRUCIAL part of this fight and if it doesn’t happen then the run is essentially dead because DPS is already really tight so the time it takes to avoid and adjust for every divebomb that occurs is just too much DPS loss in order to make the DPS check to clear.
How do you perform the Divebomb cancel?
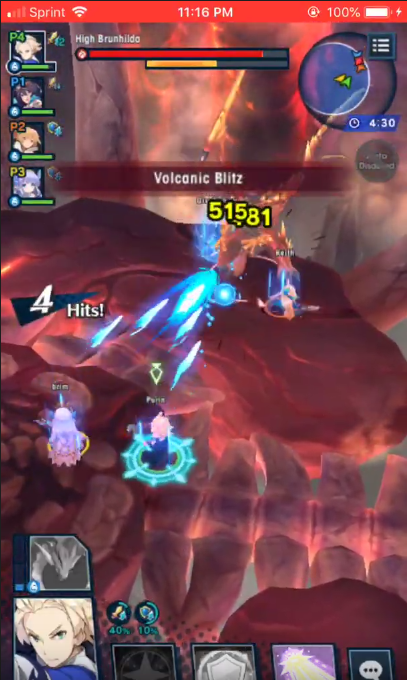
Well it’s actually kinda simple if the baiter (S.Celery) did their job then eHBH is in the north side of the map. Before eHBH commits to doing a dive bomb Thaniel (or Lily but mostly Thaniel) dodgerolls to the bottom of the map on the opposite side. This distance is too large for eHBH to dive bomb towards as it targets the farthest unit on the map. Therefore instead of doing a divebomb the AI instead skips that mechanic and does a 2nd claw attack instead. The first 2 divebomb cancels is crucial so I have two pictures above showing WHEN you need to dodge roll down. The first one is after you see the 1st claw attack which you then dodgeroll down immediately. The 2nd one is when she does Volcanic Blitz where you dodge roll down after seeing the text box appear.
Volcano Placement
So Volcano placement is important and one bad Volcano will just be the death of the run. The best place to put Volcanoes differ based on the run but the ideal locations are between you and eHBH WHILE trapping eHBH in the wall. The picture above gives an example of how trapping eHBH looks like. Careful this might cause desync if you put the Volcanos too close to eHBH and the wall which will make her clip and then suddenly start teleporting all over the map which is just gonna lead to a hellfire to death.
Supplement: Examples of Wingbeat/Fire Breath
Here is a side by side visual example of two mechanics I will be referencing in the raid as Wingbeat and Fire Breath respectively as that is what I call them. I am putting them here and telling you now because they either show up too infrequently or too frequently for me to show you a picture every time it shows up.
Wingbeat: eHBH will basically flap her wings and bounce back and anyone in front of her will be blown back. This is bad as it fucks up positioning and if you’re the baiter and get blow back then expect to not reach eHBH in time in order bait fire breath in time. This move can be iframed which is recommended if you’re the baiter.
Fire Breath: is eHBH most common move in the raid and it will kill you if it even grazes you so please don’t get hit. Basically eHBH will target a unit who has its attention the most and the do a fire breath from left to right from eHBH PoV. The Fire Breath itself will basically go 180 degrees from where it starts, so to be completely safe please be right behind eHBH. Alternatively like Wingbeat you can use a skill to iframe this move but if the animation isn’t long enough and you aren’t position right you could just be killing yourself in which case prepare for the Good Job stickers.
eHBH Battle Guide/Mechanics
Ok so this is where we get into the meat and potatoes of the guide which going into a step by step explanation of each of the mechanics and how the fight should be going for each unit in the fight.
Phase 1: The beginning

So the beginning of the fight is pretty important as placement matters. This is why its always recommended that the baiter be the host in this case that would be S.Celery the rest can be in any location. Because eHBH opening blast is followed by a dragon wingbeat where she flaps her wings and that knocks people back followed by a fire breath. It is recommended that the start of the fight S.Celery goes behind eHBH takes the opening blast or FS through it so she can start the fight right behind her ready to bait the fire breath and move her to the wall. Remember if eHBH isn’t hugging the wall then Thaniel can’t perform the Divebomb Cancels and that just leads to a dead run. Thaniel has to use S2 before opening blast in order for everyone to survive the later the better after the blast Thaniel has to heal instant and do as much hits as he can to refill to continue healing. Because healing is tight in the raid everyone should avoid getting hit and Thaniel should always use S1 when off cd UNLESS MENTIONED SO IN THE GUIDE or unless everyone already topped off
Phase 2: Volcanos
Assuming that you got through Stage 1 fine where both Divebombs were canceled and no one got hit with fire breath then you reach the first Volcano mechanic. As mentioned above in Volcano placements you want to position them so that eHBH has no way to escape. There are a total of 4 volcanoes and they all break apart in the order they were dropped so make sure they’re close. After the first 2 Volcanos drop eHBH will do another fire breath make sure that is facing away from the team and then do hellfire. Hellfire is an instant kill blast so if you get hit you died. In order to dodge it you need to be behind a Volcano and you keep repeating this process while doing DPS until all 4 Volcanoes are destroyed.
Phase 3: Separate then Stack


After going through all the Hellfire and volcanos loop you are quickly given a purple AOE under you that will do more damage if it overlaps with your allies purple aoe so make sure you aren’t stacking. Thaniel and S.Celery should use their S2 to stack a def bonus in order to survive this mechanic with minimal damage. It is important to note that Thaniel and S.Celery use their s2 buff AT THE LAST SECOND POSSIBLE. The reason this is crucial is because following the purple AOE you will have to stack up for a red aoe mechanic like in eHMS. If Thaniel did their job then the def buff should still be live for that stack meaning less damage taken overall. Following the purple Aoe Thaniel should heal ASAP and then make his way to the stack up marker. Following this a fire breath will follow so make sure that S.Celery baits it away from their teammates and then follows another mini-mechanic we will go over.
Phase 3.5: Meteor > Divebomb
So This mechanic isn’t a huge deal but A LOT of people tend to die here so we will go into it pretty quick. After the fire breath eHBH will do a small meteor mechanic targeting the player closest to it (S.Celery) you can notice it by her shooting a fireball into the sky. S.Celery will then dodge roll away and while she is doing that eHBH will do a divebomb so don’t use a long skill animation carelessly and get hit. It can be canceled but the timing to get it right is difficult so just assume the Divebomb is coming and dodge roll away. 2 seconds of DPS loss is worth it because the alternative is getting hit and dying and then the run ends.
Phase 4: Grand Muspelheim


So If you reached Grand Muspelheim congrats cause that’s about half the fight but don’t get comfortable as everyone tends to die here. eHBH will fly into the air and then lat a lava path in the dead center touching it is an instant wipe so dont be dumb. From here she will do a stack up marker that you all have to share. Now this is basically the Thaniel/S.Celery check of the fight. If they did their optimal rotation and enough hits their S2 should be up at this time. If it is then they can use it AT THE LAST POSSIBLE MOMENT to help tank the stack up damage as it does A LOT of damage. Thaniel then heals ASAP after and you spread to your corners and the def buff should last long enough to keep everyone alive assuming the timing was right.
Phase 5: Break Phase
So this one is a bit complicated, so try to follow along. Depending on the teams DPS eHBH should be breaking incredibly soon. Depending on when she breaks the mechanic she does after she gets out of break state differ. She basically always picks up where she left off so I will list all the mechanics she does in order and it’s up to you to memorize where the break left off and adjust accordingly.
Meteors > Dive Bomb > Fire Breath > Wingbeat > Fire Breath > Volcanos
Phase 6: Dragon Tanking

So Following the long list of mechanics that I listed above you are then forced to do the separate and stack mechanic like detailed in Phase 3. Except you don’t actually do the stacking part. Because time is getting pretty low its time to optimize the run a bit to allow more DPS and for this part instead of stacking up S.Celery which is who has the marker in this example will instead Dragon up and run away from the team to tank the whole mechanic themselves.
Phase 7: Grand X Muspelheim/Conclusion
This is basically the end of the fight. eHBH will do Grand X Muspelheim forcing you to go into one of the 4 corners in order to avoid getting hit by her flame breath and lava and then dying like an idiot. If you and someone else that’s hopefully not Thaniel cause then the run is over get stuck in a corner don’t panic like fools just dragon up to tank the purple aoe together. After Grand X Muspelheim everyone gives Thaniel space as he carries your ass one more time in this fight by taking the stack up marker himself and dragoning up to tank it alone while you all DPS like madmen cause timer running out super soon. After that you either kill eHBH or you don’t and if you did congrats you beat the hardest eHDT in the game. So be proud and then you can cry yourself to sleep when you realize you need to do this 2 more times for the weekly chest clears and 4 more weeks of this in order to just fully uncap one eHBH weapon.
Credit
Credit to these Youtubers and Videos I used to crop the images from
Rain Hyou: https://www.youtube.com/watch?v=-DW7g1k2mhs&t=6s
Purin the Puff Main: https://www.youtube.com/watch?v=jyyGRb_CPM0&t=3s
Expert High Midgardsormr (eHMS)
Arguably the second easiest eHDT to start the loop with if you’re a healer and the second easiest eHDT overall. The fight is mechanically easy to the point that if you die at any point to a mechanic you should feel bad because you’re bad. The fight is very much that easy and well telegraphed. If you can do sHMS then eHMS is a cakewalk. So with all that said you might be wondering if it’s so easy, why do people still fail it so often and why isn’t this the place to start the cycle at?
Well that’s because the DPS check for this fight is SUPER TIGHT if no one comes in with a HDT weapon. It’s made even worse by the fact that most people have to bring the HDT wyrmnprint because the opening blast is a bit brutal and we only have one fire facility, assuming you were around for that event. That’s also not taking into account most of the best fire DPS are ranged units and ranged units historically have a tough time surviving the opening blast due to how much HP they need. So yea when all 4 units in the raid have to use the HDT WP then the dps can really tank. That being said if two DPS units have their respective HDT weapon the fight is a breeze and trivial for the most part. Although that’s easier said than done considering eHBH is easily the hardest fight in the game and the hardest eHDT due to how brutal and punishing it is in addition to being a buggy mess.
With all that said the fight isn’t that bad but because the DPS check is so tight without your eHDT weapon. Please don’t attempt it without it. Healers can ignore that and just go in with a 5.3 weapon instead given you meet the min. Might of 6.2K or higher.
Change Log
*** December 13th, 2019***
-Added Vanessa into recommendations
-Changed some text to better reflect that eHMS is a good starting point as a HEALER only as long as they take you in pubs cause the might gate is real so go to the discord which has mixed results
-Updated the WP for adventurers to better reflect some newer WP added so I am not recommending old ass wp cause this guide hasn’t been updated in months
-Added minor details about the use of Emma
Meta Units/Dragons/Wyrmprints:
| Aside from the DPS check the fight is already really really easy do not overcomplicate it by being a sword baiter. The optimal sword rotation combo is 2 hits then FS. That rotation doesn’t give you much breathing room so baiting as a sword unit is very very hard so don’t make the raid harder than it has to be. Just don’t be the sword unit. Yes even if your waifu is Lea. |
| MikotoThe carry or the deadweight Your job is either to deal massive amounts of DPS OR to be the Baiter. As the baiter your job is crucial for raid DPS so you have to make High Mid face away from the group for tornado spits and during 3 way purple aoes | |
| Promethus – STR/Wind res Dragon can’t go wrong with it (If you have spare sunstones) Arctos – If you magically have a MUB Arctos laying around from dupe city then Mikoto makes good use of it Sakuya – Skill Dragon, probably Mikoto best Dragon Cerb – 60% STR dragon plus she’s cute so its a win Ifrit – hahaha DPS is tight don’t bring Ifrit without a HDT weapon | |
| RR – Best general WP in the game can’t go wrong with it United by one Vision – A better JoTs assuming your teammates don’t die like flies JoTs – A worse United by One Vision if your teammates are pros and don’t die Glorious Tempest – The WP you’re gonna have to bring if your healer aint H! Lowen or if you didn’t invest enough HP Augments. |
| RamonaThe baiting queen Your job is to be the Baiter plz be the baiter. As the baiter your job is crucial for raid DPS. You have to make High Mid face away from the group for tornado spits and during 3 way purple aoes. Your baiting combo is so easy it’s just 5 attack taps | |
| Promethus – STR/Wind res Dragon can’t go wrong with it (If you have spare sunstones) Arctos – If you magically have a MUB Arctos laying around from dupe city then Ramona can use it with the Axe WP Sakuya – Skill Dragon, probably best Dragon Cerb – 60% STR dragon plus she’s cute so its a win Ifrit – hahaha DPS is tight don’t bring Ifrit without a HDT weapon | |
| RR – Best general WP in the game can’t go wrong with it Kung-Fu Masters – Really good for getting crits, use it Valiant Crown – Get some extra oomph from your s2 with Valiant Crown Glorious Tempest – The WP you’re gonna have to bring if your healer aint H! Lowen or if you didn’t invest enough HP Augments. |
Notes:
If the healer isn’t Verica you are probably not going to have a good time seeing how she is the only healers that can cure your stun affliction cause you know, you’re sleep res :/
| VanessaThe discount Ramona This the unit you bring because you really really wanted to be a baiter but didn’t pull Ramona. Either way the roles is the same a c5 (tap 5) combo is just all you need for the most part. Same as before keep everyone out of danger by making eHMS attacks face away from the group. | |
| Arctos – If you magically have a MUB Arctos laying around from dupe city then Ramona can use it with the Axe WP Sakuya – Skill Dragon, probably best Dragon Cerb – 60% STR dragon plus she’s cute so it’s a win Ifrit – hahaha DPS is tight don’t bring Ifrit without a HDT weapon | |
| RR – Best general WP in the game can’t go wrong with it Kung-Fu Masters – Really good for getting crits, use it Glorious Tempest – The WP you’re gonna have to bring if your healer aint H! Lowen or if you didn’t invest enough HP Augments. |
Note: Vanessa while 100% able to do the role Ramona can do is kinda gated by the fact that you only need 1 baiter per party. Therefore people might just legit not take you in PUBs. Additionally, as a baiter its best to be a host so do that and hope people will stick around and trust you, especially if you don’t have a HDT weapon. Which is entirely possible given how difficult eHBH is for beginners.
| Maribelle The DPS queen Your job is to do a ton of DPS and not die like a fool. Also make sure you have enough HP augments to live opening blast even with a H!Lowen as a friend. | |
Sakuya – You wanna do max DPS then you bring Sakuya* Cerb – You wanna do ehh DPS then you bring Cerb* Ifrit – You wanna do ughh DPS then you bring Ifrit* *DPS rating differ based on weapon (As in bringing a HDT weapon lets you bring whoever you want as a dragon within reason) | |
| RR – Best general WP in the game can’t go wrong with it Candy Couriers – Wand Skill damage WP its not bad United by One Vision – A better JoTs assuming your teammates don’t die like flies Glorious Tempest – The WP you’re gonna have to bring if your healer aint H! Lowen or if you didn’t invest enough HP Augments. |
| Gala SarisseThe “I have a good coop ability” character Your job is to just exist and press your skills every so often contributing to DPS | |
Sakuya – You wanna do max DPS then you bring Sakuya* Cerb – You wanna do ok DPS then you bring Cerb* Ifrit – You wanna do ughh DPS then you bring Ifrit* *DPS rating differ based on weapon (As in bringing a HDT weapon lets you bring whoever you want as a dragon within reason) | |
| RR – Best general WP in the game can’t go wrong with it Forest Bonds – Bow Skill damage WP its not bad Dear Diary – Bow Crit rate WP that pairs really well with FB only use it if you live opening blast without HDT WP United by One Vision – A better JoTs assuming your teammates don’t die like flies Glorious Tempest – The WP you’re gonna have to bring if your healer aint H! Lowen or if you didn’t invest enough HP Augments. |
| Gala MymThe Good Mym Your job is to just exist for your coop ability. Also you dragon up all the time when golem mechanic is up. Its crucial you do that for stacking dragon damage and your perma boost. Also its just quicker to kill Golems as dragon Mym | |
Sakuya – You wanna do max DPS then you bring Sakuya* Cerb – You wanna do ok DPS then you bring Cerb* Ifrit – You wanna do ughh DPS then you bring Ifrit* *DPS rating differ based on weapon (As in bringing a HDT weapon lets you bring whoever you want as a dragon within reason) | |
| RR – Best general WP in the game can’t go wrong with it United by one Vision – A better JoTs assuming your teammates don’t die like flies JoTs – A worse United by One Vision if your teammates are pros and don’t die Glorious Tempest – The WP you’re gonna have to bring if your healer aint H! Lowen or if you didn’t invest enough HP Augments. |
| Halloween MymThe Bad Mym Oh so you wanna be THAT person. Ok fine, who am I to judge someone’s taste. Your job is to find a lobby willing to take you AND to do the job of Ramona if she isn’t in the lobby (I.E. be the baiter). Your DPS is iffy but if you have the HDT weapon it won’t matter at all. | |
Sakuya – You wanna do max DPS then you bring Sakuya* Cerb – You wanna do ok DPS then you bring Cerb* Ifrit – You wanna do ughh DPS then you bring Ifrit* *DPS rating differ based on weapon (As in bringing a HDT weapon lets you bring whoever you want as a dragon within reason) | |
| Kung-Fu Masters – You basically have to use this WP. Your Coop ability only works if you get crits off ergo you need a WP that gives you high Crit chance and nothing does it better than Kung-Fu Masters for Axe units. Cheer Corps – The reality is your SP cost is too high for you to naturally build up so you are gonna have to cheat it a bit. Cheer Corps lets you do that without missing out on haste so use it Glorious Tempest – The WP you’re gonna have to bring if your healer aint H! Lowen or if you didn’t invest enough HP Augments. |
Notes:
H!Mym job isn’t hard per say but it is a bit rough and the reality is that you have to be on top of your game. Your debuff zone is gonna be crucial for DPS so use it well.
| EmmaThe F2P option So this is one of the MOST F2P options in this raid which is just being Emma. Emma job is no different from Noelle. You buff up your team and try to double buff as much as possible that is your goal. | |
Cerb – The reality is you just gonna s1 spam so Sakuya has no use for you ergo Cerb is your next best bet. Ifrit – You wanna do ughh DPS then you bring Ifrit* *Not really recommended | |
| Chocolatiers – Its 100% Skill prep for a buffer unit its basically made for units like Emma Cheer Corps – You need to stack those S1 so the reality is you want Cheer Corps in order to do that as much as you can with its FS skill refill without losing out on skill haste. FWHC – It’s really good buff time + 25% SP what more could u want Glorious Tempest – The WP you’re gonna have to bring if your healer aint H! Lowen or if you didn’t invest enough HP Augments. |
Notes: Your S1 Stacking is SUPER important for DPS if people are lacking the HDT weapon so it’s important you do what you can and fill up that S1 gauge asap to stack them at crucial times. Also if it wasn’t completely obvious before Emma S2 is a def team wide buff. With 100% SP from chocolatiers or using Cheer Corps and FSing to fill guange before opening blast. Emma lets you cheat in order to keep range units more healthy (altho H!Lowen does it better but any additional help is welcomed)
| VericaThe Other F2P option So this is one of THE F2P options in this raid which is just being a healer. Your job as a healer is so ridiculously easy in this fight that its basically your way to get an easy clear without being at fault. As Verica all you do is remove stun affliction from people in your party that got hit with the opening blast. Then you save S1 for crucial moments and that’s that. Ideally no one with sleep res ever gets hit again but if they do then you exist. | |
| Cerb – Ikr a STR Dragon on a healer kinda counter-productive but Cygames sucks at balancing content so you have to contribute to DPS somehow no matter how small it is. Phoenix – This is the dragon you take when you wanna get MAD carried. Expect everyone to hate you a little as they make up your non existent DPS. | |
| Chocolatiers – This is non-negotiable you have to bring Chocolatiers. Your only purpose is to remove stun affliction and you can’t do that without 100% Skill prep. Cheer Corps – This is the option you take because you either started after Valentines event or you were dumb and didn’t grab a Chocolatiers during the valentines rerun. Either way take this and FS like crazy before opening blast get yall. The Bridal Dragon – Its a good support WP for the team for Dragon prep and besides you ain’t gonna be doing damage anyways so help the Myms out. Glorious Tempest – The WP you’re gonna have to bring if you didn’t invest enough HP Augments or be a total degenerate and bring Phoenix. |
| Halloween LowenTHE HEALING GOD If you didn’t grab a H!Lowen by the end of Halloween banner you massively fucked up. He is by far the best fire healer in the game and a golden standard on what Healers should be for endgame content in the future. Your job is let everyone on your team go Super Sayian as they now get to drop Glorious Tempest and can now go with two offensive WP massively increasing the total DPS the team can do. H! Lowen S2 adds 10% max HP to the team and his S1 gives a 10% defense buff on top of healing for approx. 5 seconds. Using S2 > S1 let you cheat the opening blast for eHMS allowing units that usually would die or need augments like Maribelle and Sarisse instead live like champs. | |
| Cerb – DPS is much less tight on a lowen run but if you got it uncapped already then you can use it Phoenix – Enabling double offensive WP lets you get away with Phoenix but the reality is that PUBs are really dumb and it doesn’t register to them that if they see a H!Lowen they should use double offensive WP so they instead keep Glorious Tempest like idiots so use a STR dragon to be safe. | |
| From Whence He Comes – H!Lowen need 25% more SP for 100% skill prep so here’s the F2P option to fill that while also giving 20% Buff time for his Def buff. New World Escort – Best Skill Prep WP if healing is somehow a problem in eHMS but it shouldn’t be Endless Demise – Not a WP but its important to note it gives 50% SP so use it if you got it Cheer Corps – His secondary WP you always take so you can refill S1 and S2 ASAP for either stack mechanic or for an emergency |
Baiting as Mikoto or Ramona
– Trident Tempest Bait

– Trident Tempest is a very easy move to Bait you can notice eHMS is gonna do it based on the !! on the top of its head. If you’re Mikoto and once you locked in the animation you can FS like this Mikoto did in order to appear on the other side while not losing dps. Note that the 8 way tornado isn’t really something you bait cause everyone needs to dodge anyways to get out of the why.
– The Tornado Spit Bait
Ok this one is arguably the hardest one to do correctly as you need to do iframe some tornadoes but even then it’s stupidly easy. Basically the animation eHMS does for its tornado spit and the path that the tornado travels before it reaches its destination have a hitbox. So in order to not lose placement and DPS you use S1 or S3 to iframe the spit animation so the tornado lands safely behind you and NOT at your ranged DPS allies.
ONLY THREE MECHANICS
Mechanic 1: Stack up / Seperate

EZPZ, all you do is stack up when you see the red circle and target and then when you all share the damage you get purple aoe’s below you. So you then separate so none of your circles are like overlapping like crazy. In between this mechanic your healer should have already healed you.
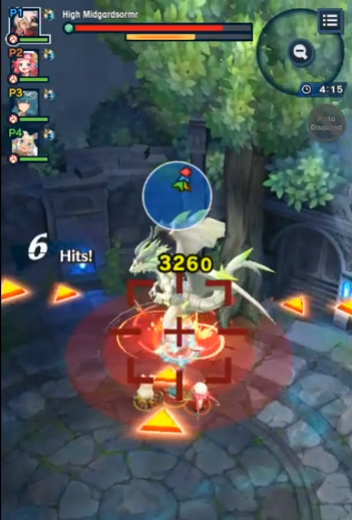
Mechanic 2: Golems
This is the second mechanic Golems. Another very ez mechanic basically eHMS will summon 1 giant golem and a few mini golems. During this he will be doing the Tornado Spit mechanic but your baiter basically handles that. Everyone else’s job in the raid is to DPS down that big golem because if it finishes its AOE then its an instant wipe. It doesn’t have much HP here so its not a big deal, so just take it down ASAP. Myms can dragon up here to help with DPS and to get a free dragon STR bonus.
Mechanic 3: Gale Blast / Stack
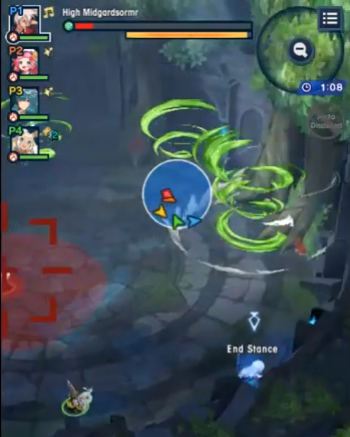
Gale Blast is eHMS tornado sweep attack and as you can see on the screen one of the tornadoes will always have an extra animation attached to it noticeable by the white circle of gust around it. When you see that it means that, that specific tornado will be the first one to go and the rest follow it either clockwise or counter clockwise. The way to avoid it is to wait below the tornado with the gust animation leaves then you walk into the location it just left and continue hugging the wall and walking as one by one they all leave thereby avoiding the entire 4 tornadoes. The 2nd time this occurs the player closest to eHMS will be hit with the stack up animation at that time they Dragon up and just tank the mechanic solo or if they’re crazy and don’t have dragon up for some goddamn reason then you leave them to die like the fools they are. Just in case to explain how Gale burst works I will show you through the magic of MS paint.
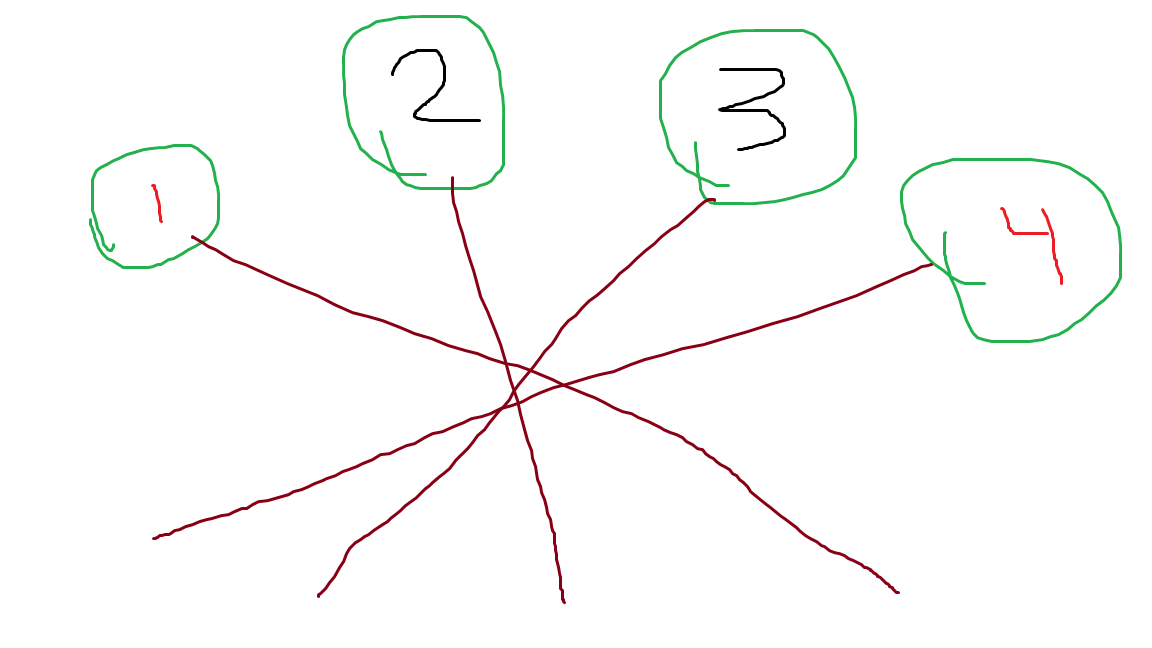
So aside from looking like I just drew a Demonic Pentagram what this ideally should show is the Tornadoes from Gale Blast and the directions they move towards. Notice how 1 and 4 are red that is because either one of those tornadoes will be the one with the extra gust animation meaning either or could go first. It is your job to quickly ascertain which one that is and move right below them in order to get into position to hug the wall while running to be safe. If all else fails and you don’t think you can make it in time then just Dragon up.
Closing Remarks
eHMS is really really easy mechanically. The only difficulty is meeting the DPS check so having the HDT weapon is heavily recommended or at the very least a MUB void weapon. 5.3 are basically useless if you’re not the healer. So don’t put more burdens on your teammate just farm Void battles. Overall I think this is one of the easier eHDT and you should be able to do it after reading the few key mechanics in the raid. There is literally only 2 of them that actually matter so its really hard to mess it up and the fight exactly the same from sHDT. If you’re going for pubs all DPS need to be above 7K might to get in the door and healers around 6.2K might. Yes I know I know might is not everything, but people want comfort in getting ez clears in an ez fight so ofc they gonna might gate. Take it up with Cygames and hope they fix it.
Credit
Credit to these Youtubers and Videos I used to crop the images from
Eserikto:https://www.youtube.com/watch?v=XgEyR0QuvCU&t=124s
Eri Otto: https://www.youtube.com/watch?v=7ZUhuK-UDM4
***Coming Soon mHBH Guide***


